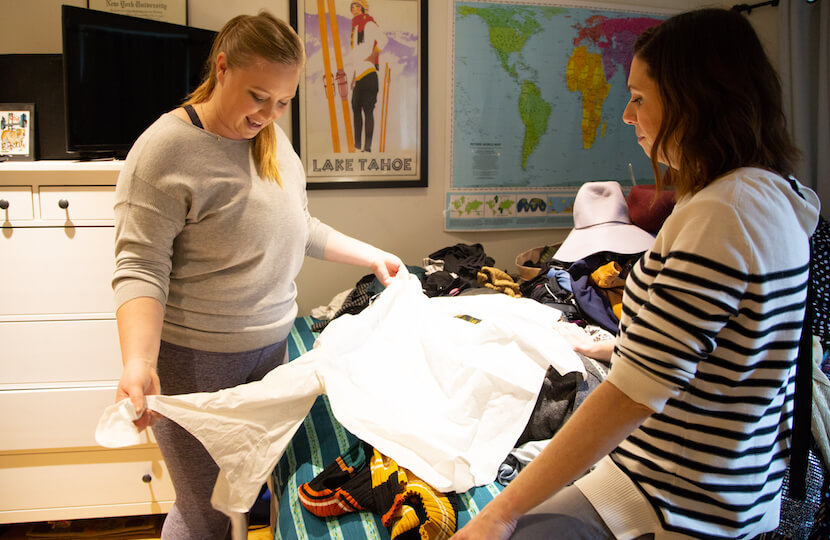
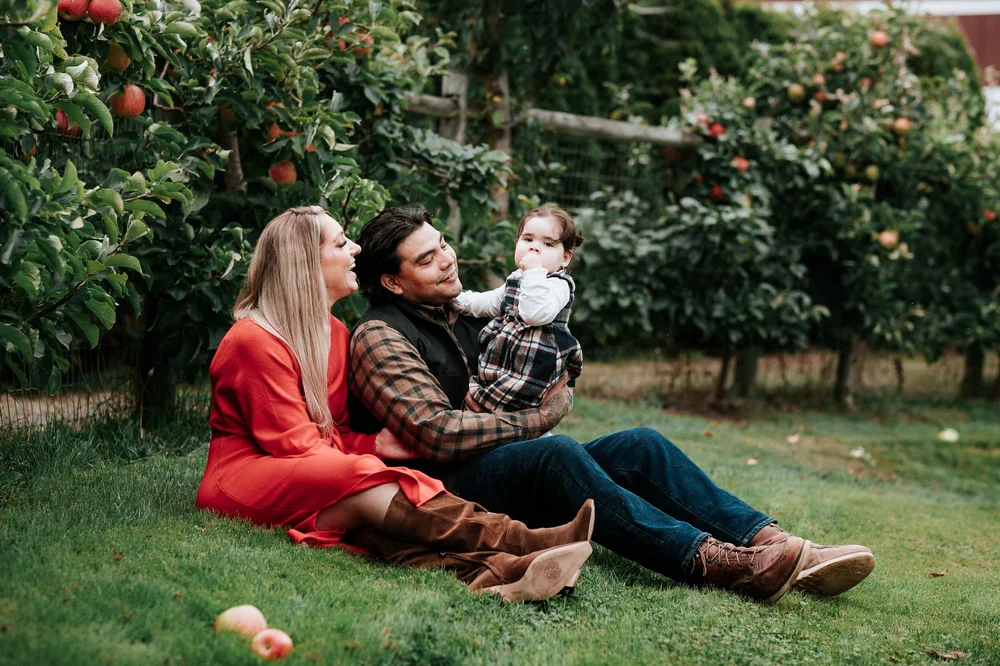
On a Friday night in November 2024, I emptied my closet onto the bed and made three piles. KEEP on the left. DONATE in the middle. And, on the right, the pile I’d been quietly making my whole adult life without ever naming it out loud: WHEN I’M SMALLER. Two pairs of high-waisted jeans that fit for about six wearings across three years. A silk slip dress from a 2022 sample sale with the tag still attached. Three blazers in a size 14 from a year I had not been a 14. A vintage cotton shirtdress I’d told myself I would wear “after a good summer.” The WHEN I’M SMALLER pile was the biggest of the three by a noticeable margin, and that night I added up what was in it. The number came to roughly $1,840 of clothing, almost all of it in good condition, almost none of it ever worn out of the apartment, waiting for a future body that, after a decade of weight cycling, was statistically unlikely to arrive on the schedule I’d promised it.
I dragged the WHEN I’M SMALLER pile into the DONATE pile that night. I did not photograph it, did not post about it, did not do any of the things that turn a private decision into content. I just sat on the floor next to a forty-gallon bag of clothing I had been emotionally storing for years and admitted, out loud and only to myself, that I had spent close to two thousand dollars dressing a stranger. This article is what I wrote down in the weeks after that. It is not a love-your-body essay and it is not a manifesto. It is a working editor’s notes on how to actually get dressed in the body you have on a given Tuesday, when the body you have is also the body you are most ambivalent about.
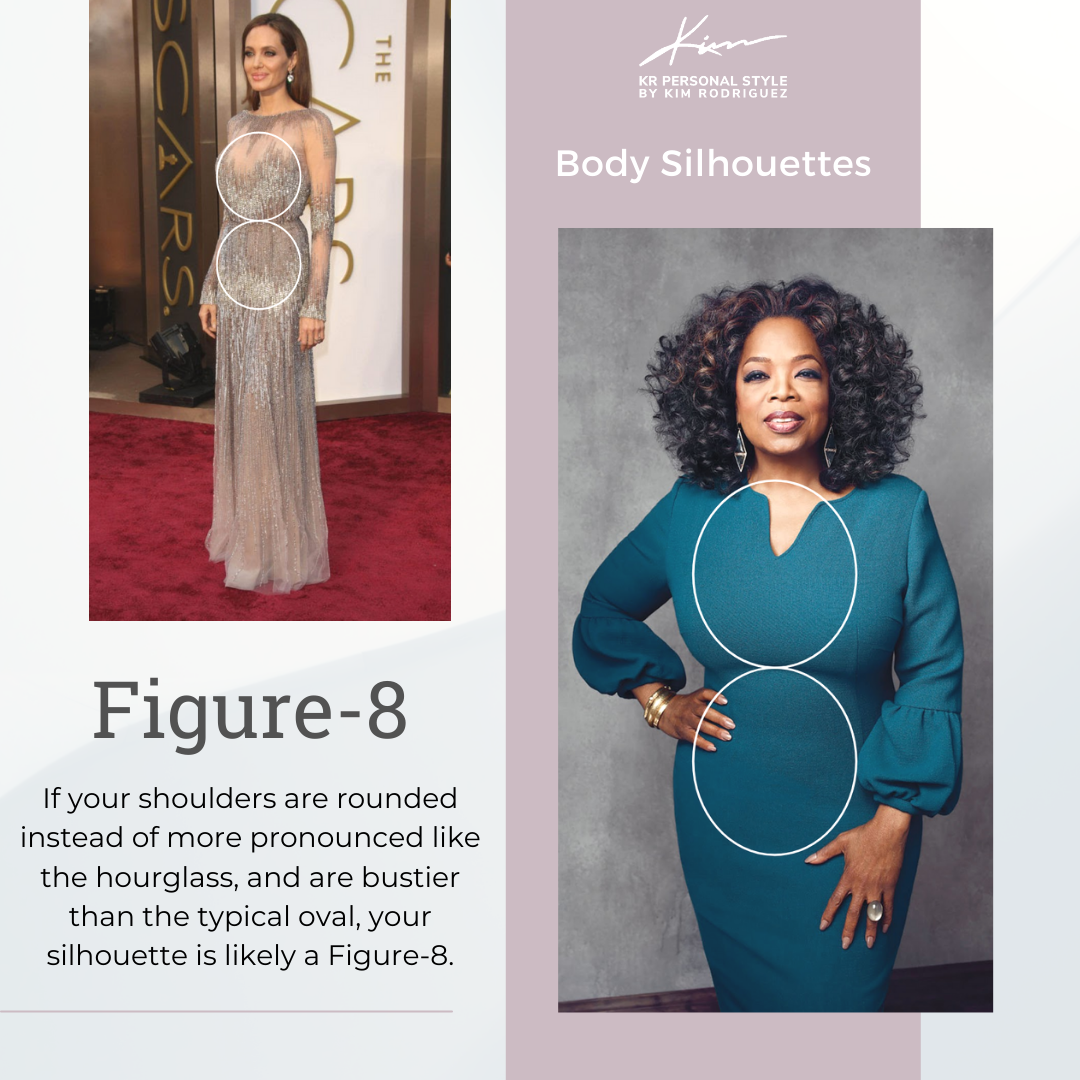
The WHEN I’M SMALLER closet and what it actually costs
Most plus-size women I know have a version of the WHEN I’M SMALLER section, even if they don’t call it that. It lives at the back of the closet behind the things they actually wear. It lives in the bottom drawer of the dresser. It lives in a single bin in the storage unit labeled “summer” or “going out” or simply nothing at all. The pieces in it are usually nicer than the pieces in active rotation, because the WHEN I’M SMALLER closet is where the aspirational dollars went. The jeans cost more. The dress cost more. The blazer cost more. Future-thinner-you was always going to deserve nicer things than current-you, which is its own quiet form of self-punishment dressed up as planning.
The 2024 NPD apparel return data, which tracks the resale and return behavior of US clothing buyers, put a number on this in a way that landed hard for me. The average plus-size woman in the US wastes between $1,200 and $2,000 a year on aspirational sizes, meaning clothing purchased in a size below her current measurements and either never worn, worn once or twice, or returned past the window. That figure tracks separately from regular fashion spending. It is purely the tax on dressing for a future body. Over a decade of adult dressing, that is somewhere between $12,000 and $20,000 of unworn clothing.
There is a psychological cost on top of the dollar cost, and it is the part most personal finance writers miss. Every time you open the closet and see a row of pieces that do not currently fit you, the closet itself becomes a quiet referendum on your body. You did not set out to give yourself a daily verdict. You set out to buy a dress. But the cumulative effect of standing in front of fifteen garments that disagree with your measurements is a slow erosion of the assumption that your body is allowed to take up space in the room you are standing in. I noticed it most on the mornings I was already running late, when the closet should have been a tool and was instead a closing argument.
The fashion psychologist Tara McGoldrick has written about this as the “aspirational closet effect,” and her clinical work suggests that the daily exposure to ill-fitting aspirational clothing measurably correlates with lower body satisfaction scores over a six-month window, independent of any actual weight change. The closet is not neutral. The closet is talking to you. The WHEN I’M SMALLER pile is the loudest voice in it.
Why “you can always lose weight” is not the assignment
The reflex response to everything I’ve just written is “well, you could always lose the weight.” I want to be precise about why that response, well-intended or not, misses the assignment of this article.
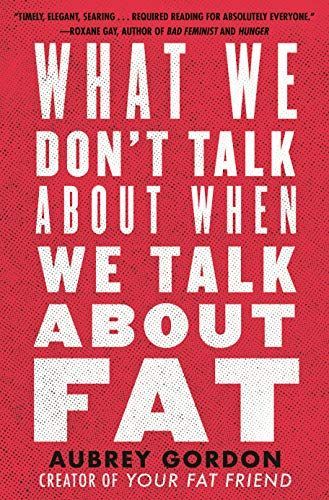
Aubrey Gordon writes in
What We Don’t Talk About When We Talk About Fat
that fewer than five percent of people who intentionally lose a significant amount of weight maintain that loss over five years. The number is from long-running NIH-funded meta-analyses and it is not in serious dispute among researchers, only among the diet industry that depends on you not knowing it. Roxane Gay, in
Hunger
, writes about the specific cruelty of organizing your life and your wardrobe around a body that has not arrived and may not arrive: “I knew I should be losing weight. I did not lose weight. I lived in the body I had while pretending to live in the body I wanted.”
What both writers point at, and what I want to put plainly here, is that the question of whether you eventually change your body is not the same question as what you are going to wear this Saturday. They are separate questions on separate timelines and they need separate budgets. The WHEN I’M SMALLER closet conflates them. It says: I will not dress this body well because dressing it well is a betrayal of the body I am supposed to want. That is a confusion of categories. You can be actively working on something – your relationship to food, to movement, to medication, to medical care – and also wear clothing that fits you today. The two are not in moral competition. One is health behavior on a multi-year arc. The other is what you put on your legs Saturday at four p.m.
The 2025 Nordstrom plus-size customer study, which surveyed roughly 4,800 customers wearing sizes 14 through 32, found that 71 percent of respondents owned more than ten items they could not currently wear, and 58 percent reported feeling “worse” or “much worse” about their bodies after closet exposure to those items. The same study found that customers who had done a deliberate audit and removed aspirational sizing reported significantly higher outfit satisfaction within ninety days. The intervention was the audit. The variable that changed was not body size. It was what they were looking at every morning.
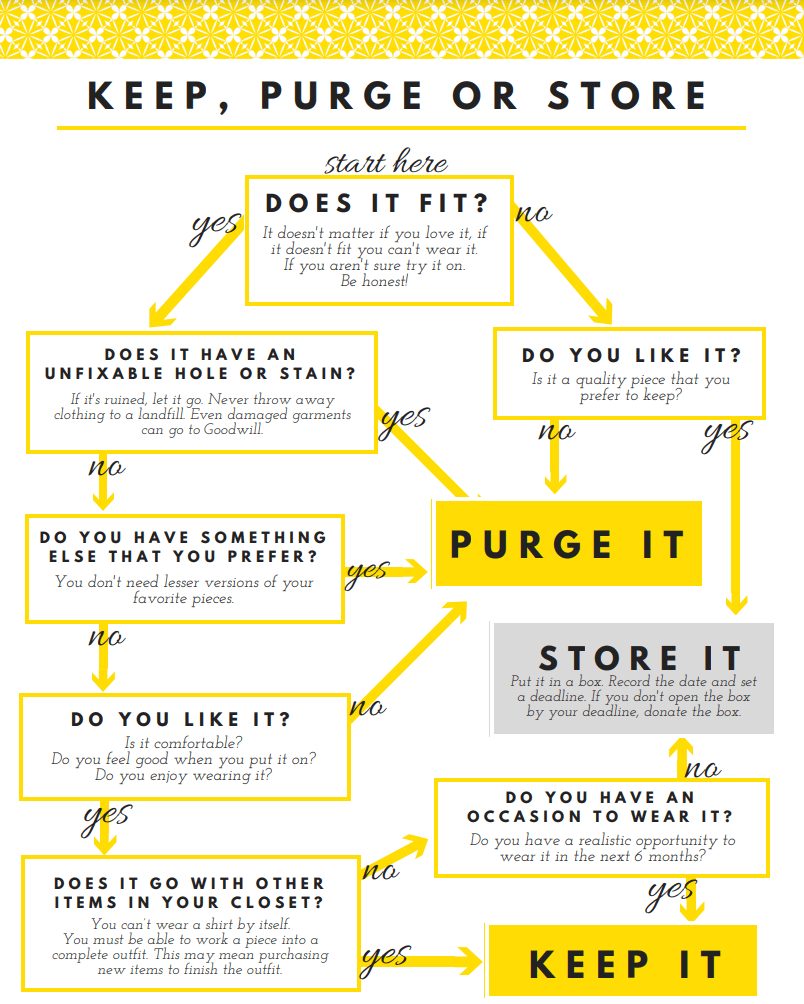
The five-question audit
Here is the audit I ran on my own closet that November and have since run with friends, with coaching clients, and with my mother-in-law. Pull out one piece at a time, and ask five questions in this order.
1. Have you worn it in the last twelve months?
Not “have you owned it.” Not “have you tried it on.” Have you worn it out of the apartment to do a thing in the world. Wedding, dinner, errand, work. Twelve months is the full cycle. If a piece has not made it onto your body for an outside event in a full year, it has had its chance.
2. Does it currently fit?
Not “does it zip with effort.” Not “did it fit at the sample sale.” Does it fit your body, today, in a way you would willingly leave the house in. The honest answer here is usually obvious within five seconds of trying it on.
3. Did you buy it for a fantasy event?
The gala that did not happen. The vacation that got cancelled. The job interview at the company you decided not to apply to. The date that turned into a different relationship. Fantasy-event clothing accumulates faster than you think and is among the easiest to release because the event is no longer on the calendar.
4. Does putting it on make you feel like you owe it something?
This is the most important question and the one most people skip. There is a category of clothing that, when you put it on, makes you feel indebted – to the price you paid, to the person who gave it to you, to the body you used to have, to the body you said you would have. The garment becomes a reminder of a debt rather than a tool you reach for. Debt clothing is not clothing. It is a guilt artifact wearing a hanger.
5. Would you buy it new at this size today?
Imagine walking into the store this week and seeing the piece, in your current size, at its original price. Would you buy it. If the answer is no, the only reason it is in your closet is sunk cost, and sunk cost is the worst possible reason to dress your body in the morning.
Any piece that fails two or more of these questions goes in the cut pile. I do not negotiate with the cut pile. The cut pile is final, and the relief on the other side of it is real and measurable. My November audit cut 47 pieces. I did not miss a single one. I have not been able to recall, six months later, what most of them were.
What to do with the clothes you cut
Three buckets. Decide before you start so the cut pile does not move into a bag in the hallway and stay there for another year.
For the everyday pieces in decent condition – the tees, the trousers, the dresses under $80 retail, the casual jackets – donate directly to a women’s shelter or your local YWCA. Call ahead. Most shelters have specific intake windows and specific size needs, and plus-size donations are notoriously underrepresented at shelter clothing closets. The pieces you have been letting hang unworn are very likely to be the most-needed pieces on the rack the moment they arrive. Bowery Mission, Sanctuary for Families, Win NYC, and Dress for Success all run intake programs that take plus-size clothing seriously. Your city has the equivalent.
For the higher-value pieces – silk, leather, structured outerwear, anything originally over $80 with the label intact – list on ThredUp or Poshmark. ThredUp’s “Clean Out Kit” handles the photography and listing if you would rather not, at the cost of a lower payout. Poshmark pays better and is faster, but you list and ship yourself. I have personally recovered close to $600 across the two platforms from a single audit pile, which is not nothing, and went directly into a small fund for one well-fitting current-size hero piece.
For the sentimental and the family-adjacent – the dress from a friend’s wedding, the blazer your sister has admired for years, the piece a niece would actually wear – hand it off in person. Do not mail. Do not “ship when you get around to it.” Walk the bag over, hand it across the table, watch it leave the building. The reason this matters is that mailed pieces become a project, and projects sit in a corner, and the corner becomes a smaller version of the original problem.
Eight silhouettes that work on most plus-size bodies right now
The mistake that ruined most of my twenties was shopping by item instead of by silhouette. I would see a great pair of skinny jeans on a friend and buy the same skinny jeans for myself, then be confused when the same garment read entirely differently on my body. Silhouette is not item. Silhouette is the overall shape the outfit creates from across a room. Here are the eight that consistently work for plus-size bodies in 2026, drawn from my own rotation and from years of dressing friends.
The wide-leg pant + tucked tee.
A flat-front, full-length wide-leg trouser with a tucked or half-tucked fitted tee creates a vertical line that reads as long and intentional. The fitted top establishes the waist, the wide leg balances the hips, and the proportion is automatic. Universal Standard, Eloquii, and Old Navy’s plus extension all have versions under $80.
The column dress.
A floor-skimming or midi dress in a single color that runs uninterrupted from shoulder to ankle. No belt, no contrast. The column is the oldest cheat code in plus-size styling because it does the work of a long unbroken vertical without requiring any styling moves on your part.
The structured shoulder + soft body.
A blazer or jacket with a real, defined shoulder seam paired with something softer underneath – a slip skirt, a jersey dress, a relaxed trouser. The shoulder gives the eye a clean anchor at the top and lets the rest of the outfit fall in a way that flatters without trying.
The blazer and bike-short.
An oversized blazer over a fitted bike short with a clean shoe is the most underrated plus-size silhouette of the last three years. It works because the blazer covers the zones most plus-size women report being most self-conscious about while the bike short defines the leg line. Lizzo, Paloma Elsesser, and Ashley Graham have all worked variations of this look. It is a real outfit.
The bias slip with a t-shirt over.
A bias-cut slip dress with a soft cotton tee layered over it. The slip provides the drape and the leg line, the tee adds a casual upper register that makes the slip wearable in daylight without feeling like lingerie escaped the bedroom.
The layered tank set.
Two thin tanks worn together, one slightly longer than the other, with a wide trouser or a denim. The double layer gives shape to the torso without compression, and the proportion of fitted top to wide bottom does the rest.
The wrap dress in the right rayon-blend.
The wrap dress has been oversold and undertailored for thirty years, but a real wrap dress in a rayon-blend with weight to it – not a synthetic stretch – is one of the most reliable silhouettes there is for a body with curves. The key is the fabric. Pure polyester wraps cling badly. Rayon with some give holds the shape.
The oversized button-down + cigarette pant.
A men’s-cut or relaxed cotton shirt half-tucked into a slim cropped trouser, with a sleek shoe. This is the silhouette I wear most often in editorial contexts because it reads as quietly serious without reading as hiding. The cigarette pant defines the calf and ankle. The shirt does everything else.
You do not need all eight. You need three that you genuinely like, repeated in slightly different colors and fabrics, and the dressing question on most mornings disappears.
The bra question
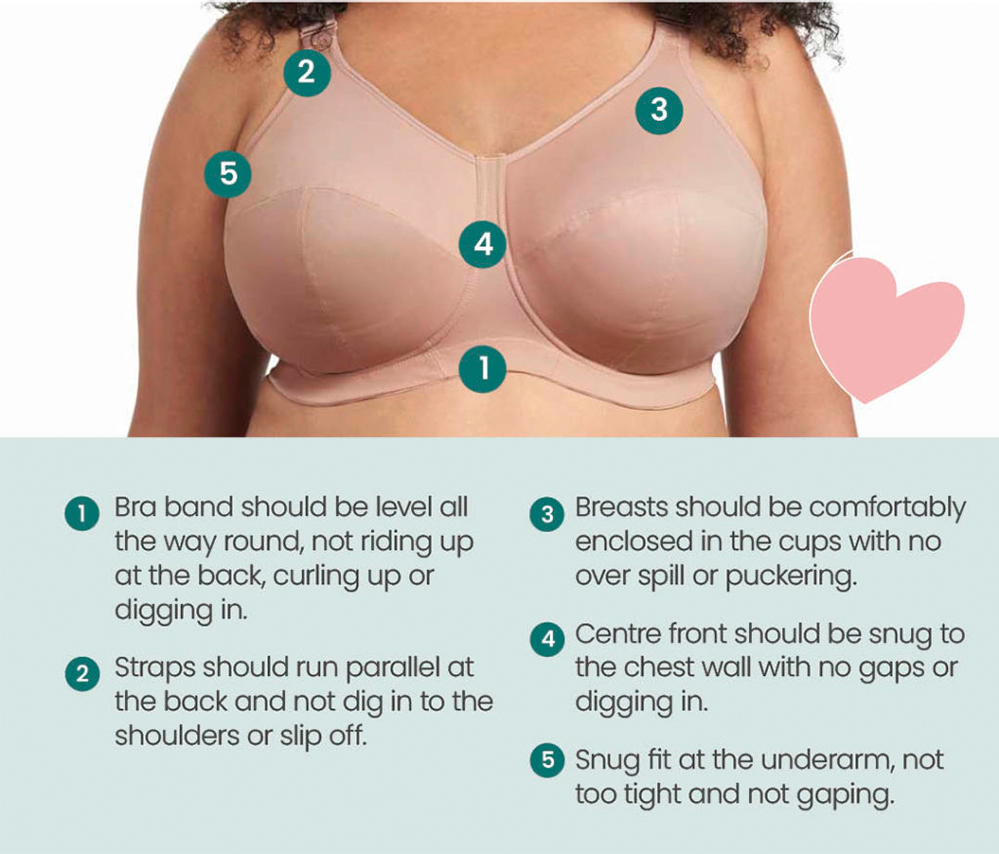
I am putting this in its own section because it matters more than the rest of it combined. The number of women I have styled who are wearing the wrong bra size is somewhere north of 80 percent, and the number who have not had a real professional fitting in five years or more is higher than that. The wrong bra changes the silhouette of every single outfit above it. You can do all eight of the silhouettes above and still look subtly off if the foundation underneath them is in the wrong cup.
Your wedding-day cup size is not your current cup size. Your post-pregnancy cup size is not your current cup size. Your cup size from before you started or stopped a medication that affected your hormones is not your current cup size. Cup sizes shift with weight, with age, with menstrual cycle, with hormonal contraception, with motherhood, with peri-menopause. The body you have today has the bra size you have today, and it is almost certainly different from the bra size on your most recent purchase.
Two places in the US do this fitting properly and at no charge. Nordstrom’s lingerie department will fit you in cup sizes from A through K, the consultation is free, and you are under no obligation to buy. Ask for an experienced fitter and tell them your goal is calibration, not purchase. The other is Town Shop on the Upper West Side of Manhattan, which has been doing professional bra fittings since 1888 and is the gold standard. A Town Shop fitting is twenty minutes, no appointment, no charge unless you buy. Both options will measure you correctly using the band-first method rather than the volumetric guessing most lingerie boutiques default to.
Once you know your real current size, the next thing every outfit above sits on top of changes. Tops drape differently. Dresses fall differently. Blazers close differently. The single highest-return styling move available to most plus-size women is not a new blazer or a new dress. It is a properly fitted bra in two colors that they replace every nine to twelve months.
Shopping rules for the body you have
Three rules. They are not negotiable for me and I would not write this article if I weren’t willing to put them in writing.
Try on before you buy.
Sizing across plus-size retailers is wildly inconsistent. A 16 at Old Navy is not a 16 at Eloquii is not a 16 at Universal Standard is not a 16 at vintage. Online sizing charts are starting points, not finishing lines. If you cannot try on, buy from a retailer with a no-questions return policy and return what does not work the day it arrives, not in three weeks.
Do not buy anything for an event that is more than three months out.
Your body in three months is unknown. Your mood in three months is unknown. Whether the event happens in the format you currently imagine is unknown. Anything you buy for an event further than ninety days from now is, statistically, more likely than not to either not fit or not feel right by the time the event arrives. Buy event clothing in the window you are actually about to live through.
Rent for the gala.
Anything that requires a price tag higher than $200 for a single event – the black-tie wedding, the gala, the work awards night, the cousin’s destination wedding in Tulum – rent it. Rent the Runway, Nuuly, Armoire, and Vivrelle all carry sizes through 24 reliably and some carry through 28. The math is not even close. A $1,200 dress worn once is $1,200 per wear. A $90 rental of a $1,200 dress worn once is $90 per wear and gets shipped back the next morning.
The body-neutral language reframe
The language you use about your body in your own head is part of what gets dressed when you get dressed, even if no one else can hear it. McGoldrick’s clinical work, published across several papers and her 2024 book on fashion psychology, includes a deceptively small intervention that has held up consistently across her client samples: try, for one week, replacing the phrase “my body” with the phrase “this body.”
The substitution sounds trivial and produces a result that is not. “My body” implies ownership, judgment, a verdict you have already rendered. “This body” is descriptive. It is the body that is here. It does not require you to feel any particular way about it. It just acknowledges that it exists and that it is, today, the one getting dressed. McGoldrick’s clients reported, on average, a measurable drop in clothing-related anxiety after one full week of consistent use of “this body” instead of “my body” in their internal narration.
I do not love every “love your body” message in the wellness aisle and I am not asking you to either. Body positivity, as a movement, has produced both real progress and a layer of forced cheerfulness that some of us have never quite been able to perform. The body-neutral move is different. It does not ask you to love anything. It asks you to stop running a continuous quiet trial. “This body needs a bra that fits. This body is cold today. This body wants the wide trouser, not the skinny.” That is a livable internal voice. The other one is exhausting.
What to keep buying secondhand vs new in 2026
Plus-size secondhand has gotten significantly better in the last three years and remains the place where the value math is most favorable, but not for every category. Here is the split I use, and recommend.
Buy secondhand: outerwear (coats hold up for decades and the resale market is full of barely-worn plus-size coats), denim (washed-in denim wears better than new denim and saves the most money), blazers (especially structured tailored pieces that are expensive new), bags, leather, dresses for one-off occasions you nonetheless want to own. ThredUp’s plus-size category, Poshmark, The RealReal for designer, and your local consignment if it actually stocks above a 16.
Buy new: bras (always, fit drift and band stretch make secondhand bras a false economy), underwear, swimwear (the structure and elastane degrade), shapewear, athletic wear with technical fabrics, white shirts you intend to wear weekly, and the foundational pieces in your eight silhouettes. The reason to buy these new is that they are the daily-rotation pieces. The cost-per-wear math actually favors new on anything you will wear more than thirty times.
The split saves real money over a year. My current personal mix is about 60 percent secondhand by item count and roughly 30 percent secondhand by dollar spend, and the wardrobe is the most useful one I have ever owned at any size.
What to wear tomorrow
The wardrobe you build for the body you are working toward is a wardrobe you are not wearing. That is the entire argument of this article in one sentence. Every Saturday it sits in the closet is a Saturday you showed up in clothing chosen for a stranger. Every dinner you ate in the second-best outfit because the best outfit was reserved for the smaller version of you is a dinner the smaller version did not actually attend. The body in the mirror today is the body that gets dressed first. The other one, if she arrives, can wait her turn.
Tomorrow, before you do anything else, pull out a wide-leg pant in your current size, a fitted tee in your current size, and the most comfortable shoe in the rotation. Tuck the tee halfway. Add the third piece you reach for most often – a longline blazer, a soft duster, an open shirt. Look in the mirror once, take one piece of jewelry off if there are more than two, and leave the house. That is the outfit. It cost you nothing this morning, it took ninety seconds, and it was built for the body that walked into the closet, not the one you keep telling yourself is on the way.
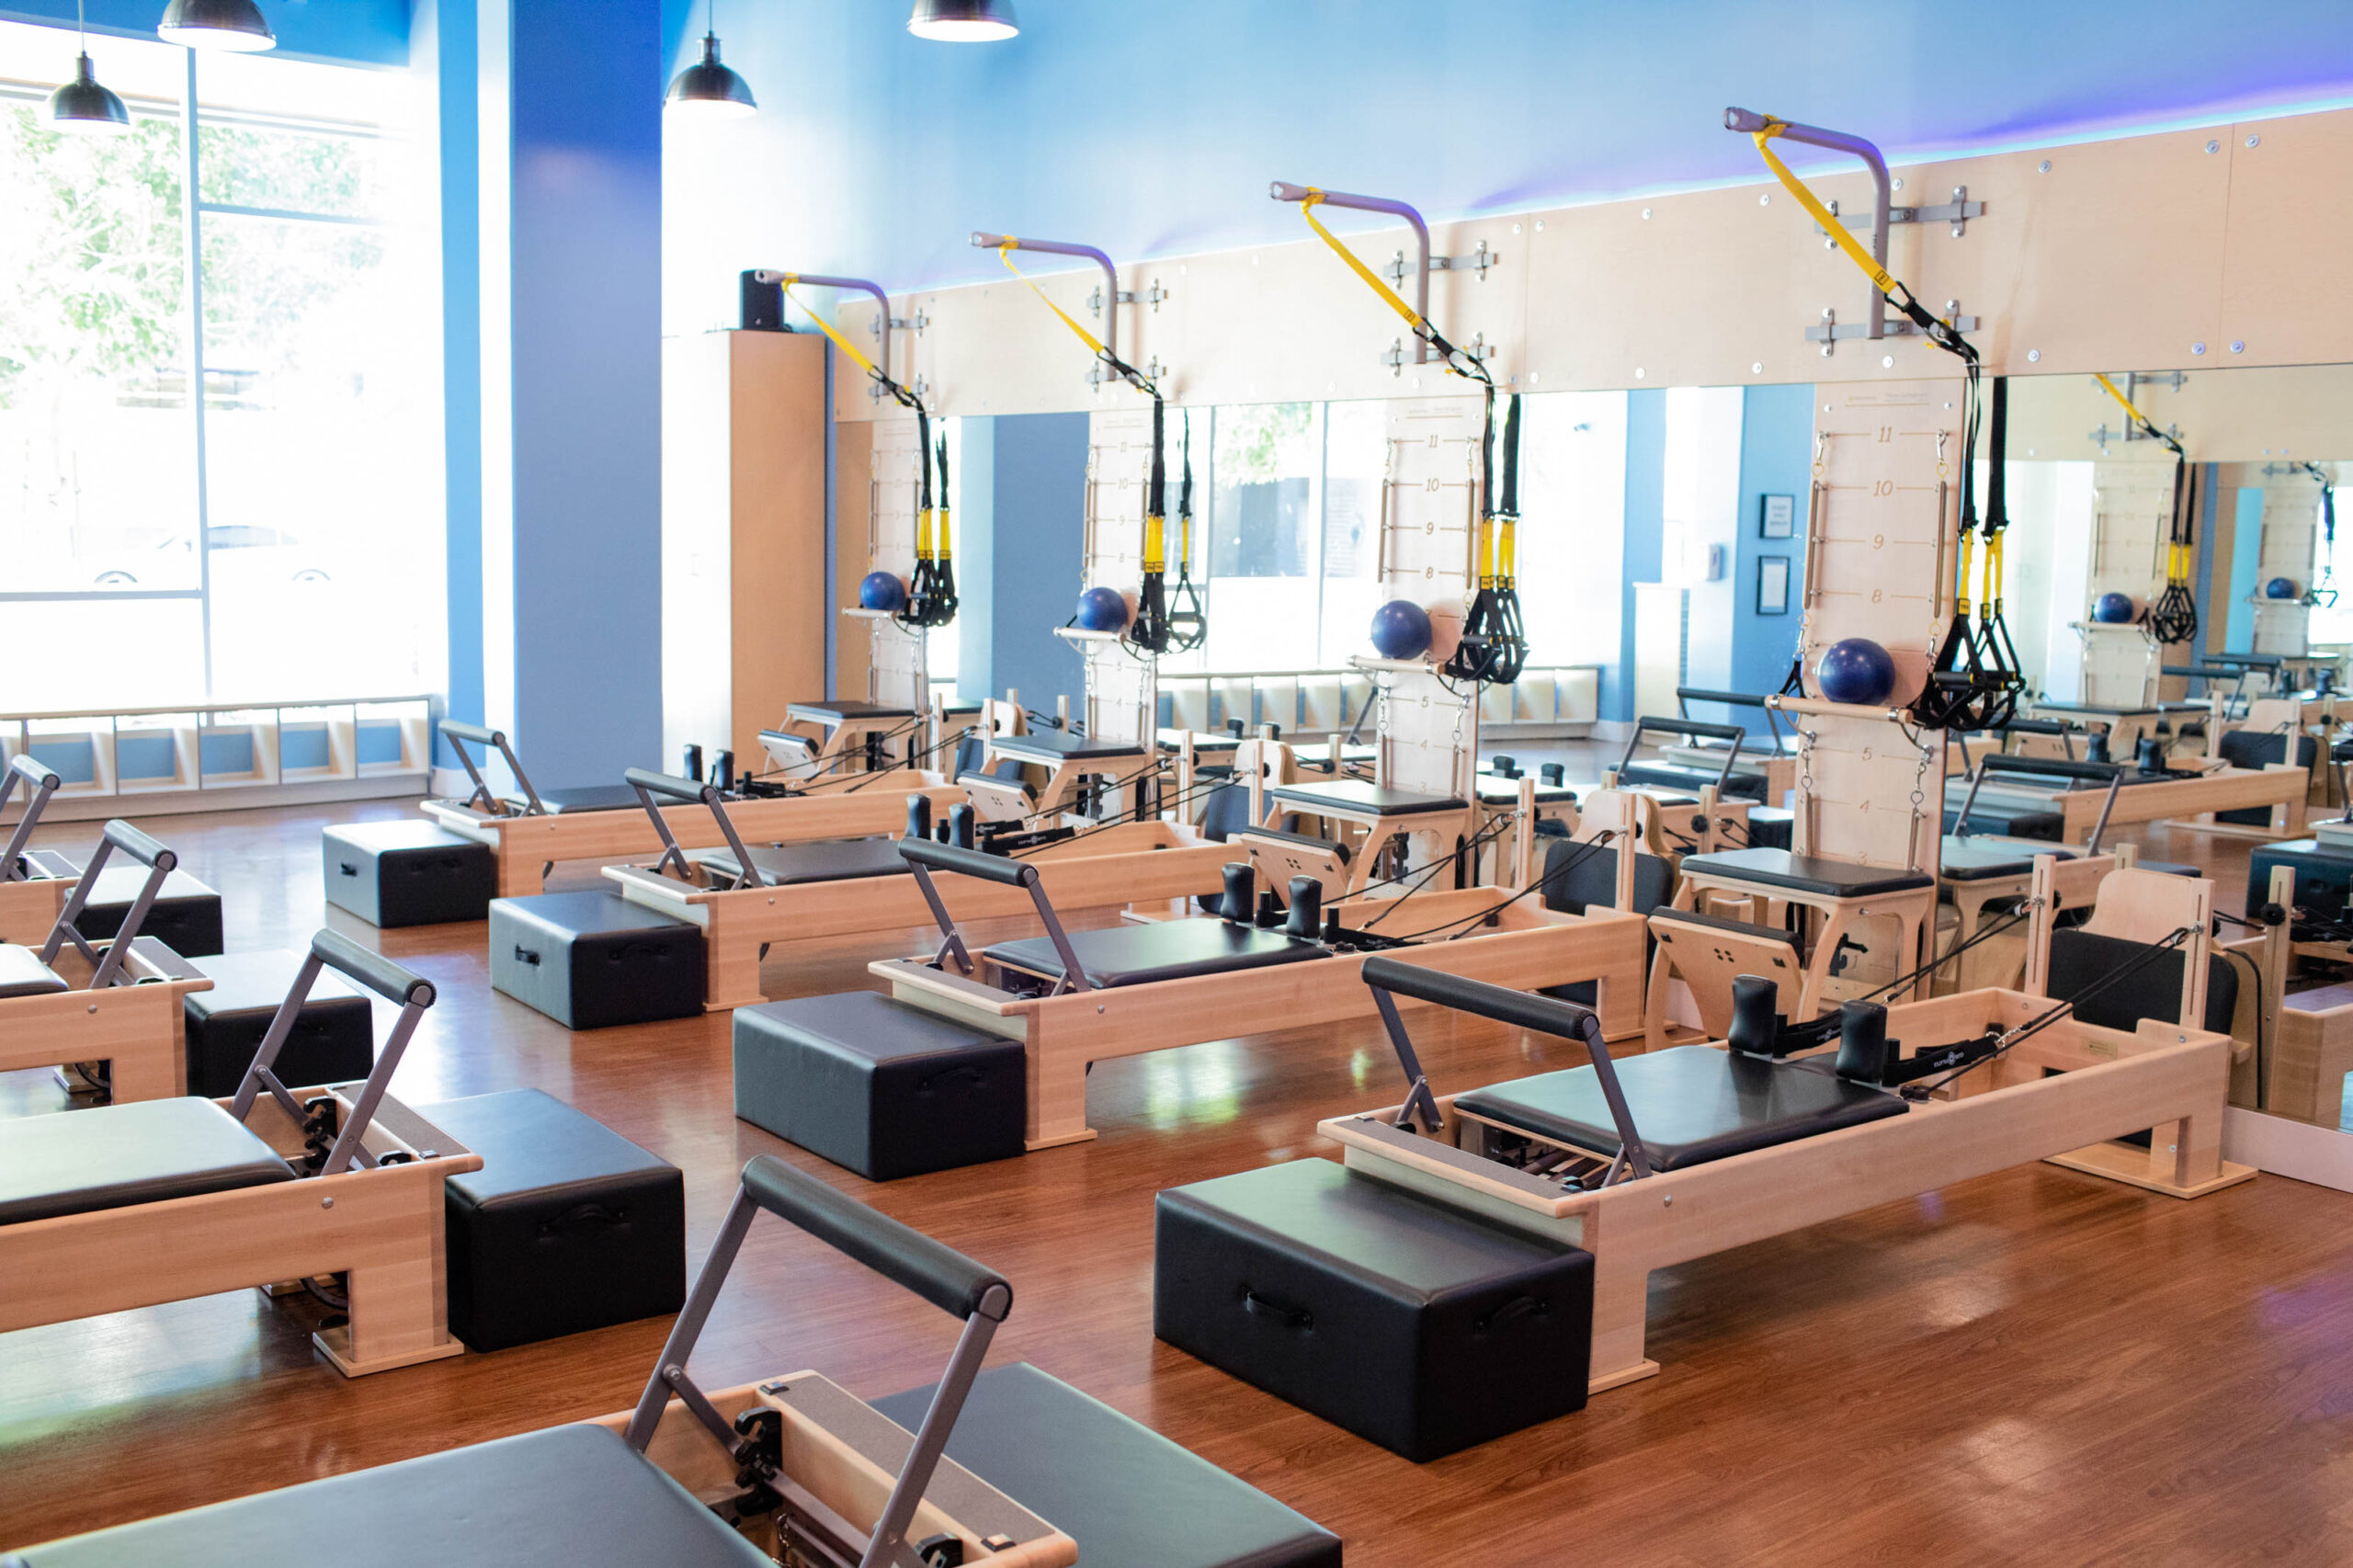
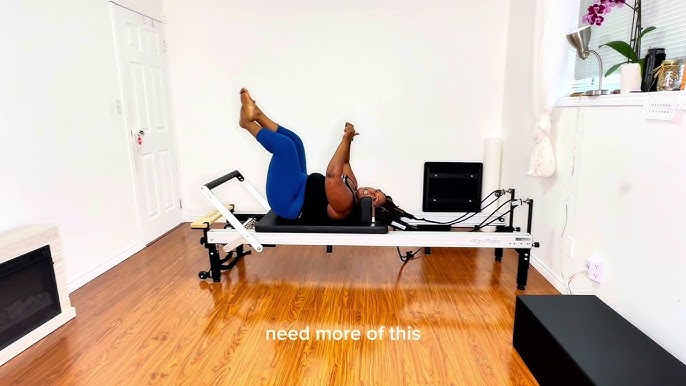
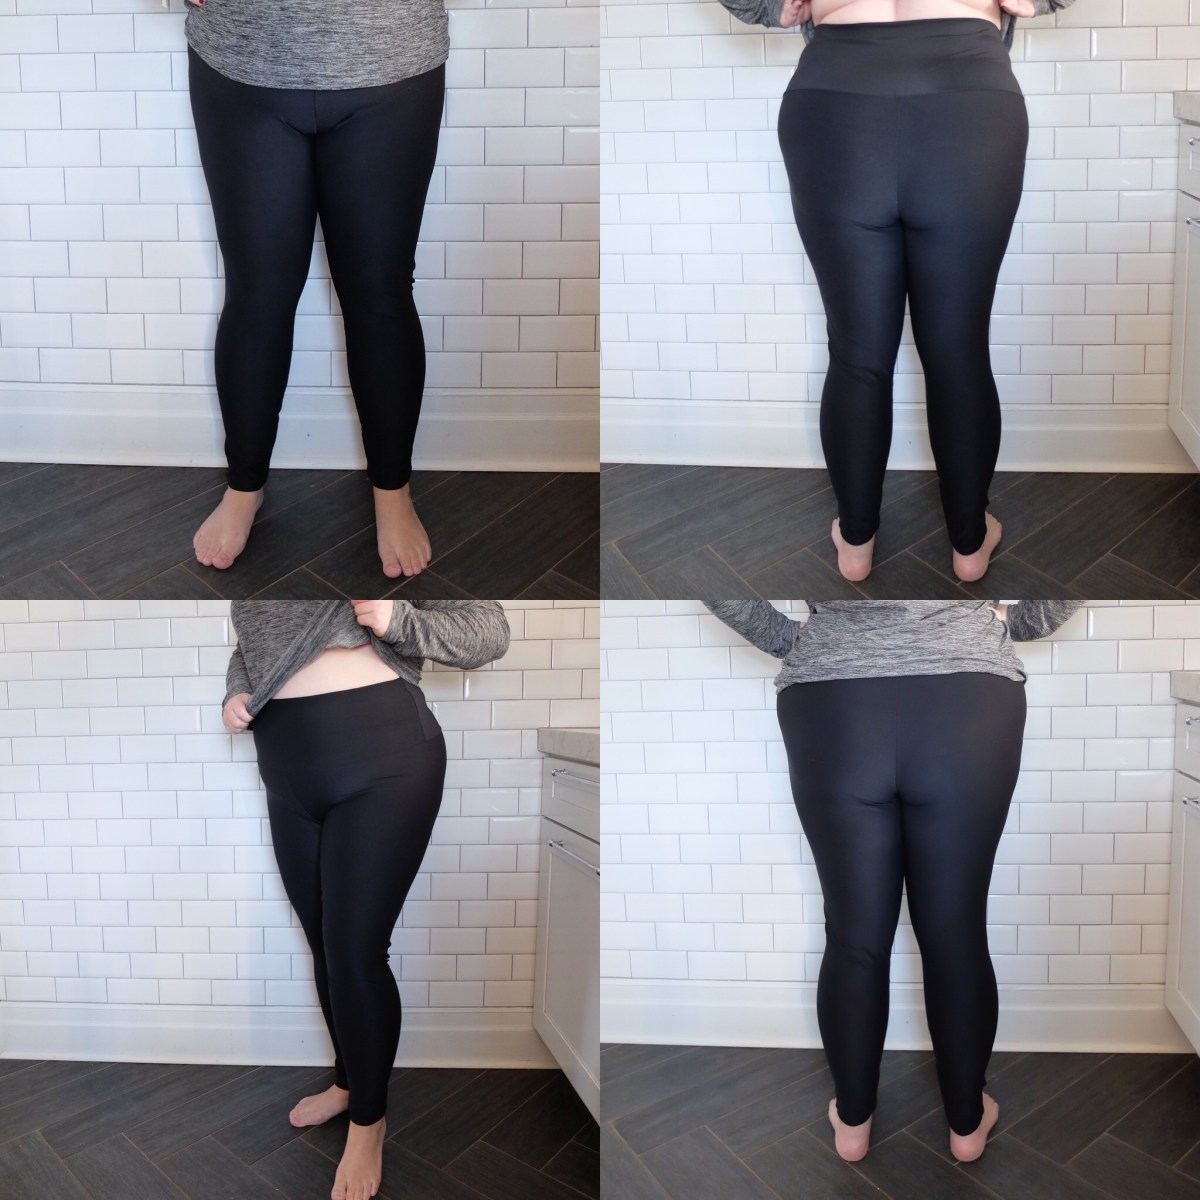
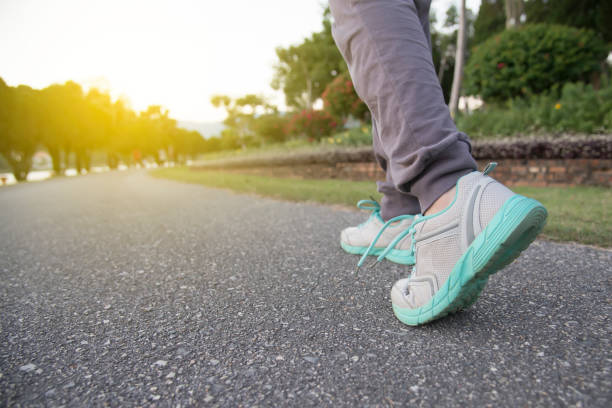
The reformer at the Club Pilates studio I attend in Decatur, Georgia is calibrated to a one-spring resistance for the footwork series, which is the first ten minutes of a beginner class, and the studio’s standard temperature on a Tuesday evening in February 2026 is cool enough that you feel it on your shoulders before you start moving. I am a size 22. I am lying supine on the carriage, my feet on the foot bar in heels-together, toes-apart Pilates V, and I have already failed at four pieces of my wardrobe in the first six minutes of the class. The leggings, a pair of Old Navy PowerSoft 7/8 high-rise in a heather charcoal that I had bought in size XXL the previous week at the Edgewood Retail District store, have started a slow migration along the inner thigh seam from the moment Mariel cued the first footwork rep. The seam is now tracking inward toward the center of my body with every single press of the carriage out, and by rep eight on a set of ten, the seam has rotated nearly an inch off true. The cropped tank top I had paired with it, a Nike Pro Indy crop in a size 2X that I had assumed would stay put on a Pilates mat, has ridden up to expose three inches of my mid-belly to a ceiling fan I had not noticed before. The Aerie Offline sports bra underneath, a 38DD that the website had assured me would handle “low to medium impact,” is fine on bounce-control because there is no bounce in Pilates, but the band is rolling at the underbust because I am lying on it and my own weight is pressing the elastic out of true. And the grip socks I had grabbed from a clearance bin at TJ Maxx, a no-name brand whose calf circumference cannot accommodate a size 22 lower leg, are biting into my calves so hard that the indentation will still be there four hours later when I am washing my face for bed. Four wardrobe failures. One reformer class. Six minutes in. This is the article I wish someone had written for me before that Tuesday.
I have been writing about plus-size wellness for seven years, and I have spent the last fourteen months attending Pilates and Barre classes twice a week at three different studios across metro Atlanta as part of a personal mobility project that started after a Cooper Clinic functional movement screen flagged a thoracic rotation deficit. I am not a certified instructor. I am a wellness mentor and an essayist, and I am also a working consumer who has spent more on activewear in the last fourteen months than I have ever spent in a comparable window on any other category of clothing. What I have learned is that the activewear industry has gotten meaningfully better at plus-size cardio gear in the last five years, and meaningfully worse at acknowledging that Pilates and Barre are not cardio. The fabric science, the seam engineering, and the elastic placement that work for a thirty-minute interval class on a Peloton bike at size 22 are not the fabric science, seam engineering, and elastic placement that work for a fifty-minute reformer class where you are inverted, supine, and side-lying for at least sixty percent of the session. This piece is the long version of what I have learned. It is meant for the size 14, 18, 22, 26 woman who has been told to “just wear what you’d wear to the gym” by a sales associate who has never done a side-lying leg series on a reformer in a body that ends in a 47-inch hip.
Pilates and Barre body mechanics, and what fabric and seam engineering they actually demand
The structural difference between Pilates, Barre, and cardio is not subtle, and it has direct implications for what your clothes need to do. Cardio modalities involve repetitive impact, sustained heart rate elevation above seventy percent of max, and a body that is largely upright or hinged forward at the hip. The activewear demands are bounce control, moisture management, and a waistband that will not slide during sustained vertical motion. Pilates and Barre are structurally different. Joseph Pilates, who developed the method in the 1920s and named it “Contrology” before his students began calling it by his surname, built the system around six original principles: concentration, control, centering, flow, precision, and breath. The modern Pilates instructor Brooke Siler, who trained directly under Romana Kryzanowska at the original Pilates studio on Eighth Avenue in Manhattan and who wrote “The Pilates Body” in 2000, has talked extensively about how those six principles translate to slow, controlled, gravity-against movement that prioritizes connective tissue and deep stabilizers over the gross movers that cardio targets.
What this means for your clothes is specific. Slow, controlled movement against gravity puts your body in positions you do not occupy during cardio. You are supine for footwork, prone for swan and pulling straps, side-lying for the side leg series, and inverted in short spinal articulations during the short spine massage and the jackknife. In every one of these positions, your clothing is being pressed into your body by your own weight against a vinyl or leather carriage surface, and the fabric is not asked to wick sweat (because you are not sweating heavily, by design) but is asked to stay in place while gravity tries to relocate it. The forces are pressure forces and slow shear forces, not impact forces. The fabric science that handles those forces is heavier knit, denser stitching, and seam placement that does not cross the contact zones between your body and the equipment.
Dr. Stacy Sims, the New Zealand-based exercise physiologist whose book ROAR (first published 2016, revised edition January 2024) is one of the most-cited texts in women-specific sports science, has spent the last decade arguing that women’s connective tissue responds differently to slow, controlled strength work than to high-impact cardio, and that recovery and adaptation windows shift across the menstrual cycle. Sims summarizes the work on her own platform and in the revised edition of ROAR. The relevance for plus-size bodies is the slow eccentric loading Pilates and Barre deliver: the connective tissue around hips, knees, and the lumbar spine is being asked to bear a body it’s already been bearing for years, without the impact spikes that higher-load modalities introduce. The clothing implication is downstream of the science. If you are going to be doing this work for the long haul, and the science says you should be, then the clothes need to be engineered for the actual mechanics, not the marketing version of fitness mechanics.
The structural problem the rest of this guide turns on is that the standard activewear seam is engineered for a body whose thighs don’t touch, where the inner-thigh seam never experiences friction during movement. At size 22, where the inner thighs are in continuous contact, that seam is being shear-loaded with every rep. A flatlock seam designed for cardio breaks down within minutes. The plus-size Pilates wardrobe needs a different seam strategy entirely. Either the seam moves (gusset construction), or the seam goes away (seamless knit), or the seam is reinforced (bonded seam tape over the inner thigh). I’ll get to the brands that solve this and the brands that pretend to.
The four wardrobe failures specific to plus-size Pilates
The four failures I experienced in my first Club Pilates class are not random. They are predictable, they are common, and they map to four distinct engineering problems that the activewear industry has not solved at scale. The first failure is inner-thigh seam migration, which I have already named. The second failure is what I am going to call “top creep,” which is the phenomenon where any top that is not engineered for a supine or inverted position will travel up your torso the moment you go horizontal. A cropped tank that sits perfectly at the natural waist when you are standing in front of a mirror in the studio lobby will be at your bra band within six reps of footwork. A standard-length tee will be at your sternum. The structural reason is that the friction between your back and the carriage vinyl is greater than the friction between the fabric and your front, and Newton does the rest.
The third failure is sports bra band rotation under body weight. A bra that fits correctly when you are vertical is fitting against gravity that runs from your shoulders to your hips. Lie down, and the gravity vector runs from your sternum to your spine. The band is now being pressed laterally rather than vertically, and a bra that is engineered for impact (with a wide elastic underband and a high front gore) will rotate out of true because the underband is now bearing weight it was not designed to bear. The fourth failure is the grip sock calf cutoff, which is a flat sizing failure rather than an engineering failure. The grip sock industry, until very recently, sized its products on a straight-size lower leg, and the calf circumference of a plus-size woman frequently exceeds the upper band tolerance of the standard sock. The sock either cuts off circulation, rolls down to mid-calf and bunches, or rips at the heel within three wears.
Knowing the four failures is the first half of solving them. The second half is knowing which brands have actually addressed them, which brands have launched plus-size lines that did not address them, and which brands are using “extended sizing” as a marketing veneer over a straight-size pattern block. I am going to walk through tops, bottoms, sports bras, and grip socks one category at a time, with specific SKUs and specific 2026 prices, and I am going to flag where the brand has solved the problem at the engineering level versus where the brand has solved it on the website.
Tops: the cropped versus tunic-length debate at size 22
The top creep problem has two structurally different solutions, and the plus-size Pilates community is split on which one to use. Solution one is the cropped or fitted tank that is engineered with a band of silicone gripper at the hem to anchor it to the body, the same construction that strapless bras use to stay up. Solution two is the tunic-length top with enough length below the natural hip that even significant upward travel still leaves the torso covered. Both solutions have advocates, and both have brands that execute them correctly at size 22.
Beyond Yoga Plus is the brand that has executed the gripper-hem cropped tank the most reliably in plus sizes. The Spacedye Lift Your Spirits Cropped Tank in sizes 1X through 4X at $66 in 2026 has a silicone gripper band at the hem and the Spacedye fabric (87 percent polyester, 13 percent spandex) has enough body to lie flat against the torso without bunching. I own this tank in three colors, and it is the only cropped style I will wear to a reformer class. The Beyond Yoga Plus Spacedye Cropped Long-Sleeve at $88 is the cool-weather version of the same engineering choice. Athleta Plus has been pushing the Salutation Mesh Tank at $54 in sizes 1X through 3X as its Pilates-marketed top, and the Salutation Stash Pocket II Crop at $59, but neither has the gripper hem, and both will creep on a supine series. The Salutation Elation cross-back tank, currently $64 in plus, holds its position better because the cross-back construction anchors it to the bra band rather than to the torso, but the bra band itself has to be the right bra for that to work, which I will get to in the sports bra section.
The tunic-length solution is where Universal Standard Movement and Superfit Hero make their case. Universal Standard launched its Movement line in 2022 specifically for low-impact training, and the Movement Tunic in sizes 4XS through 4XL at $98 in 2026 is cut to fall four inches below the natural hip with a curved hem that does not ride up because there is too much fabric below the contact zone for upward travel to expose any midsection. The fabric is a 76 percent recycled polyester, 24 percent elastane blend that is heavy enough to drape without clinging, and the cut is wide enough across the shoulder that it does not pull at the front when you press into footwork. Superfit Hero, the Los Angeles-based brand founded by Micki Krimmel in 2015 and size-inclusive from launch (sizes L through 7XL across most of the line), makes the Body Confidence Tank at $66 with a length that hits at the high hip and a side-shirred construction that lets the fabric move with the torso without traveling upward. Superfit Hero is also the brand in this review whose fit model for the larger sizes is actually a larger-sized woman, not a smaller size graded up, and the difference is visible in the way the armhole sits.
Old Navy Plus Activewear deserves a mention here as the budget option. The PowerSoft Cropped Tank at $24.99 in sizes 1X through 4X has gripper-adjacent construction (a thicker elastic band at the hem, not silicone, but functional) and the PowerSoft Tunic Tank at $26.99 is a workable budget version of the Universal Standard piece at a quarter of the price. Old Navy’s fabric will not last as long, the elastic at the hem will lose its grip after roughly twenty washes, and the fit model is a straight-size graded up rather than a plus-size patterned, but if you are starting Pilates and are not sure you will stick with it, the Old Navy tunic tank is a defensible starting point. I would not recommend it as a long-term solution, but I would recommend it over the wrong tank from a more expensive brand.
Bottoms: leggings versus capri versus shorts, and the inner-thigh seam reality
The inner-thigh seam is the single most consequential engineering choice in plus-size Pilates bottoms. The brands that have addressed it have done so in one of three ways, and the brands that have not addressed it should not be in your Pilates drawer regardless of how comfortable they feel during a standing fitting in the dressing room.
Beyond Yoga Plus uses what the brand calls “no-show seaming” on the Spacedye High-Waisted Midi Legging in sizes 1X through 4X at $97. The construction is a gusset seam at the crotch that distributes the seam load across four panels rather than concentrating it at a single inner-thigh seam, and the inner-thigh itself is essentially seamless, with the fabric panels joined behind the leg rather than at the inner thigh. I have done a fifty-minute reformer class in these leggings, including the side-lying series and a full short spine, and the seam stays where it is supposed to stay. The fabric content is 87 percent polyester, 13 percent spandex, which is the same as the Spacedye tank, and the body of the fabric is heavy enough that it does not show sweat marks (which matter less in Pilates than in cardio, but still matter).
Athleta Plus’s Salutation Stash Pocket II Tight at $98 in sizes 1X through 3X has a standard four-needle flatlock inner-thigh seam, and it is the seam that fails for me at size 22 with predictable consistency. The fabric is the brand’s Powervita, a 79 percent recycled nylon, 21 percent Lycra blend, and the fabric itself is excellent. The seam is the problem. I have bought this legging twice on the assumption that maybe my first pair was a defect, and the seam has migrated on me in both pairs. I do not recommend the Salutation Stash for Pilates at size 22. I recommend it for walking and for upright Barre work, where the seam load is different.
Universal Standard Movement’s Form 73 Legging at $98 in sizes 4XS through 4XL is the brand’s Pilates-specific bottom, and it uses a bonded seam construction on the inner thigh, which is the third engineering solution. The seam is heat-bonded rather than stitched, which eliminates the friction edge that a stitched seam creates. The fabric is a 75 percent nylon, 25 percent elastane blend with the brand’s proprietary Form 73 compression. I have worn these for three months of weekly reformer classes, and the bonded seam has not failed. The legging itself runs longer in the inseam than the Beyond Yoga version (about a 28-inch inseam at the 3X versus 26.5 inches at Beyond Yoga’s 3X), which is something to factor in if you are shorter than 5’6″.
Senita Athletics’s Lux High-Waisted Legging at $59 in sizes XS through 3X is the moderate-price option. The construction uses a curved center-back seam that splits the inner thigh into two shorter seam segments, which reduces the shear load on any single seam point. It is not as elegant a solution as Beyond Yoga’s gusset or Universal Standard’s bonded seam, but it works at the price point. Senita’s plus sizing tops out at 3X, which limits the brand’s usefulness for size 26 and above. Superfit Hero’s Power Move Legging at $94 in sizes XS through 7XL uses a gusset construction similar to Beyond Yoga’s, and the 7XL pattern is actually drafted for that size rather than graded up, which is the brand’s structural differentiator.
On the capri-versus-legging-versus-shorts question, I am firmly on the side of the full-length legging for Pilates, and I am on the side of the capri for Barre. The reason is the contact surface. In Pilates, your lower leg is in contact with the reformer carriage during prone work, and a capri that ends mid-calf will expose your skin to the carriage vinyl, which is not comfortable when the vinyl is cold. In Barre, you are vertical the entire class, and a capri keeps the calf cool during the static-hold work where the lower leg is doing the most. The Beyond Yoga Plus Spacedye Midi Legging is the right product for reformer Pilates. The Old Navy PowerSoft Cropped Pant at $39.99 in sizes 1X through 4X is a workable capri for Barre. I would not wear shorts to either, but that is a personal preference about how my own body interacts with a vinyl surface, not a categorical recommendation. Some plus-size practitioners I know swear by Athleta’s Salutation Stash Pocket II Bike Short at $54, and the bike short does avoid the inner-thigh seam migration problem because the seam is so short. If you are heat-sensitive in a studio environment, that is a real consideration.
Spanx Booty Boost Active Leggings at $98 are the look-versus-function debate in physical form. The shaping panels in the legging deliver a visibly smoother silhouette in the studio mirror, which is a real benefit for some women’s confidence in a public class. The shaping panels also constrict the abdomen in a way that interferes with the diaphragmatic breathing that Brooke Siler and every other working Pilates teacher will tell you is the foundation of the method. You cannot breathe into your low back through a shaping panel. You can breathe into your chest, which is the wrong breath for Pilates. I have worn the Booty Boost to Barre, which is a more upright modality with less emphasis on lateral rib expansion, and they are fine. I will not wear them to a reformer class. The function loss is too high for the look gain.
Sports bras for Pilates and Barre: low-impact engineering at H cup
The plus-size sports bra category is the most over-promised and under-delivered segment of the activewear industry, and the Pilates and Barre-specific subset of that category is the most difficult problem within the difficult problem. The reason is that low-impact engineering for cup sizes above DD has been treated by the industry as a secondary concern to bounce control for high-impact modalities, and the bras that get marketed as “low-impact” in plus sizes are largely high-impact bras with the marketing copy changed.
The structural issue, as I described in the section on the four failures, is that a bra engineered for vertical impact is not engineered for the lateral and supine pressure that Pilates puts on the underband. At an H cup, which is where my own bra sizing lives, the underband is doing roughly seventy percent of the work of holding the breast tissue in place. The cups are doing twenty-five percent and the straps are doing five. If the underband rotates because your body weight is pressing it against the reformer carriage, the bra has failed regardless of how well the cup is engineered.
The bra I have landed on after eight months of trial is the Knix Catalyst Sports Bra in sizes 32C through 42H at $98 in 2026. The Catalyst uses what Knix calls a “smooth profile” underband, which is a wider, softer elastic than the standard sports bra underband, and the band is designed to compress laterally without rotating because the elastic tension is distributed across a larger surface area. I have worn the Catalyst through full reformer sessions including supine, prone, and side-lying work, and the band stays in position. The cup is encapsulation rather than compression, which matters at H because compression bras at large cup sizes flatten the tissue in a way that is uncomfortable during the prone work where you are lying directly on the chest.
For practitioners at smaller cup sizes (DD through F), the Beyond Yoga Plus Spacedye Lift Your Spirits Bra at $66 in sizes 1X through 4X is a workable Pilates bra. The construction is a long-line racerback with a wide elastic underband, and the lift is moderate rather than high. The Spacedye fabric carries through from the tank and the legging, which makes for a coordinated set if you care about that. The Athleta Plus Ultimate Bra at $69 in sizes 34D through 44E is the brand’s most-purchased plus bra, and it is engineered for medium-impact rather than low-impact, but the underband construction holds up reasonably well in supine work. I would not recommend it for cup sizes above F.
The bra I would actively recommend against for Pilates and Barre at any plus size is the Aerie Offline Real Me High Neck Sports Bra. The Real Me is excellent for yoga and for walking, and the fabric is soft against the skin, but the underband is engineered for low-tension compression rather than for lateral stability. It rotates on a supine series. It rotates on a side-lying series. The Aerie Offline Real Me is the bra I was wearing during the Club Pilates Decatur class I opened this article with, and it is part of the reason that class became the prompt for this entire piece. The Nike Pro Indy at $50 in plus sizes 1X through 3X has the same engineering profile, and the same problem.
Andrea Speir, the Los Angeles-based Pilates instructor who runs Speir Pilates, has talked publicly about how the bra question is the one her larger-cup clients ask most often, and her general recommendation aligns with what worked for me: an encapsulation bra with a smooth, wide underband. The European option many plus-cup women point to is the Anita Active Momentum (model 5544), available in sizes that go well into the H-cup range and stocked through Bare Necessities. The Anita underband is wider than the Knix, and the fit at H is structurally similar. That’s the bra I’d recommend if the Knix is sold out in your size.
Grip socks: the two brands that fit plus calves
The grip sock problem is the most-overlooked of the plus-size Pilates wardrobe problems, and it has the cleanest solution. There are two brands that have meaningfully addressed plus calf circumference in 2026, and there are roughly a dozen brands that have not.
ToeSox, founded in 2004, is the brand whose Bellarina grip sock (half-toe and full-toe variants) is the legacy product, priced around $20-22 a pair. The construction uses a softer, wider rib at the cuff than most clearance-aisle grip socks, and the silicone grip pattern on the sole catches a reformer carriage and a foot loop cleanly. The half-toe construction (the toes are exposed) is the choice for hot studios. The Full-Toe version is the choice for cooler studios. I own both. I wear the Bellarina Full-Toe to every reformer class. ToeSox’s plus-friendly fit isn’t called out as a separate “Plus” line on the site, but the wider rib at the cuff is the reason this fits where the no-name brands cut off.
Tavi (Tavi Noir / Tavi Active), founded as a sister brand to ToeSox under the same parent group, makes the Emma high-crew grip sock at around $24 a pair, with the Emma running the highest up the calf of any grip sock I’ve tested. The cuff sits at mid-calf rather than lower calf, the elastic is softer than the ToeSox version, and the grip pattern catches the reformer carriage cleanly in side-lying work where the foot is in contact with the foot bar at an angle. Tavi’s sizing officially runs through size L. I’m a 15-inch calf at the cuff line, and the Emma fits me without binding.
The brands I would not buy for plus calves include Pointe Studio (calf cuff binds at over 14 inches), Lululemon (the brand does not make grip socks in plus sizing at all), and any of the no-name brands at TJ Maxx, Marshalls, and Ross. The clearance bin is not where the plus-size Pilates wardrobe gets built. I learned that the slow way.
The reformer-class specific reality: springs, foot loops, neck pad
The reformer is the piece of Pilates equipment that introduces wardrobe constraints that the mat work does not. There are three contact points on a reformer that interact with what you are wearing: the spring system at the head of the carriage, the foot loops or straps at the front, and the neck pad at the back of the carriage. Each one has implications for your wardrobe.
The springs are not a direct contact point with your body in a standard class, but the spring tension and the spring sound are sensory elements that affect how you experience the class, and a wardrobe that pulls your attention away from the movement makes the spring cues harder to follow. If your leggings are migrating, your tank is creeping, and your bra is rotating, you are spending mental energy on your clothes that should be going to the breath and the spring transition. This is the case for spending money on the right gear rather than getting by with the wrong gear. The cognitive load of bad gear is real, and Joseph Pilates’ first principle is concentration. Concentration is harder when your wardrobe is broken.
The foot loops are the more direct contact point. In the long spine massage, the jackknife, and several of the spring-supported leg series, your foot is in a leather or canvas loop, and the friction between the loop and your foot determines how stable the position is. Grip socks help here, because the silicone on the sole catches the inside of the loop in a way that bare feet on a sweaty carriage does not. The Bellarina Full-Toe and the Emma High Crew both perform this function well. A standard athletic sock does not. A bare foot is fine in a warm studio for the experienced practitioner, but is a stability risk for the beginner.
The neck pad is the contact point that affects what you wear at the top. In the supine series, your head and upper back are resting on a small leather or vinyl pad at the head of the carriage, and the top of your sports bra band, the back of your top, and the back of your head are all in contact with that surface. A top with a hood, a high collar, or a thick neckline (like a turtleneck Spacedye long-sleeve I tried once) will bunch under the neck pad and pull your head out of alignment for the duration of the supine work. The recommendation is a top with a low scoop neck at the back, no hood, and no collar. The Beyond Yoga Plus Spacedye Cropped Tank, the Universal Standard Movement Tunic, and the Superfit Hero Body Confidence Tank all meet this requirement. The Athleta Salutation Elation cross-back tank also meets it, and the cross-back construction actually performs better against the neck pad than a standard scoop because there is no fabric on the upper back to bunch.
What I wear now versus month one: the four-piece capsule
Fourteen months into this project, my Pilates and Barre wardrobe has consolidated into a four-piece capsule that I rotate across two complete sets. The capsule is built around the four engineering solutions I have walked through, and it is meant for a Tuesday-Thursday class schedule with a wash on Friday.
The bottom is the Beyond Yoga Plus Spacedye High-Waisted Midi Legging at $97, in black and in a heather charcoal. I own two pair, I wash them on cold, I hang them to dry, and the gusset seam has not failed at the inner thigh in eight months of weekly wear. The top is the Beyond Yoga Plus Spacedye Lift Your Spirits Cropped Tank at $66, in three colors. The gripper hem holds against top creep, the back is a low scoop that does not interact with the neck pad, and the fabric coordinates with the legging if I care about that on a given Tuesday. The bra is the Knix Catalyst Sports Bra at $98, in two colors. The wide underband holds against lateral rotation, the encapsulation cups are comfortable on prone work, and the bra has survived roughly eighty washes without losing structure. The socks are the ToeSox Bellarina Full-Toe Grip Sock at $22, in three pairs in rotation. The plus calf cuff fits, the grip pattern catches the carriage and the foot loop reliably, and the half-toe option is in the drawer for the rare warm-studio class.
The total replacement cost of the four-piece capsule at one set is $283. At two sets, it is $548 plus an extra pair of grip socks. That is not a small number, and I am not pretending it is. It is also a meaningful step down from what I spent in the first six months of this project on Athleta Salutation pieces, Aerie Offline bras, Old Navy PowerSoft leggings, and the clearance-bin grip socks that started this whole problem. I bought roughly eleven pieces in those first six months at a total spend of about $640, and I now wear three of those eleven pieces, none of them to a reformer class. The cost of getting it wrong is higher than the cost of getting it right. The cost of getting it right is the cost of buying once.
Ragen Chastain, the size acceptance writer and athlete who has been documenting her own plus-size fitness practice publicly since 2007 and whose newsletter Weight and Healthcare is read across the size-acceptance and athletic-fat communities, has written explicitly about the way the industry has tried to monetize the wardrobe failure cycle, where each new “plus extension” capsule from a major brand is sold as the solution to the failures of the previous capsule. Chastain’s argument, which I largely agree with, is that the structural fix has to come from brands like Universal Standard, Superfit Hero, and Beyond Yoga that have built their plus pattern blocks from a plus model rather than from a graded-up straight size. The cycle breaks when the engineering is correct from the start. The cycle does not break by sizing up.
The observation I want to close on is the one that took me fourteen months and roughly $1,200 in activewear to arrive at, and it is the observation that almost no one in the plus-size fitness conversation is making out loud. The reason plus-size women need different fabric and seam engineering for Pilates and Barre than for cardio is not a comfort question, and it is not a vanity question, and it is not a question of bounce control. It is a question of what the modality is actually doing. Cardio asks your body to move fast against itself, and the wardrobe demands of cardio are about managing the speed and the impact and the moisture that come out of that. Pilates and Barre ask your body to move slow against gravity, and the wardrobe demands of those modalities are about managing the pressure of your own body weight against equipment surfaces, and the shear of your own thighs against each other, and the lateral rotation of your own bra band under your own torso. Those are different problems. They require different solutions. The industry has solved the cardio problems for plus sizes at a B-minus level. It has barely begun to solve the Pilates and Barre problems, and the brands that have are not the brands that market themselves the loudest. The seam that holds is not the seam that gets the campaign. The bra that does not rotate is not the bra at the front of the website. The grip sock that fits a 15-inch calf is in a sub-category page three clicks deep on a brand most non-Pilates people have never heard of. The work of finding the right Pilates wardrobe at size 22 is, in 2026, still meaningfully harder than the work of doing the Pilates itself. That is the observation. That is what I would tell the version of myself who walked into Club Pilates Decatur in February 2026 with the wrong leggings, the wrong tank, the wrong bra, and the wrong socks, if I could send her a single piece of information ahead of her first class. The clothes are not an afterthought to the practice. For a plus-size body, in a Pilates studio, the clothes are part of the practice.
It was 5:47 pm on a Sunday in late September when I admitted that my Monday morning was not a personality flaw, it was a system failure. My one-bedroom in Crown Heights had the kind of closet you get for $2,400 a month in 2026 Brooklyn, which is to say it was a reach-in with a single rod, a top shelf, and a floor that was supposed to hold shoes but was holding a heap of dry-cleaning bags I had not gotten around to processing. Six days earlier, on the previous Monday at 7:51 am, I had been late to a 9 am editorial meeting at our SoHo office because I had pulled a pair of wide-leg trousers from a hamper, dragged a steamer over them for ninety seconds, and zipped them anyway. The shoes I wore – a pair of taupe block heels – had a black scuff on the right toe from a subway grate two Fridays prior that I had told myself I would buff out and had not. My bag was the wrong bag for the outfit, a slouchy hobo I had grabbed because the structured satchel was still packed with last Friday’s gym clothes. I sat down at my desk at 9:14 am, took a sip of cold brew, and felt the specific kind of low-grade shame that comes from looking like a person who does not respect her own time. I am a fashion editor. I dress people for a living. The trousers were rumpled.
That Sunday at 5:47 pm, with the trousers still in the hamper from six days earlier and the shoes still scuffed and the dry-cleaning bags still on the floor, I set a kitchen timer on my phone for forty-seven minutes and I built the protocol. Five phases. Each one timed. No phase longer than twelve minutes. Total budget under fifty minutes because anything longer than fifty minutes is something I will skip on a Sunday in February when the daylight is gone and the couch is calling. The protocol ended the Monday chaos. It has run every Sunday since, including the Sunday after Thanksgiving, the Sunday of a head cold, the Sunday I came back from a press trip to Lisbon at 4 pm jetlagged, and the Sunday before my sister’s wedding. Forty-seven minutes. The trousers have not been rumpled since.
What I want to give you in this article is not a lifestyle ideal. It is a tested, timed, plus-size-specific protocol that respects the actual physics of a size 18 to 24 wardrobe – the weight of a wool blazer, the sag a beaded gown puts on a hanger, the way a heavier knit creases when it is hung wrong. The Sunday reset content that already exists online almost entirely assumes a straight-size closet, where a cotton blouse weighs four ounces and a pair of jeans weighs fourteen and a hanger choice is aesthetic, not structural. At size 22, the wool coat weighs four and a half pounds. The hanger choice is structural. The protocol below accounts for that, and for the specific time math of a Sunday night in a small apartment with a real job on Monday and a real life on Tuesday.
Why “Sunday reset” content does not account for plus-size garment weight and storage
If you have spent any time on closet-organization TikTok or in the back half of Pinterest, you know the genre. A pastel-lit walk-in. A row of identical white velvet hangers. A wicker basket of rolled bralettes. The voiceover talks about “energy” and “ritual” and the camera lingers on a candle. The system being demonstrated is, almost without exception, a straight-size system applied to straight-size garments in a straight-size quantity. The garment count is forty pieces. The hanger budget is one hundred dollars. The drawer dividers are decorative because the drawer is half empty. None of this is wrong for the person it was built for. It is wrong for a plus-size closet, and the wrongness becomes structural the moment you try to apply it to a size 18 to 24 wardrobe.
Here is what changes at plus. A standard polyester blouse in size 6 weighs roughly five ounces. The same blouse in size 22 weighs roughly nine to eleven ounces because there is genuinely almost twice as much fabric in it. A wool-blend blazer in size 8 weighs about a pound and a quarter. In size 22, it weighs three and a half to four pounds. A pair of full-length wide-leg trousers in size 10 weighs about fourteen ounces. In size 24, with a heavier crepe and a longer inseam adjustment, it weighs nearly two pounds. The cumulative effect on storage hardware is real. A standard thin plastic tubular hanger rated for two pounds will start to bow under a size 22 wool coat within a week. The bow translates to a shoulder distortion that gets baked into the fabric and is visible the moment you put the coat on. A size 8 silk slip dress can hang on a wire hanger from the dry cleaner indefinitely. A size 22 beaded gown will pull the wire hanger into a V within four months and leave a permanent crease at the bust seam.
Allison Bornstein, the New York stylist whose book Wear It Well built the now-famous Three-Word Method, has written that the foundation of getting dressed quickly is editing your wardrobe down to pieces that share an aesthetic vocabulary. Her Three-Word Method asks you to name your style in three adjectives and then audit every item in the closet against those words. The method is sound. What the method does not address, because Bornstein is generally working with straight-size clients whose wardrobe inventory is more flexible, is the storage layer underneath. You can edit a plus-size closet down to a perfect twenty-four pieces and still have a Monday morning disaster if those twenty-four pieces are hanging on hardware that cannot hold them.
Tan France, whose Queer Eye styling philosophy and ongoing style work (including his MasterClass on capsule wardrobes) have become a baseline reference for weekly closet practices, has talked publicly about laying out the week’s outfits on Sunday evening. France’s version is essentially a hanger-rack lineup with five hangers labeled Monday through Friday. It works beautifully for him and for the size-medium clients he features. For a plus-size wardrobe, the same lineup needs reinforced hangers, more space between each hanger on the rod (because the shoulder structure on a size 22 blazer is wider than a size medium and they will physically crush each other if you crowd them), and a separate storage solution for the heavier knits because hanging a chunky merino sweater wrecks the shoulders within forty-eight hours.
Shira Gill, the Bay Area organizer whose books
Minimalista
and
Organized Living
have become the practical alternative to the Marie Kondo era, makes a more useful point for plus closets. Gill’s principle is that an organized closet is a closet with breathing room – she recommends visible space between hanging items and full visibility of every shelf. The principle scales beautifully to plus, but it requires honesty about what plus garments actually need. A capsule of twenty-five pieces in a size 22 takes roughly the same linear rod inches as a capsule of forty pieces in a size 6. The math of the closet is not piece-count, it is fabric volume, and any system that does not start from fabric volume will fail by Wednesday.
The protocol below is the version that accounts for all of this. Forty-seven minutes total. Five phases. Plus-size hardware assumptions baked in. Specific products named where the product matters.
Phase 1: the 5-day rewind (8 min) – what got worn, what failed, what needs cleaning
The first phase is diagnostic. You cannot plan the week ahead until you understand what happened in the week behind. The eight-minute budget for this phase is generous. Most weeks it takes five. Set a timer.
Walk into the bedroom with a small notebook and a pen. I use a pocket Field Notes Memo because it fits in the back pocket of my Sunday leggings, but any notebook works. Draw a five-column grid for Monday through Friday. Under each day, write three lines: top, bottom, shoes. If you wore a dress, write dress and skip the bottom line. If you worked from home, write WFH and the outfit anyway. The point is the inventory, not the judgment.
For each piece, mark one of three codes next to it. C for clean and ready to re-hang. L for needs laundry. S for needs spot-treat or steam or a button or a stitch. The most common mistake here is to skip the S code and just throw everything in the L bucket, which routes garments through the wash cycle they do not need and shortens their useful life. A wool blazer with a coffee splash on the lapel needs a spot-treat with a Tide To-Go pen and a damp microfiber, not a full dry-clean cycle. A pair of trousers that got rained on but not soiled needs a steam and an air, not a wash. The S code is where plus-size garment longevity is won or lost, because plus pieces are more expensive per unit (and harder to replace), so over-washing them is a meaningful financial drag.
Once the grid is filled in, you should see patterns. Mine usually look like this: two pieces in the L bucket, three pieces in the S bucket, four pieces clean enough to re-hang directly. The trousers from the Monday I described at the top of this article were in the L bucket on the previous Sunday and did not get processed, which is how they ended up rumpled in a hamper six days later. The diagnostic only works if you act on it in Phase 2.
The other thing to capture in the rewind is what failed. If you had an outfit that did not work – a fit issue, a wrong-fabric-for-the-weather issue, a meeting that demanded a different vibe than you had planned for – write a single line at the bottom of the grid. “Tuesday: black knit dress with denim jacket read too casual for the lunch.” “Thursday: sleeveless top was wrong for office AC.” This is the data that informs Phase 3. You are not planning next week in a vacuum. You are planning it with the receipts of the week you just lived.
Phase 2: laundry stage (12 min) – the cycle, the air-dry, the spot-treat
Twelve minutes is the longest phase, and it is the one most people underbudget. The reason it is longer is that you are doing three different things in sequence: starting a wash, setting up air-dry stations, and spot-treating the S-bucket pieces.
Start with the wash. Pull the L-bucket pieces from the hamper. Sort by color and by weight. Plus-size knits and woven tops go together on a delicate cold cycle with a mesh laundry bag (I use the L-Brand Sak-it brand mesh bags, ten dollars for a three-pack on Amazon, and they have lasted me four years). Heavier pieces – jeans, denim jackets, structured cottons – go together on a normal warm cycle. Anything labeled dry-clean-only goes into a separate pile by the door for the dry-cleaner drop-off, which you will do on the way to work Monday or Tuesday. Do not throw dry-clean-only pieces in the washer because the internet told you that everything is washable. At plus sizes, dry-clean-only fabrics tend to be heavier and more structured, and the structure does not survive a home wash.
While the wash is running – if you have a washer in your unit, which not every Brooklyn renter does, and if you do not, your Phase 2 substitutes a folded pile for the laundromat run on Monday after work and adjusts accordingly – set up air-dry stations. I use a Honey-Can-Do four-tier mesh sweater drying rack, which folds flat and stores behind the bedroom door, and a single shower-rod air-dry bar in the bathroom for the slip-dryable pieces. The rule is that anything with stretch (a ponte dress, a midi skirt with elastane, a knit top with a high spandex content) lays flat to dry, because hanging it wet pulls the fibers out of shape and the heavier the garment the worse the pull. At size 22, a wet ponte midi dress weighs nearly three pounds. Hang it wet on a hanger and the shoulder seams will be visibly distorted by morning.
While the dryer is doing its thing – or while the rack is set up if you are line-drying – move to the spot-treat. Lay the S-bucket pieces on the bed. Get out the Tide To-Go pen, a small bowl of cool water, a couple of microfiber cloths, a steamer if you own one (I have a Conair Turbo Extreme Steam at $54 and it has earned out the cost in dry-cleaning savings within two months), and a small lint roller (Walgreens has a five-pack of fifty-sheet rollers for $7.99 and that is the best price-per-sheet I have found that is not Costco). Treat each spot. Steam each rumple. Lint-roll each piece. Twelve minutes is enough time for five to seven S-bucket items if you do not get on your phone.
The plus-size note on Phase 2 is about fabric weight in the wash. A regular load of straight-size laundry runs about ten to twelve pounds. A regular load of plus-size laundry, the same number of garments, runs sixteen to twenty pounds. You will overload a standard-capacity washer faster than you expect, and an overloaded washer does not actually clean the clothes, it just sloshes them. Run two smaller loads, not one large one, even if it feels less efficient. The clothes will come out cleaner and will keep their shape longer.
Phase 3: the 5-outfit lineup (12 min) – Monday-Friday by day’s calendar
Phase 3 is the heart of the protocol, and it is the phase that most directly answers the Monday morning question. The deliverable is five complete outfits hanging in a row, in calendar order, each one mapped to the actual obligations of that day. Twelve minutes.
Pull up your calendar on your phone. Read Monday through Friday in sequence. For each day, write a single descriptor at the top of an index card or a sticky note: Monday “editorial meeting + lunch with publicist.” Tuesday “WFH + 3 pm video call.” Wednesday “office + drinks after work.” Thursday “fashion week prep day, on feet all day.” Friday “travel day to LA, 2 pm flight.” The descriptor sets the dress code, the comfort requirement, the layering need, and the bag size for the day.
Now walk into the closet. For each day, pull a complete look. Top, bottom, shoes, layer, bag. If you want to use Bornstein’s Three-Word Method as the editing filter – I do, mine is “polished, textured, terracotta” – run each piece through the words and confirm it earns the spot. If a piece does not, it does not get on the rack for the week. Hang each look on a single hanger, in calendar order, on a dedicated lineup rod or on the left side of your closet if you do not have a second rod. Pin a small index-card tag to each hanger with the day of the week and the descriptor.
The hanger choice matters enormously at plus. The Honey-Can-Do velvet hangers (forty hangers for thirty-six dollars on Amazon) are my baseline because the velvet grip holds heavier garments without slipping and the slim profile saves about four inches of rod space across five outfits, which is the difference between cramped and breathing in a Brooklyn closet. The forty-pack is enough for a full Phase 3 lineup plus the rest of the closet inventory for a curated plus wardrobe. For the heaviest pieces – the wool coat, the beaded gown, the leather jacket – I use Container Store wide wooden hangers ($4 each) because the wider shoulder distributes the weight across more inches of fabric and prevents the dimple-shoulder distortion that velvet hangers can leave on the heaviest knits. A forty-pack of velvet and ten wooden hangers covers a thirty-five-piece working plus wardrobe.
The general capsule rule for the lineup is that each outfit should be ready to walk out the door, which means accessories and underpinnings are pre-staged with the outfit. For plus dressing, the underpinning question is more involved. A wrap dress that needs a specific shapewear short. A silk blouse that needs a smoothing camisole. A pair of high-waisted trousers that read best with a specific bralette. Pin the underpinning note to the index card so you do not stand in front of the open dresser drawer at 7:23 am on a Tuesday rifling through three shapewear options. The note says “Tuesday: smoothing tank, beige, top drawer left.” Done.
Allison Bornstein’s broader argument in
Wear It Well
is that decision fatigue is the silent killer of getting dressed, and that pre-deciding is the work of style. The Phase 3 lineup is pre-deciding made physical. By Sunday at 6:14 pm, the next five mornings are decided. Monday morning Tanya does not have to think. She has to put on what Sunday Tanya hung up.
Eight minutes. Five pairs of shoes. The jewelry pulls for each outfit. The bag check.
Pull each of the five pairs of shoes you assigned to the Phase 3 lineup. Line them up on a towel on the bedroom floor or on a small dresser surface. Run through them one at a time. The scuffed taupe heels from the Monday at the top of this article get a Meltonian shoe cream rub with a soft brush, ninety seconds. The white sneakers get a Magic Eraser on the rubber soles and a damp cloth on the canvas, sixty seconds. The black ankle boots get a quick edge-dressing touch-up if the heel edge has gone gray, sixty seconds. The brown loafers get a horsehair brush and a leather conditioner if the leather looks dry, ninety seconds. The navy slingbacks get a once-over with a lint roller because suede picks up everything, thirty seconds. Total shoe time, six minutes.
Plus-size note on shoes: foot edema is more common at higher body weights, especially after long workdays on feet, and shoes that fit on Sunday at 5 pm may not fit on Wednesday at 4 pm. Build the week’s footwear with that in mind. If Wednesday is an on-feet day, the lineup shoe for Wednesday is the most generous-fit pair you own, not the most flattering. A pair of Vionic Karmelle loafers ($150) or Allbirds Tree Runners ($98) is a better Wednesday pick than a pair of pointed-toe heels even if the trousers were chosen with the heels in mind. Pre-decide for foot reality.
The remaining two minutes go to jewelry and the bag check. Pull the earrings, necklaces, and rings for each outfit and stage them in a small leather tray on the dresser. I use a Cuyana tray that I bought at the Hudson Yards store in 2024 for $45, but a small ceramic dish or a leftover Le Creuset ramekin works. The point is that you are not opening a tangled jewelry box at 7:18 am on Wednesday hunting for a single gold hoop. The hoops are in the tray with the Wednesday outfit’s tag.
Bag check is one minute. Pick up the bag you assigned to Monday. Open it. Empty it onto the bed. Sort: keys, wallet, lip balm, transit card, AirPods, sunglasses, charger, mini-umbrella, Tide To-Go pen, a few tampons or pads. Anything not on this list goes in a small ziplock that lives in a basket on the closet shelf and gets re-deployed when a different bag is in rotation. Reload Monday’s bag with the core. Pre-deciding the bag contents is the move that prevents the “wrong bag for the outfit” failure I had on the Monday at the top of this article.
Phase 5: the bag prep + Monday-morning hand-off (7 min)
The final phase is the hand-off. Seven minutes. The deliverable is a Monday morning where you do not have to make a single decision until you are on the train.
Position the Yamazaki Tower valet stand (mine is the white one at $90 from Yamazaki Home, and it is the single best apartment-organization purchase I have made in five years) at the foot of the bed or in the bedroom corner. The valet stand holds: Monday’s outfit on its dedicated hanger, the bag underneath, the shoes at the base, and the index card tag visible on the hanger. The whole look is on one piece of furniture, vertical, waiting.
Walk the look. Stand in front of the valet stand, hold the look up, and check it as if you were dressing a client. Does the bag color work with the shoes? Does the necklace land on the right neckline? Does the jacket layer work with the bag strap? Is the weather check done? Pull up the weather app and read Monday’s forecast. If rain is in the forecast, swap the loafers for boots and write the swap on the index card. If a cold front is coming through, add a layer to the look and re-pin the tag. This is the one phase where you might catch a Sunday error before it becomes a Monday problem.
While you are doing the walk, put together the Monday bag. The keys go in. The wallet goes in. The AirPods get a quick charge if they are below thirty percent. The phone charger is in the side pocket. If you are bringing a laptop, the laptop is in the laptop sleeve and the laptop sleeve is at the door. If you are bringing lunch, write “pack lunch” at the top of the Monday index card so you see it when you walk into the kitchen at 6:45 am.
The final move of Phase 5 is the closet door. Close it. The phases are done. The Monday is decided. The notebook from Phase 1 goes back in the drawer. The timer reads forty-six minutes and change. You are under budget. You can pour a glass of wine and watch
Industry
.
This section is the one you will not find in a straight-size closet-reset article. The storage rules for plus garments are different because the physics are different, and ignoring the physics is what turns a beautifully organized closet on Sunday at 7 pm into a stretched-out, dust-covered disappointment by Sunday at 7 pm three months later.
Rule one: heavier knits fold, they do not hang. A chunky merino sweater, a cashmere cardigan over a certain weight, a cable-knit pullover – all of these belong in a drawer, folded, never on a hanger. The reason is gravity. A heavy knit hung on any hanger will sag at the shoulders within two to four wears, and the sag does not press back out. The original Marie Kondo principle of vertical-fold knits in a drawer, refined into more practical terms by Shira Gill, is the right move for plus knit storage. I use Iris Drawer Dividers (a four-pack of clear acrylic dividers, $26 on Amazon) to partition a single dresser drawer into four zones, one zone per color family. Each zone holds six to eight folded sweaters standing on their edges, file-fold style, visible at a glance.
Rule two: structured blazers and tailored jackets need wide wooden hangers and a dust cover for non-rotation pieces. The blazer I wore last Tuesday and that is back in rotation this week stays on its wide hanger uncovered. The wool coat I will not wear until November stays on a wide hanger inside a breathable cotton garment bag (the Container Store sells natural cotton garment bags at $13 each, and they breathe in a way the plastic dry-cleaner bags do not). Plastic dry-cleaner bags trap moisture, which on a plus garment held over a long off-season produces the kind of musty smell that requires a professional re-cleaning to fully remove. Pull the plastic the day the garment comes home from the cleaners. Hang it in cotton.
Rule three: foundation garments need their own dedicated rotation system because they wear out faster at plus and because the bra and shapewear inventory is too expensive to manage casually. I keep my full shapewear and bra inventory in a single drawer, sorted by function: smoothing for under-knits, structured for under-tailored, sport for activewear days. Each function-zone gets a labeled fabric box (I use Open Spaces small boxes at $24 for two, but any rectangular fabric bin works). When I pull a shapewear piece for the Phase 3 lineup, I make a small mental note of which one I used. If I find myself reaching for the same piece three weeks in a row, it is time to either rotate in another piece I own or budget for a replacement. Plus shapewear ages out faster than straight-size shapewear because the elastic fibers are working harder against more body, and the compression goes south within twelve to eighteen months of regular wear. The rotation system catches the wear-out before it shows up as a bad fit under Monday’s outfit.
Rule four: shoes need a closed storage system because plus-size foot edema means swelling and sweat, and an open shoe rack at the bottom of a closet absorbs odor faster than you think. I use clear stackable plastic shoe boxes (The Container Store’s drop-front shoe boxes at $8 each, or the cheaper IRIS USA ones at $4 each on Amazon, six-pack). Each shoe gets a box. Each box gets a small silica gel packet, replaced every six months. The shoes stay dry, the closet does not smell, the lineup pulls in Phase 4 take ninety seconds instead of five minutes of hunting on the closet floor.
Rule five: dress storage for occasion pieces. A beaded gown, a heavy silk slip, a structured cocktail dress – these belong in a separate part of the closet on the strongest hangers you own, with a breathable cotton cover, and they do not enter the weekly Phase 3 rotation unless an occasion is on the calendar. Treating an occasion piece as part of the weekly rotation accelerates its wear and you will be sad about it the next time you reach for it for an actual event.
The mid-week refresh: the Wednesday 10-minute touch-up
The Sunday protocol does the heavy lift. The Wednesday touch-up keeps it intact. Ten minutes, midweek, ideally Wednesday evening between dinner and television.
The Wednesday refresh has three moves. First, walk the Phase 3 rod and check the remaining outfits. If Tuesday’s outfit was the one with a fit issue (the blazer was too warm, the trousers crept up, the shoes gave a blister), pull the Wednesday-through-Friday looks and audit them against what you learned. The Tuesday data should change the Thursday choice if the same fit issue is going to apply. Second, do a small-load laundry run if the L bucket has grown – which it usually has, because Tuesday added at least a top and Wednesday added a sports bra and an athleisure set. A small Wednesday wash keeps the Saturday and Sunday laundry from becoming three full loads. Third, do a five-minute closet floor sweep. Pick up anything that has fallen, return things to their boxes, reset the shoe lineup, dust the valet stand surface with a microfiber cloth, and pull anything that needs to go to the dry cleaner before the weekend.
The Wednesday refresh is the difference between a Sunday protocol that lasts a week and a Sunday protocol that lasts forever. The closet entropy that builds between Sunday and the following Sunday is real, and ten minutes of midweek attention slows the entropy by a significant margin. Skip Wednesday three weeks in a row and the next Sunday protocol takes seventy minutes instead of forty-seven because you are doing two weeks of work at once.
The seasonal pivot Sunday: twice a year, the deeper reset
The forty-seven-minute protocol is the weekly maintenance layer. Twice a year – once in late April or early May for the spring-to-summer pivot, once in late September or early October for the fall-to-winter pivot – the protocol expands into a longer seasonal reset. Budget three hours. Pour a coffee. Put on a long album.
The seasonal pivot has five additional moves on top of the regular forty-seven minutes. First, pull every off-season piece from active rotation and store it in cotton garment bags in the back of the closet or in under-bed storage. Second, pull every in-season piece from the back of the closet or from under-bed storage and re-hang it in active rotation. Third, run the Bornstein Three-Word Method on every active-rotation piece. If it does not earn the spot in the new season’s lineup, it goes to the donation bag, the consignment bag, or the resale-listing pile. Fourth, audit the foundation garment inventory and budget for any replacements that are aging out. Fifth, audit the shoe inventory and either repair or replace anything that did not survive the previous season.
The seasonal pivot is also when I do the slow conversation with myself about gaps. The summer of 2025 I realized I had no clean white linen blazer and I had been faking it with a too-warm cotton one. The fall of 2025 I realized my brown leather tote was beginning to crack and would not make it through another winter. The pivot is the time to write down the gaps, set a budget, and commission the purchases over the following four to six weeks rather than panic-buying the week of an event.
Shira Gill makes the related point that a minimal wardrobe is built season by season, not all at once, and that the seasonal pivot is the rhythm at which a wardrobe earns its name. For a plus closet, this rhythm matters even more because plus pieces are harder to find and more expensive per piece, and impulse purchasing at plus rarely produces lasting wardrobe value. The seasonal-pivot list is the document that turns a closet from a collection into a wardrobe.
The 47-minute Sunday protocol summary, and your challenge for this Sunday
Here is the full forty-seven-minute protocol, phase by phase, with the timer math on the right. Read it once. Save it. Run it this Sunday.
Phase 1: the 5-day rewind (8 minutes).
Open a notebook. Draw a five-column grid. Inventory what you wore Monday through Friday. Mark each piece C for clean, L for laundry, S for spot-treat. Write one line on what failed and why. This phase tells you what to do in Phase 2 and what to consider in Phase 3.
Phase 2: laundry stage (12 minutes).
Pull the L bucket. Sort by color and weight. Start a delicate cold cycle and a normal warm cycle. Set up air-dry stations. Spot-treat the S bucket with Tide To-Go, steam, and a lint roller. Move dry-clean-only pieces to the door for drop-off. Two smaller loads, not one large one, because plus laundry weighs more per garment than the washer’s published capacity assumes.
Phase 3: the 5-outfit lineup (12 minutes).
Read Monday through Friday on your calendar. Write a one-line descriptor for each day. Pull a complete look for each day – top, bottom, shoes, layer, bag – and hang each on a single Honey-Can-Do velvet hanger or, for heavier pieces, a wide wooden hanger. Pin an index-card tag with the day, the descriptor, and any underpinning notes. Run each piece through your Bornstein Three-Word Method filter to confirm it earns the spot. Leave breathing space between hangers.
Phase 4: footwear and accessories (8 minutes).
Line up the five pairs of shoes assigned in Phase 3. De-scuff with Meltonian shoe cream, Magic Eraser, horsehair brush, edge dressing, and lint roller as needed. Stage jewelry for each outfit in a small leather tray. Pre-decide for foot reality – generous-fit shoes for on-feet days. Empty your everyday bag onto the bed, sort the contents, and reload Monday’s bag with the core kit (keys, wallet, transit card, AirPods, sunglasses, charger, Tide To-Go pen, mini-umbrella).
Phase 5: bag prep and Monday hand-off (7 minutes).
Position the Yamazaki valet stand. Hang Monday’s outfit on it. Place the bag underneath, the shoes at the base, the index card visible. Walk the look as if you were dressing a client. Check the weather and swap any piece that does not match the forecast. Pack the laptop and any add-ons. Close the closet door. Pour a glass of wine.
Now here is the challenge, which is the whole point of you reading this article all the way down to this paragraph. This Sunday, between 5 pm and 7 pm, set a kitchen timer for forty-seven minutes and run the protocol once. Not twice. Not a perfect version. The first version. Pour the wine before you start if it helps. Put on the Sade album if Sade is your Sunday music. Use whatever hangers you currently own. The Yamazaki valet stand can come later. The Honey-Can-Do velvet hangers can come later. The point on Sunday one is to run the five phases at the published time budget and see what happens on Monday morning when you walk into the closet at 6:45 am and the trousers are not rumpled, the shoes are not scuffed, the bag is correct, and the decision is already made. The Monday morning you have after the first Sunday protocol is the proof. Every Sunday after the first one is easier because the system exists. The hardest version of this protocol is the one you run before you have ever run it. The chairs in my apartment that used to be draped with rejected outfits at 7:45 am on Mondays are now just chairs. The hamper does not hold rumpled trousers six days later. The shoes do not have scuffs that I told myself I would buff out. Forty-seven minutes, this Sunday. Set the timer. Begin.
It was 9:47 pm on a Tuesday in early March when I admitted to myself that the side hustle wasn’t working. My one-bedroom in Chicago had become a small warehouse. A garment rack from Target stood in the corner of the living room with twenty-three plus-size pieces hanging on it – sizes 18, 20, 22, 24, a couple of stretchy 26s – and I was on hour three of trying to photograph a navy fit-and-flare dress that the algorithm didn’t want to move. Twelve listings posted across the previous six weeks. One sale. A $32 sundress that netted me $19.43 after Poshmark’s twenty percent fee and a shipping concession I made because the buyer asked. The ring light kept tipping over. My phone kept refusing to focus on the dress because the background was the same warm beige as the fabric. I’d bought the dress at an estate sale for $4 with the conviction that any plus-size piece from a closing-up boutique would move. It had been sitting in the closet for forty-one days. Twelve listings. One sale. Six weeks. The math was the math.
What I had not understood when I started reselling was the demographic gravity of the resale market. Most of the volume on the major platforms is sub-size-fourteen buyers – the same skew the primary retail market has, the same skew the runway has – and the volume that exists for plus-size pieces sits later in the funnel, with a longer time-to-sale, a narrower buyer pool, and a price ceiling that nobody on YouTube tells you about when they are filming their thrift haul. The full-time resellers who post their $4,000 weeks on TikTok are usually moving size 4 through size 12 inventory at high velocity. The size 18 to 24 reseller is running a different business. Same platforms, same fees, slower clock. If you do not adjust the cadence and the pricing and the photography time per piece, the math turns on you, and three months in you are sitting at 9:47 pm on a Tuesday with a ring light tipping over and twenty-three pieces on a Target garment rack you cannot move.
This is the playbook I wish someone had handed me at hour three of that Tuesday. It’s the platform-by-platform math, the cadence that lets you keep your weekends, the pricing rule that actually works for plus pieces, the tax reality once your gross sales cross the platform reporting threshold, and the twelve-month plan with a dollar target that won’t destroy your nervous system. I’m still reselling. I’m also still pulling receipts on every plus brand I review, which is the only reason I can be honest about this. Reselling is a real side income. It’s not a get-rich-quick situation, especially in plus, and the people selling you the dream of quitting your job in six months aren’t selling the size 22 dress.
The plus-size reseller burnout pattern has a data signature
ThredUp publishes an annual Resale Report every spring, and recent editions are the documents every plus-size reseller should read once before they list a single item. The headline number from the report is the one that gets repeated everywhere: the secondhand apparel market crossed $197 billion globally in 2023 and is projected to keep growing into the hundreds of billions through the end of the decade. The number underneath the headline, the one that doesn’t get repeated, is the velocity gap. Plus-size garments consistently sit in the marketplace longer than equivalent straight-size garments before selling, according to reseller-community data and platform feedback. The buyer pool is smaller, the fit risk is higher, and the search behavior is more specific. That’s the data signature of the burnout pattern.
What the gap means in practice: a size 8 sundress that would sell in three weeks can take a month or more in a size 18. A blazer that would move in a month-and-a-half can sit closer to two months. A formal dress that would move in two months can sit closer to three. The total addressable market for the plus-size piece is smaller in pure buyer-count terms, the buyer is more careful because the fit risk is higher, and the search behavior is more specific – a size 22 buyer is searching for a size 22, not browsing for whatever fits. The platform’s algorithm responds to engagement velocity, so listings that don’t sell quickly get less feed real estate the next week, which compounds the problem.
The reseller community on YouTube and in Reddit’s r/poshmark has documented the same pattern in monthly recap videos and breakdowns. Plus-size pieces routinely take longer to sell than straight-size pieces and price out lower per item on average for resellers carrying mixed inventory. The plus inventory is still worth carrying because buyer loyalty is higher and the repeat-customer rate is better, but the cadence has to be different. Sustainable plus resellers list less of it per week. They price it tighter at the start. They don’t chase the algorithm with daily listings the way straight-size resellers do.
Poshmark, founded by Manish Chandra and now operated under Naver after the 2023 acquisition, has publicly framed extended sizes as a growth category and has rolled out fit and sizing filters that address some of the search friction. The framing is bullish and the platform-level data supports it – the plus category does grow on Poshmark year over year – but the growth is from a smaller base, and the individual reseller experience hasn’t caught up to the macro story. The category grows. The individual seller of a size 22 dress still waits longer for the sale than the seller of a size 8.
The burnout pattern that follows this data is consistent. New plus-size reseller hears the ThredUp headline, sees a few viral TikToks, sources a lot of inventory quickly, posts twenty listings in week one, then twenty more in week two, sees minimal sales by week four, and panics. The panic response is to list more, not less. The reseller pushes to thirty listings a week, then forty. The photography gets sloppy, the descriptions get short, the pricing gets random, the inventory sits in the apartment growing into a physical and emotional problem, and somewhere around week eight to twelve the reseller hits the wall. I hit it at week six. The data says I was early.
Platform-by-platform fee and audience math
The single biggest education a new plus-size reseller can give themselves is understanding the fee structure and the audience composition of each platform. Most resellers list across two or three platforms, which is the right move, but the choice of which two or three matters enormously. Here is the working math for the major platforms in 2026, with the audience reality each one carries.
Poshmark: 20 percent fee, the social-feed engine, plus-friendly buyer base
Poshmark charges a flat 20 percent commission on any sale over $15, and a flat $2.95 on sales of $15 or less. The math is unforgiving on cheap items – a $12 sale nets you $9.05 – but the fee structure is predictable once you cross $30 per piece. A $50 dress nets you $40. A $100 piece nets you $80. There are no listing fees, no insertion fees, no relisting fees. Shipping is a flat $8.27 paid by the buyer for items up to five pounds, which works in the seller’s favor on most clothing.
The audience on Poshmark skews female, U.S.-based, ages 25 to 44, with a moderate plus-size buyer share. The platform’s “Sized to Sell” feature added in 2022 lets buyers filter by extended sizes specifically, which is a real upgrade. The community share-economy mechanic – where users share each other’s listings to their followers – is the part of Poshmark that no other platform replicates, and it is the reason plus-size resellers tend to do better here than on the listing-only platforms. A network of plus-size resellers who share each other’s items is a real algorithmic advantage. The downside is that the social labor is constant. If you stop sharing your closet daily and engaging with the community, your listings drop in the feed. The platform rewards daily presence, which is part of why it is also the platform most associated with the burnout cycle. The fix is to share with a routine, not on demand, which I will get to in the cadence section.
Depop: 10 percent fee, young buyer base, mostly straight-size demand
Depop charges a 10 percent fee on the sale price as of the platform’s 2022 fee restructure, which was a significant cut from the previous 10 percent plus payment processing model. The platform was acquired by Etsy in 2021 and the buyer base remains heavily Gen Z, Europe-leaning, and skewed toward vintage and Y2K aesthetic pieces. The plus-size category exists but is smaller. A size 22 vintage Levi’s jacket will move on Depop. A size 22 contemporary plus-size brand piece – say, a current-season Lane Bryant blazer – moves slower and at a lower price than it would on Poshmark.
The Depop audience economic reality is the part that matters. Average sale prices on Depop run lower than Poshmark across the board, partly because the buyers are younger and have less disposable income, and partly because the aesthetic preference is for cheaper, more disposable pieces with a vintage or thrifted vibe. A piece you would list at $58 on Poshmark might list at $38 on Depop and sit for longer at that lower price. The fee is lower, the price ceiling is lower, the net comes out roughly the same. The reason to be on Depop is reach into the under-30 buyer who is not on Poshmark, not better economics.
ThredUp: 25 to 80 percent payout tiers, zero listing labor, the volume-clear-out play
ThredUp is structurally different from Poshmark and Depop. You do not list. You ship a bag of clothes to ThredUp’s processing center using a “Clean Out Kit,” and ThredUp assesses, photographs, lists, and sells the pieces for you. In return, you get a payout that scales by item value. The payout tiers as published on ThredUp’s site for 2026 are: 5 to 15 percent on items that sell for under $20, scaling up to 60 to 80 percent on items that sell for over $200. A $40 item nets you somewhere between $6 and $11. A $100 item nets you somewhere between $25 and $50.
The math on ThredUp is brutal on low-value items, generous on high-value items, and the unsold items are donated unless you pay an “Assisted Return” fee to get them back. For a plus-size reseller, ThredUp is best used as a clear-out lane for pieces you have given up on, not as a primary income channel. The platform’s plus-size category is real and growing – ThredUp’s own data shows plus listings are a meaningful share of the women’s inventory – but the per-piece payout for the seller is the lowest of any platform on this list. The trade you are making is the listing labor. Zero photography, zero descriptions, zero shipping, zero customer service messages. You ship a bag and forget it. For pieces you would otherwise donate, the math is “some money is better than no money.” For pieces you actively want to sell at fair value, ThredUp is the wrong channel.
Mercari restructured its fee model in 2024 to a sale-price-based commission of around 10 percent depending on category, with a payment processing fee added on top, which lands the net seller cost in the 12 to 14 percent range. The platform is broader than Poshmark in category – it covers electronics, home goods, beauty, toys, and apparel together – which means clothing is not the primary feed for a typical Mercari buyer. The audience is older on average than Depop and slightly more male-skewed than Poshmark.
For plus-size apparel specifically, Mercari is a thinner lane. The buyer is on the platform looking for a deal across many categories, not specifically hunting for a size 22 dress. Listings show up in keyword searches, which works if your titles are dialed in, but the social-feed mechanic that drives Poshmark does not exist on Mercari. The seller is doing more SEO work and less community work. The net for plus-size sellers tends to be slower sell-through and similar net dollars per sale to Poshmark after the fees are accounted for. Mercari is worth listing on as a third platform, not a primary one, for most plus-size resellers.
eBay: variable fee around 13 percent, the long-tail buyer, the auction option
eBay is the oldest platform on this list and the most underestimated by new resellers. The fee structure is variable by category, but for apparel the final value fee runs around 13 percent including the payment processing component as of 2026. eBay’s buyer base is enormous and global, which means a niche plus-size piece – a vintage Lane Bryant blouse from 1998, a discontinued Eloquii dress with a cult following – can find its specific buyer in a way the other platforms do not deliver. The auction format also exists, which is the only platform on this list where a competitive bid can push a listing above the seller’s expected price.
The friction on eBay is that the buyer expectations are higher. Listings need more detail. Photography needs more angles. Returns are policed more strictly. Shipping is handled by the seller through a label-purchase flow that requires more administrative time per sale than Poshmark’s flat-rate shipping. For a plus-size reseller with vintage or designer pieces, eBay is essential. For a reseller moving contemporary plus-size pieces from mainstream brands, it is one channel among several. The payout per sale tends to be the highest of the listing platforms after fees, but the time-per-sale is also the highest.
Vinted: zero seller fees, European buyer base, growing U.S. presence
Vinted, the Lithuanian-founded peer-to-peer marketplace that has dominated the European resale scene since the late 2010s, launched in the U.S. market in 2023 and has been growing through 2025 and 2026. The headline feature is that sellers pay zero fees – all the platform costs are paid by the buyer through a small “buyer protection fee” added at checkout. For a seller, this is genuinely meaningful. A $40 dress on Vinted nets you $40, not $32 after Poshmark’s cut or $34 after Mercari’s.
The catch is the audience. Vinted’s U.S. user base is still small compared to Poshmark and Mercari, and the platform’s algorithm is still maturing for U.S. inventory. The plus-size buyer is on the platform but in smaller numbers. The European audience is real but the shipping math for international sales rarely works in the seller’s favor unless you are moving high-ticket pieces. Vinted is worth listing on for the zero-fee math alone, with the understanding that the volume will be smaller than Poshmark for now. The trajectory is up. The current state is still maturing.
Curtsy: women-only, college-skewing, fast for trendy pieces
Curtsy is a smaller peer-to-peer marketplace built specifically for women, with a buyer base that skews college-aged and trend-driven. The fee structure is around 20 percent on items over $20, similar to Poshmark, and the platform has a “Buy It Now” plus offer system that drives faster sales on hot pieces. The plus-size lane on Curtsy is small but the buyers who are there are loyal. For trendy plus pieces – a current-season formal dress, a viral TikTok jeans brand in extended sizes – Curtsy can move inventory fast. For older or more classic pieces, it is the wrong fit. Most plus-size resellers do not need to be on Curtsy. The ones who specialize in current-season trendy inventory should consider it.
Facebook Marketplace: zero fees for local pickup, hyperlocal buyer, no shipping
Facebook Marketplace charges zero fees for local pickup transactions and a small fee for shipped purchases, which makes it the cheapest channel on paper. The reality is that the marketplace is local, the buyer expects to negotiate, no-shows are constant, and the time per transaction is high. For bulky inventory you do not want to ship – a coat, a wedding dress, a piece of formal wear – Facebook Marketplace can clear it for cash with no fees. For a plus-size reseller running a real volume operation, it is a clearance lane, not a main channel. Worth using strategically. Not worth building a business around.
Whatnot: live selling, 8 percent fee plus processing, performance-heavy
Whatnot is the live-stream selling platform that exploded in 2022 and 2023 and is now a meaningful channel for resellers willing to broadcast. The fee structure is around 8 percent on the sale plus payment processing fees, so the net cost is roughly 10 percent. Sellers go live on a scheduled stream, hold pieces up to the camera, and buyers bid or buy at fixed prices in real time. For plus-size sellers with a dialed presentation style, the platform can move significant volume in a single ninety-minute stream.
The labor is the broadcast itself. Setting up the studio, scheduling the stream, marketing it to your buyer base, performing for ninety minutes in a row, packing and shipping everything that sold in the next twenty-four hours. It is exhausting and it is not the right channel for someone who is already burned out from listing. It is the right channel for a reseller who is ready to graduate from listing-platform passive sales to performance-driven active sales. Most plus-size resellers should treat Whatnot as a year-two channel, not a year-one channel.
Instagram: DM-based sales, zero platform fees, relationship-driven
Selling through Instagram is not a platform feature, it is a behavior. Resellers build a following, post pieces in their grid or stories, and complete sales through direct messages with payment via Venmo, Cash App, or PayPal Goods and Services. There are no platform fees. The payment processor takes a small cut if you use Goods and Services for buyer protection, which is around 3 percent. The buyer pool is whoever follows you and trusts you. For plus-size resellers with an existing following or a strong visual brand, Instagram can be the highest-margin channel by a wide margin. The catch is that you need the following first. New resellers without an audience cannot sell through Instagram. Established resellers with a few thousand engaged plus-size followers can.
The 3-listing-per-week sustainable cadence
The single biggest mindset shift between the burnout reseller and the sustainable reseller is the listing cadence. The standard advice in reseller YouTube, repeated by influencers chasing growth at all costs, is to list daily, at minimum five to ten pieces a day, to keep the algorithm fed. For a full-time reseller moving straight-size inventory at velocity, that cadence might be sustainable. For a part-time plus-size reseller with a day job, it is the direct cause of the burnout cycle I described at the top of this article.
The cadence that works for sustainable plus-size reselling is three listings per week. Three. Not three a day. Three total, spread across the week. Monday, Wednesday, Saturday. Or Tuesday, Thursday, Sunday. Pick a rhythm and hold it. The discipline of three a week does several things at once. It forces you to source more selectively, because you cannot just keep buying inventory and dumping it into the closet. It gives each piece more photography care, because you are doing one piece on a Monday evening, not five. It distributes your time across the week instead of compressing it into a Sunday-night marathon. It lets the algorithm see consistent activity from your account rather than feast-or-famine spikes.
The three-listing rhythm pairs with a daily “engagement window” of fifteen minutes. The engagement window is when you share your closet on Poshmark, respond to offers, ship anything that sold, and check the other platforms. Fifteen minutes a day. Set a timer. When the timer rings, close the apps. The combination of three listings per week plus fifteen minutes a day of engagement is roughly four to five hours of total reselling time per week, which is the upper bound of what is sustainable next to a full-time job.
The burnout cycle, for comparison, looks like twenty listings a week, ninety minutes a day of engagement, weekend marathons sourcing new inventory at estate sales and thrift stores, and a constant low-grade anxiety about the apartment filling up. That is somewhere around fifteen to twenty hours a week, which is a part-time second job, which is not what most plus-size resellers signed up for. The three-listing cadence is half the income of the twenty-listing cadence in the short run and roughly the same income in the long run, because the sustainable seller is still selling six months later when the burnout seller has quit.
Photography that takes 3 minutes per piece, not 20
The photography burnout I described at the top of this article – the ring light tipping over, the navy dress that would not focus, the hour three of trying to get one shot – is a solvable problem and the solution is brutal simplification. Most reseller YouTube teaches a photography setup that takes twenty minutes per piece. Lightbox, two lights, white wall backdrop, mannequin, multiple angles, flat-lay shots, detail shots, tag shots. By the time you have shot one piece at that level of production, your evening is gone. Multiply by three listings a week and you are spending an hour a week just on photography, which is fine, but if you scale to twenty listings a week you are spending six and a half hours on photography alone, and that is the part where the burnout starts.
The three-minute photography setup is the answer. One white wall in your apartment, or a clean light-color sheet pinned to the wall. Natural daylight from a window if it is daytime, a single inexpensive LED floor lamp if it is night. The garment on a wooden hanger or a torso mannequin. Phone on a small tripod or just held steady. Three shots: front, back, one detail (the tag, an embellishment, the fabric texture). Done. Move to the next piece.
The trade you are making is fidelity for time. The Pinterest-perfect plus-size reseller photography you see on Instagram took someone an hour per piece. Your job is to take photography good enough to sell the piece, not photography good enough to win an award. A clean front shot on a clean background with accurate color and a clean back shot showing the silhouette will sell the dress. The buyer is going to message you for measurements regardless of how many shots you took. The detail shot does the work of answering “is this fabric stretchy” without a message. Three shots per piece, three minutes total. Nine minutes a week of photography across the three listings. The math reverses.
Pricing the size 18 to 24 garment correctly
Pricing is where plus-size resellers consistently leave money on the table. The default reseller pricing framework, taught in every Poshmark beginner guide, is to price at roughly thirty to forty percent of original retail. A dress that retailed at $80 lists at $28. A blazer that retailed at $120 lists at $42. The math is borrowed from straight-size reseller economics and it is wrong for plus-size pieces.
The reason it is wrong is the supply-and-demand gap. A size 6 version of any given plus-size brand’s dress is everywhere on the secondhand market. A size 22 of the same dress is rare. The buyer who wants that size 22 dress has fewer alternatives, which means the demand curve is steeper at the larger sizes. A size 22 dress from a desirable plus-size brand – Eloquii, Universal Standard, City Chic, 11 Honoré – should price higher than the equivalent straight-size piece from the same brand, not lower, because the supply is smaller.
The rule I use, which I arrived at after eight months of mispricing my own inventory: the size 18 to 24 piece from a plus-friendly brand prices at fifty to sixty percent of original retail in the first thirty days, dropping to forty percent after sixty days. The straight-size benchmark of thirty percent is the floor, not the target. A Universal Standard Seine dress that retailed at $128 lists at $64 to $77 in the first month, drops to $55 if it has not sold by day sixty, and only drops to $42 (about thirty-three percent of retail) if it is still sitting at day ninety. My size 6 sister’s equivalent dress, the same brand and style at her size, would price at $40 from day one because the supply at size 6 is enormous and the buyer has thirty alternatives. My size 22 has three alternatives. The pricing should reflect that.
The exception is contemporary fast-fashion plus pieces – SHEIN, ASOS Curve fast-fashion lines, Fashion Nova – which have low resale value across the board because the supply is high and the perceived quality is low. Those pieces should price aggressively because they will not move at a premium. For those, the thirty percent rule applies. For genuine plus-size-specialist brands and contemporary mid-tier pieces, the fifty to sixty percent rule applies. Knowing which bucket the piece falls into is the seller’s job before listing.
The donate-vs-resell-vs-trash decision tree
Not every plus-size piece in your closet should be listed. The sustainable reseller’s discipline is the upfront sort. Before a piece goes on a hanger and into the listing queue, it should pass three filters.
Filter one: condition. The piece must be in excellent or better condition. No pilling that cannot be removed with a fabric shaver, no permanent stains, no broken zippers, no missing buttons that are not easily replaceable. If the piece would embarrass you to ship to a buyer, it does not list. It goes to donation or trash. Most resellers, including me at the start, are too generous with their condition assessment. A piece that “looks fine if you do not look closely” is not a piece that will get a five-star review. Returns and bad reviews destroy your seller rating faster than slow sales destroy your morale.
Filter two: brand value. The piece must come from a brand that has secondhand market recognition. Universal Standard, Eloquii, Torrid (selectively), Lane Bryant (selectively), Old Navy (only for in-season), J.Crew Extended Sizes, Madewell extended, Eileen Fisher, 11 Honoré, Henning, Anthropologie A-plus, Athleta, Madewell, Free People (selective), Ganni, vintage anything pre-2010. Brands the resale market does not value – off-brand SHEIN dupes, generic Amazon plus-size brands, the no-name resellers cannot place – do not list at a price that justifies the listing time. Those pieces go to donation.
Filter three: realistic resale price. The piece must be able to net at least $15 after fees. A piece that will list at $20 and sell at $15 will net you $12 on Poshmark. After packaging materials and the time to ship, you made about $9. For three minutes of photography, $9 is fine. For the cumulative time of listing, messaging buyers, and shipping, $9 is not enough to justify the cognitive overhead. The minimum net per sale, in my system, is $15. Pieces that cannot clear that go to donation. The donation has a small tax benefit if you itemize (the IRS allows fair-market-value deductions for donated clothing in good condition), which makes the math close to neutral even on pieces you do not sell.
The trash filter is the easiest one. If the piece has a stain, a tear, an odor, or any condition issue that means a thrift store will not resell it either, it goes to a textile recycling program. Most major cities have one – in Atlanta, the H&M store accepts any-brand textiles for recycling and gives a small store credit. The point of the trash filter is to stop sending genuinely unsellable items to a thrift store, where they become someone else’s problem.
The tax reality at $600 plus in resale income
The tax conversation is where most reseller content goes vague, and the vagueness costs sellers real money at year end. The 1099-K threshold, which is the dollar amount at which third-party platforms (Poshmark, Mercari, eBay, ThredUp, Depop) are required to send you a tax form and report your sales to the IRS, has been moving for several years and the 2026 threshold matters.
Under the original American Rescue Plan Act of 2021, the threshold was supposed to drop from $20,000 to $600 starting in tax year 2022, which would have meant any reseller who crossed $600 in gross sales on a platform would receive a 1099-K. The IRS delayed the implementation in late 2022, again in late 2023, and again in late 2024, phasing the threshold down in steps. The published schedule from the IRS for tax year 2026 sits at $2,500 in gross sales as the federal threshold, with the full $600 threshold scheduled to take effect for tax year 2027 unless Congress changes it again. Several states (Massachusetts, Vermont, Virginia, Maryland, and the District of Columbia among them) already have lower state-level thresholds, some at $600, which means resellers in those states may receive a 1099-K even below the federal threshold. Check your state’s revenue department site for the current number.
Here is the part that matters regardless of what number is on the IRS schedule: you are legally required to report all reselling income on your tax return, whether you receive a 1099-K or not. The 1099-K is just the platform’s report to the IRS. The income obligation exists from the first dollar. What the 1099-K threshold actually controls is the audit risk, not the legal obligation.
The good news for resellers is that the IRS treats reselling as a hobby or a business depending on intent and frequency, and either category allows you to deduct the cost basis of the item from the sale price before paying tax on the profit. A dress you bought for $4 and sold for $50 is taxable on $46 of profit, not $50 of gross. A dress you bought for $30 retail, wore for two years, and resold at $25 is a loss (you cannot generally deduct losses on personal-use property in a hobby context, but the loss means there is no tax owed on the sale either). The accounting work is the part most resellers skip. The fix is a simple spreadsheet with columns for date acquired, source, cost basis, date sold, platform, gross sale, fees, net sale, and category. Five extra minutes per sale. Saved at tax time.
For resellers who cross the $5,000 to $10,000 gross sales mark in a year and want to treat the activity as a business rather than a hobby, the deductions expand to include packaging materials, mileage to thrift stores, a portion of home internet, a portion of phone, the cost of a tripod and ring light, and other ordinary and necessary business expenses. A CPA who works with side-hustle clients – and most CPAs in major cities have at least a few – can structure this correctly for a flat fee of $300 to $600 a year, which is itself a deductible expense. The seller who does this correctly pays less in tax than the seller who does not. The seller who ignores it entirely pays no tax until they get audited, at which point they pay back tax plus penalties plus interest, which is a much worse outcome than the spreadsheet.
The 12-month plan with a real dollar target
Here is the part of the article where I tell you what success looks like, in numbers, twelve months from a starting point of zero or near zero. This is the prediction. This is what a sustainable plus-size reselling practice looks like one year out from the burnout moment I described at the top.
Month one through three is the build. The cadence is three listings per week, fifteen minutes a day of engagement, one Saturday morning a month sourcing new inventory at estate sales, consignment store clearance racks, or relatives’ closets. Total inventory at the end of month three sits around thirty-six to forty active listings. Gross sales in month one are probably $50 to $150. Gross sales in month two move to $150 to $300 as the closet fills out and the algorithm starts to recognize the account. Gross sales in month three crack $300 to $500. Net after fees and shipping concessions sits around seventy to seventy-five percent of gross. The seller is making roughly $200 to $375 a month in net side income by month three, which is real but is not life-changing.
Month four through six is the optimization. The seller adds a second platform (Vinted is my preferred pick for the zero-fee math, or eBay for vintage-leaning inventory). The seller refines pricing based on what actually sold and what sat. The seller writes templates for common buyer messages (a measurements template, a smoke-free-home template, a bundle-discount template) to cut response time. Listings expand to four a week as the rhythm becomes natural, but only if the seller is not feeling overwhelmed. Inventory turns over more cleanly. Gross sales by month six sit at $500 to $900 a month with net around $350 to $625.
Month seven through nine is the scaling decision. The seller looks at their data and decides whether to scale up to a third platform, whether to test Whatnot live selling, or whether to hold steady at the current rhythm. The right choice depends on the rest of the seller’s life. A seller with bandwidth to grow can add eBay or Depop and push gross sales to $800 to $1,200 a month. A seller without bandwidth can hold steady and accept the existing rhythm. Both choices are valid. Burnout is the only wrong choice.
Month ten through twelve is the consolidation. The seller has a clean inventory system, a tax spreadsheet, a buyer list, a few repeat customers, a feed presence on two or three platforms, and a routine that fits next to a day job without destroying weekends. Gross sales sit at $700 to $1,400 a month depending on how aggressively the seller pursued growth. Net side income runs $500 to $1,000 a month, which is $6,000 to $12,000 a year, which is meaningful for a side hustle and is taxed correctly because the spreadsheet exists. The seller has a closet that has shrunk back to manageable size because the inventory turns over. The Atlanta apartment is no longer a warehouse. The ring light stays on the desk. The Tuesday night photography session takes nine minutes instead of three hours.
The prediction I want to leave with the plus-size reseller reading this on her own version of a 9:47 pm Tuesday with her own ring light tipping over: twelve months from now, the sustainable plus reselling practice looks like a three-platform mix (Poshmark, Vinted, plus one of Mercari/eBay/Depop based on inventory style), a three-listing-per-week cadence holding firm, a $700 to $1,400 monthly gross target with a $500 to $1,000 monthly net, a one-hour-per-week total time budget plus the daily fifteen-minute engagement window, a clean tax spreadsheet that keeps you out of audit trouble, a slowly improving closet that gets thinner instead of thicker, and a buyer list of women in sizes 16 to 28 who message you when they need something specific because they trust you to source it. The dress that took three hours to photograph on the Tuesday I almost quit sold for $48 on day thirty-one. I learned to take its photo in three minutes. The dress that hasn’t been bought yet, the one that will be the next listing, is hanging in the closet. The cadence keeps me from burning the whole project to the ground. The plan keeps me from quitting in week six. The math, finally, works.
The Sintra-Cascais coastal walk outside Lisbon does not look hard on the map. You leave the Cabo da Roca lighthouse early enough to catch the Atlantic still gray and unwarmed, you point your shoes south along the dirt track that hugs the cliff edge, and you tell yourself the eighteen kilometers between you and the Praia do Guincho beach bar will dissolve into a long October afternoon of wildflowers and gull noise. That was the plan in 2025. The reality, by hour three, was that I’d stopped twice already to peel a pair of straight-size hiking shorts away from the inner-thigh seam that was sawing a quarter-sized raw patch into the left side of my body with every step, and I was doing the math on whether a Portuguese pharmacy would carry Body Glide or whether I was about to finish this walk smearing a granola bar wrapper between my legs as a barrier. The shorts had been an experiment. I’d bought them in the largest size the brand carried and had a Brooklyn alterations woman let out the waist by an inch and a half, because I’m a size 22 in pants and a 20-22 on top, and that was as close to a true plus hiking short as the brand offered. The alteration had been clean. The inseam hadn’t been altered. The inseam was the problem.
That is the shape of plus-size hiking in 2026. My hiking wardrobe is a Frankenstein of straight-size gear with the waists let out, a small rotation of true plus pieces from the three or four brands that actually carry above an 18, and a handful of items I bought in the men’s department because the cut handles my frame more honestly than the women’s “extended” run. I have walked or hiked trails in eight of the thirty-eight countries I have visited as a travel correspondent for this publication, and the through-line in every single one of those experiences is that the gear is not designed for me. It is designed for a 5’7″ woman in a size 8 and then graded up with the assumption that a body four sizes larger does not also have a longer inseam, a wider sit-bone spacing, more inner-thigh contact, and a chest that lives in a different geometric relationship to the shoulder seam than a fit model’s does. The grading does not handle any of that. The chafing math does. What follows is the field guide I wish someone had handed me before that Sintra walk, written for the woman who is size 18 and up, who walks or hikes for pleasure or fitness or both, and who would like to stop bleeding through her shorts on hour three of a perfectly normal Portuguese afternoon.
Plus-size hiking gear gap (where the industry stops)
The outdoor industry has a well-documented size cutoff problem. Most major brands stop their women’s run at XL or 16, a smaller subset extends to XXL or 18, and a much smaller subset, fewer than ten brands operating at any meaningful retail scale in 2026, carries through 3X or size 26. Outside Magazine has covered the gap across multiple pieces in recent years. The reporting documents that even brands marketing themselves as inclusive often cap their technical hiking gear, the pants, the rain shells, the base layers, at sizes well below where their casual or yoga-adjacent lines extend. The pattern is blunt. The outdoor industry has decided, repeatedly, that plus bodies are welcome in studios and welcome in promotional photography and not welcome on the actual trail.
The women doing the work to push against this gap are not industry insiders. They are athletes and they are visible. Mirna Valerio, the ultrarunner and trail athlete whose 2017 memoir “A Beautiful Work in Progress” remains the most-circulated single text in the plus-trail conversation, has been logging long-distance trail miles at size 22 and above for over a decade. Her sponsorship history with Merrell and her ongoing speaking work have done more to legitimize the plus body on a trail than any brand campaign. Latoya Shauntay Snell, the ultramarathoner and founder of Running Fat Chef, has run over two hundred races including multiple ultramarathons at a body size that the running industry has spent decades pretending does not exist. Snell has written and spoken publicly about the gear hunt as a separate athletic event from the running itself. When two women at the very top of the plus endurance world have to spend hours per gear cycle hacking together functional kits from a market that does not want to sell to them, the gap is not a niche complaint. It is the industry’s default state.
The brands that actually serve plus hikers in 2026 are a short list. REI Co-op extends its in-house brand through 3X across most of the technical line, and the extension has held through multiple seasonal drops, which is the durability test that separates a real commitment from a press-release commitment. Columbia carries through 3X across most of its hiking line, including the pants, which is the category most brands cut first. Patagonia carries through XS-3X on most hiking-relevant pieces, with the Torrentshell rain shell topping at XXL. prAna sizes through 3X across most of its hiking pants and tops with a brand-level commitment to the extended run that predates the 2020 inclusivity wave. Athleta carries through 3X across most of its outdoor-adjacent line, with the caveat that the brand’s hiking-specific technical pieces are thinner on the ground than its yoga or running offerings. That’s essentially the bench. A handful of brands. The rest of the market either stops at XL or pretends to extend without actually grading the technical pieces.
Base layers (top and bottom) for cold/hot
The base layer is the most-skipped piece in a plus hiker’s kit and the piece that pays back the fastest. The function of a base layer is moisture management. It pulls sweat off the skin, moves it into the next layer, and dries fast enough that the wet fabric does not chill you when you stop moving. In a plus body, this matters more than in a straight-size body, because the body produces more heat under load, sweats more across more surface area, and has more skin-on-skin contact where wet fabric becomes a chafing event rather than just a temperature event. A cotton t-shirt under a hiking shirt is the single most common gear error I see on plus beginners on a trail, and it is the one that ruins more walks than any other.
The fabric to know is merino wool. Merino is naturally moisture-wicking, antimicrobial enough that it doesn’t smell after a multi-day hike the way synthetic fabrics do, and warm-when-wet in a way that no other fiber matches. The weight is the variable. Merino base layers are sold by gram weight per square meter, and the meaningful range for hiking is roughly 150 grams per square meter for warm-weather and shoulder-season use, 200 grams per square meter for cold-weather use, and 250 grams per square meter for genuinely cold conditions. Smartwool’s Classic Thermal Merino crew runs at 250 grams and sizes through 3X at around $130 as of 2026. Their Classic All-Season Merino crew runs at 150 grams and sizes through 3X at around $110. I own both. The 250-weight has earned its place on every shoulder-season trail day I’ve done since 2023. The 150-weight is the one I pack for summer alpine starts, where the dawn temperature is in the forties and the afternoon temperature is in the seventies and the layer has to handle both ends.
The base layer bottom is the piece almost no plus hiker owns and the piece that closes the kit. A merino bottom under a hiking pant in cold weather extends the temperature range of the pant by roughly fifteen degrees Fahrenheit and adds essentially no weight in your pack. Smartwool’s Classic Thermal Merino bottom in 250 weight sizes through 3X at around $115 and is the piece I’d buy first if I were rebuilding the kit. The fit is high-rise, the inseam is generous in the plus grading, and the gusset construction doesn’t pull at the inner thigh the way many bottoms do. The lower-priced alternative is REI Co-op’s Merino base layer bottom (the 185-gram weight in current production) through 3X. The fabric is lighter than the Smartwool 250, the construction is slightly less refined at the waistband, but the piece is competent and durable and is the entry-point version of this category.
The synthetic alternative to merino is polyester or polypropylene, both of which dry faster than wool, weigh less, and cost roughly half as much. The trade is smell. Synthetic base layers retain odor after one day of use in a way that merino doesn’t, which matters on a multi-day hike where you can’t wash. For day hiking, a synthetic base layer is perfectly functional. The Patagonia Capilene Cool Daily Long-Sleeve Shirt at around $49 through XXL is the workhorse synthetic top in the category. Patagonia carries this piece in plus, which most synthetic-base-layer brands don’t, and the fabric has held up through three years of weekly wear in my rotation.
Hiking pants vs. shorts vs. skort at size 22 (chafing math)
This is the section that the Sintra failure prompted. The choice between pants, shorts, and skort on a plus body is not an aesthetic question. It is a physics question about how much inner-thigh contact your specific body has, how much moisture sits between those surfaces under load, and how the fabric of each option handles the friction generated by that contact across the duration of a walk. The chafing math is unforgiving and personal. A pair of shorts that work for one plus hiker will saw a raw patch into the next plus hiker’s thigh, because the geometry of where the inseam sits and the surface area of skin contact varies meaningfully even between two women at the same dress size.
Hiking pants are the safest default for plus bodies and the option I reach for first on any walk longer than ten kilometers. The function is straightforward. The fabric covers the skin-on-skin contact zone entirely, removes the chafing variable, and lets the pant material rather than your skin handle the friction. The category leader for plus hikers in 2026 is the prAna Halle Straight Pant in the plus grading through 3X at around $99. The fabric is a nylon-spandex stretch-woven with a water-repellent finish and a roll-up tab at the calf for warm conditions. The construction includes a gusseted inseam, the single most important feature in a plus hiking pant. The gusset is a diamond-shaped panel of fabric inset at the crotch that distributes the strain across multiple seams rather than concentrating it on one. Without a gusset, a plus hiking pant tears at the inseam within a season of regular use. With one, the pant lasts years. The Halle has it. Most plus pants don’t.
The REI Co-op Sahara Convertible Pant at around $80 through 3X is the lower-priced alternative and the pant I’ve logged the most miles in. The fabric is a nylon ripstop with a UPF 50 finish, and the convertible feature zips off the lower leg at the knee to convert the pant into a short. The piece isn’t as polished as the prAna in fit, the waistband is a flat elastic rather than a structured band, and the cargo pockets are oversized in a way that catches branches on overgrown trails. None of that has stopped the pant from being durable through roughly two hundred miles of trail use. The conversion zipper is real and functional, and on a long day where the morning is cold and the afternoon is hot, the ability to drop the legs at lunch is the feature that pays for the pant.
Hiking shorts are the option I now wear only on flat trails of under ten kilometers and only with a chafing prevention layer underneath. The prAna Halle Short at $69 through 3X is the short I trust, with the same gusseted construction as the pant, a five-inch inseam in the plus grading (which is roughly an inch longer than the straight-size version, a correct grading choice), and the same nylon-spandex fabric. The short alone is not the failure mode. The short with no anti-chafing layer underneath is. The fix is a pair of bike shorts or a chafing-prevention short worn beneath the hiking short. The Undersummers Shortlette in their plus sizes through 5X at $26 is the slip short most plus hikers I know wear under everything from dresses to hiking shorts. The fabric is a 92 percent nylon, 8 percent spandex blend with a wide flat band at the leg opening that does not roll up under friction. The combination of a hiking short and an Undersummers slip is the kit that lets a plus body wear shorts on a hike. The hiking short alone is not.
The hiking skort is the option I came around to slowly. The function is a built-in short under a skirt panel, which removes the chafing concern entirely while keeping the fabric coverage of a pant on the underside. The Title Nine Clamber Skort goes to 18 and does not work for me as drafted. The Athleta Trekkie North Skort at $89 through 3X does work. The fabric is a 92 percent nylon, 8 percent spandex stretch-woven, the inner short has a six-inch inseam in plus, and the skirt panel sits at the knee without bunching at the back. The skort has become my default summer hiking piece in hot and humid conditions, where the additional ventilation between the skirt and short layer is meaningful, and where the shape of the piece reads as deliberate rather than apologetic on the trail.
Tops: cooling tech-tee reality
The hiking tee category is the place where plus options have improved the most over the last three years and where the marketing language is still the most inflated. Every major brand sells a “cooling” tech tee. Most of them are simply a polyester knit with a moisture-wicking finish that wears off after roughly thirty wash cycles. The pieces that actually deliver the cooling claim are the ones with either a meaningfully higher percentage of mechanical-cooling yarn, the ones with a structural mesh ventilation panel under the arm or across the back, or the ones using a phase-change material that responds to body heat. Most of the market does none of these things and charges a premium for the marketing copy.
The Columbia Silver Ridge Tech Tee at $40 through 3X is the workhorse in the category. The fabric is a 100 percent polyester with the brand’s Omni-Wick and Omni-Shade finishes, UPF 50 rated, and the construction includes a back yoke vent panel that is a real ventilation feature rather than a styling line. I own this tee in four colors. I wear them on rotation through the summer season. The fabric handles two hundred miles of use without pilling at the underarm, which is the failure point on cheaper tech tees, and the UPF rating is the feature I would not give up. On a fully exposed ridge walk at altitude, a UPF 50 fabric on the back and shoulders is the difference between a sunburn and a finished hike.
An Athleta-style tech tee at around $44 through 3X is the third workhorse in this category, with a nylon-elastane blend that dries faster than the Columbia polyester and feels less plasticky against the skin. Athleta cycles their core tech tee names every season; whatever the current SKU is, the construction stays roughly consistent.
The upgrade once you’ve logged enough miles to justify it is the Patagonia Capilene Cool Trail Shirt at around $59 through XXL. The fabric is a recycled polyester knit with a structured shoulder seam, dropped to sit off the actual shoulder rather than on top of it, which means the strap of a pack doesn’t run a friction line directly on the seam. This is a construction detail most tee designers don’t think about and one that matters enormously when you’re carrying any kind of pack on a multi-hour walk. The Patagonia version costs more than the Columbia. The shoulder seam alone pays back the difference.
Lightweight jacket: rain vs. wind layer
The lightweight jacket category is two separate categories that brands often blur. The rain shell is a fully waterproof piece, typically with a Gore-Tex or proprietary equivalent membrane laminated to the face fabric, that handles sustained precipitation. The wind layer is a lighter, often non-waterproof piece designed to cut wind and shed light moisture without the bulk or breathability cost of a full rain shell. A complete plus hiking kit needs both. Most plus shoppers own only one, usually the rain shell, and end up wearing it as a wind layer because the brand sold the rain shell as a “do-everything” piece. It is not. The breathability cost of a waterproof membrane is real, and wearing a rain shell as a windbreaker on a moderate-effort hike will leave you wet from the inside out within an hour.
The rain shell in the plus category that actually delivers in 2026 is the REI Co-op Rainier Rain Jacket at around $130 through 3X. The fabric is a 2.5-layer proprietary waterproof-breathable membrane, seam-sealed at every construction line, with pit zips that open under the arm to dump heat when the rain is light but you’re working hard. The pit zips are the feature. A rain shell without pit zips is functionally a sauna on a moderate climb. The Rainier has them. The Patagonia Torrentshell 3L at around $179 through XXL is the higher-end alternative, with a true 3-layer membrane that breathes meaningfully better than 2.5-layer constructions at the cost of bulk and weight. Columbia’s OutDry Extreme line is the technical alternative, with a Columbia-proprietary membrane that performs at a similar level at a slightly lower weight.
The wind layer is the piece most plus hikers skip. The function is a sub-six-ounce shell that packs into its own pocket, lives in the bottom of a daypack, and comes out the moment a ridge wind starts cutting heat off your core. The Patagonia Houdini Air Jacket at $129 through XXL is the canonical piece in this category. The fabric is a 0.7-ounce per square yard recycled nylon ripstop with a durable water repellent finish, not waterproof but water-resistant to a meaningful degree, and the piece weighs roughly three ounces in a 1X. The Houdini Air is one of two or three pieces in my entire kit that has earned its weight every single trip. It is the piece I forget I am carrying until the moment I need it, and then it is the piece that saves a hike from becoming a death-march of cold misery.
The pattern most experienced trail writers flag is that hikers buy the visible piece, the rain shell, because the rain is the visible threat. The wind is the invisible one, and the one that takes more hikers off the trail. The wind layer is a base purchase, not an optional one – I’ve internalized this after enough cold ridge experiences to know it’s correct.
Socks: the merino case (Smartwool, Darn Tough)
The sock is the smallest and most-overlooked piece of the kit and the piece that controls more of your hiking comfort than any other item except the shoe. A cotton athletic sock on a hike will produce a blister within ten kilometers in most conditions, because cotton absorbs sweat, holds it against the skin, and softens the foot tissue until friction tears it. A merino sock at the correct weight does the opposite. It moves sweat away from the foot, dries fast, regulates temperature across a range of conditions, and resists odor across multi-day use.
The two brands that matter in this category are Smartwool and Darn Tough. Both make merino socks at the weights and constructions that hiking actually requires. The crucial detail for plus hikers is the sizing. Plus women often have larger feet, in the range of US 10 to 13, and many sock brands stop their sizing at a women’s 10 or 11. Smartwool sizes its women’s socks through size 11.5 in most styles, with men’s options that go meaningfully larger and that fit a wider foot honestly. Darn Tough sizes its women’s socks through 11.5 and offers a wide-calf option in select styles that fits plus calves without rolling at the cuff, which is a fit issue most sock brands ignore entirely.
Smartwool’s Hike Classic Edition Full Cushion Crew Sock at around $26 through size 11.5 is my baseline hiking sock. The fabric is a merino wool, recycled nylon, and elastane blend, with cushioning across the heel and ball and a flat seam at the toe. The sock has lasted me roughly four hundred miles of use without a hole, which is the wear-life that justifies the price. The Darn Tough Hiker Boot Sock Full Cushion at around $25 through size 11.5 is the alternative I rotate with. The Darn Tough construction is heavier, the cushioning more pronounced, and the brand offers a lifetime warranty they actually honor (mail in a worn sock, receive a replacement, no proof of purchase required).
The sock detail that most beginners miss is to buy two pairs and rotate them across a multi-day hike, washing one in a stream or sink while wearing the other. A merino sock dries overnight in most conditions. The rotation extends the wear-life of both pairs and keeps a clean dry sock on the foot every morning, which is the single largest blister-prevention move you can make.
Hiking shoes for wide feet (Hoka, Altra, Oboz)
The shoe is the most expensive single piece in the kit, the most personal, and the piece where the plus-body fit conversation overlaps with the wide-foot fit conversation in a way the industry has been slow to acknowledge. Plus women often have wider feet, both because heavier bodies spread the metatarsal arch over time and because the population of plus women includes a meaningful number of women whose feet were always wider than the standard women’s last accommodates. The default women’s hiking shoe is built on a B-width last, which is narrower than the D-width that fits most plus feet honestly. The fix is to buy in wide widths, and the brands that offer wide widths in their hiking shoes are the brands that earn the plus market.
The Hoka Speedgoat 6 in the wide width at around $155 is the shoe I’ve logged the most plus-trail miles in over the last two years. The Speedgoat is a trail running shoe rather than a hiking boot, with the maximalist cushioning that has defined Hoka since the brand launched in 2009. The wide width accommodates a foot up to a D-width comfortably. The cushioning matters in a plus body. The impact load on every step in a heavier body is higher, and the maximalist stack height on the Speedgoat absorbs more of that load than a traditional low-stack hiking boot does. The shoe is the most-recommended trail shoe in plus running and hiking communities for a reason. The fit is generous, the cushioning is genuine, and the wide width is meaningfully wider than the regular width rather than a token half-step.
The Altra Lone Peak 9 in the wide width at $150 is the alternative for hikers who prefer a zero-drop construction. Altra’s design philosophy is foot-shaped (a wider toe box than the industry standard) and zero-drop (no heel-to-toe height difference), which suits hikers with wide feet and a forefoot-strike gait. The Lone Peak is not for everyone. The zero-drop construction takes weeks to adapt to if you are coming from a traditional heel-elevated shoe, and the lower stack height transmits more trail feel through the foot in a way that some hikers find tiring on longer days. For the hikers it does suit, it is the shoe that earns long-term loyalty.
The Oboz Bridger Mid Waterproof in wide widths at $190 is the boot rather than the trail-runner in this category. Oboz has been making honest wide-width hiking boots since the brand’s founding and is one of the few outdoor brands to offer wide as a genuine fit option rather than a marketing label. The Bridger Mid is a full-grain leather upper, a Vibram outsole, and a B-Dry waterproof membrane, with a structured ankle support that the trail-runners do not provide. The boot weighs more than a trail-runner (roughly thirty-three ounces per pair in a women’s 10 wide), and the trade is honest. You get ankle support, you get waterproofing that holds up across years, and you get a sole stiffness that handles loose scree and uneven terrain better than a trail-runner does. For multi-day backpacking with a heavier pack, the boot is the correct call. For day hiking on established trails, the trail-runner is. I own both. They serve different days.
The education resources at REI Co-op, including the brand’s long-running expert classes and online gear guides, have been the most reliable single source I have found for matching a plus body and a wide foot to the correct shoe. REI’s free expert advice service is staffed by people who actually walk the gear they recommend, and the advice I have received across multiple in-store fittings has been markedly more useful than what most online quizzes produce.
The 50-mile gear durability check
The gear-durability problem in plus hiking is meaningfully different from the gear-durability problem in straight-size hiking. The same physical wear factors that cause early failure in plus clothing (more friction at the inseam, more stress at the seat seam, heavier load on the shoulder strap of a pack) apply to hiking gear, and the brands that grade their plus pieces honestly versus the brands that just resize them shows up around mile fifty of regular use. Mile fifty is the rule of thumb I have arrived at after roughly five years of buying and burning through plus hiking gear. If a piece is going to fail in the inseam, the seat, the underarm, or the cuff, it fails by mile fifty. If it makes it past fifty miles of regular use, it usually lasts the season.
The test is simple. Buy the piece. Wear it on roughly five to ten hikes ranging from five to ten kilometers each. At the fifty-mile mark, inspect the high-stress zones. Look at the inseam stitching for any pulling, any thinning, any visible thread separation. Look at the seat seam for the same. Look at the underarm for pilling on a synthetic top or felting on a merino base layer. Look at the cuff and hem for any rolling, fraying, or stretching out of shape. The pieces that pass the fifty-mile check are the pieces worth investing in. The pieces that fail it are the pieces to return inside the brand’s return window if possible and to flag in your own notes as a one-season piece rather than a long-term investment.
The pieces that have passed the fifty-mile check in my own rotation include the prAna Halle Pant (currently at roughly four hundred miles with no failure), the REI Co-op Sahara Convertible Pant (roughly two hundred miles, one minor pulling at the conversion zipper that has not progressed), the Smartwool Hike Classic Full Cushion Crew Sock (multiple pairs at four-hundred-plus miles each), the Patagonia Houdini Air Jacket (three years of use, no failure), and the Hoka Speedgoat 6 (replaced at roughly five hundred miles, which is the expected wear-life of a maximalist running shoe). The pieces that have failed inside fifty miles in my own testing include three different pairs of straight-size hiking shorts that were altered to fit (all failed at the inseam where the alteration did not extend to), a Title Nine hiking dress that pilled across the chest and back by mile thirty, and a budget-tier rain shell I will not name that delaminated at the underarm seam at roughly mile forty-five.
What to skip from straight-size hiking advice
The bulk of available hiking advice on the internet is written for straight-size bodies by writers who have never had to think about plus-specific gear failure. Most of it is still useful. Some of it is actively wrong for a plus hiker and worth flagging.
Skip the advice to size up in everything. The default plus-shopper move when buying hiking gear, after years of being underserved by sizing, is to add a size to anything that comes close to a fit. This is wrong in hiking specifically. A pant that is too large at the waist will sag under the weight of a hip belt and will chafe at the inner thigh because the fabric drapes into the contact zone rather than sitting clean above it. A top that is too large at the shoulder will catch under a pack strap and will work itself into a friction point across a long day. Buy your true size in technical hiking gear, even if the number on the tag is uncomfortable to look at. The piece is engineered to fit in the size it is labeled, and sizing up degrades the engineering.
Skip the advice to wear cotton in hot weather. This is a piece of advice that circulates in casual walking communities and is wrong for any hike longer than two kilometers in a plus body. Cotton holds sweat, softens skin, and accelerates chafing. The right move in hot weather is a lighter-weight synthetic or merino layer, not a cotton one. The “cotton breathes” claim is true in still air and a flat sit-down setting. It is not true under load with any kind of friction, and a plus hiker has more friction than a straight-size hiker by default.
Skip the advice to break in hiking boots over weeks before a trip. Modern hiking shoes, particularly trail-runners like the Hoka Speedgoat or the Altra Lone Peak, do not require break-in in the way leather boots from two decades ago did. The right move with modern trail shoes is to walk a few short distances in them to confirm fit and then take them on the trail. Excessive break-in walking in shoes that do not need it accelerates the wear on the cushioning and shortens the in-trail wear-life. Boots like the Oboz Bridger Mid do still benefit from a few weeks of break-in, because the full-grain leather upper genuinely softens with wear. The distinction matters and the blanket “always break in your boots” advice does not preserve it.
Skip the advice to invest in expensive trekking poles before you’ve logged enough miles to know you need them. Trekking poles are a meaningful upgrade for some hikers in some terrain. The honest answer is that poles help on steep descents (where they take impact load off the knees) and on long sustained climbs (where they distribute effort to the upper body). They don’t help meaningfully on flat or rolling terrain and add weight and pack-management complexity. Buy a pair only after you’ve done enough hiking to identify your own terrain preferences. Then buy them once. Black Diamond Trail Ergo Cork at around $130 is the pole most experienced hikers I trust recommend.
Skip the advice that you need to lose weight before you can hike. This is the most damaging piece of advice in the entire conversation and the one Mirna Valerio and Latoya Shauntay Snell have spent careers refuting. The hike is the practice. The body that arrives at the trailhead is the body that does the hike. The gear conversation in this article exists precisely because the trail is for the body you have, not for the body the industry wishes you had.
The 7-piece starter kit with named brands
Here is the kit. If you are buying from zero in 2026 and you want a complete plus-size walking and hiking starter setup that will handle three-season conditions in most temperate environments, this is what to buy. Seven pieces. Seven brands. The specific items I would put on a friend’s list if she texted me from her phone in the REI parking lot asking what to walk in with.
Base layer top.
Smartwool Classic All-Season Merino Base Layer Long-Sleeve Crew at $110 in your true size through 3X. The 150-gram weight handles cold mornings and warm afternoons across a shoulder-season range. This is the piece that lives in your pack on warm days and comes out at the trailhead on cold ones.
Base layer bottom.
Smartwool Classic Thermal Merino Bottom in 250 weight at $115 through 3X. The 250 weight is the warmer option and the one I would buy first if you are choosing only one bottom. The high-rise cut and the generous inseam in the plus grading are the construction details that earn the price.
Hiking pants.
prAna Halle Straight Pant at $99 through 3X. The gusseted inseam is the construction feature you cannot skip. The roll-up tab handles warm afternoons. The water-repellent finish handles light rain without requiring the rain shell to come out. This is the workhorse pant of the kit.
Fast-dry tee.
Columbia Silver Ridge Tech Tee at $40 through 3X. The UPF 50 finish and the structural back yoke vent are the features that justify the price over a generic athletic tee. Buy two or three in colors you will actually wear.
Lightweight jacket.
Patagonia Houdini Air Jacket at $129 through XXL. The wind layer is the piece most plus hikers skip and the piece that most often saves a hike from becoming a cold-misery event. The three-ounce weight and the pocket-stuffable construction mean the jacket lives in your pack without consequence until you need it.
Sock pair.
Darn Tough Hiker Boot Sock Full Cushion at $25 in your true size through 11.5. Buy two pairs from the start. The lifetime warranty matters and the rotation across multi-day use matters more.
Shoe.
Hoka Speedgoat 6 in the wide width at $155. The cushioning handles plus-body impact load honestly. The wide width fits a wider foot without crowding the toe box. The trail-runner construction handles most non-technical terrain that most day hikers actually walk.
That kit, bought at full retail, lands at roughly $683 before tax. Roughly half of that ($284) is the shoe and the rain jacket equivalent (we left out the rain shell because the wind layer is the piece I would buy first and the rain shell is the piece I would add second once you have hiked enough to know which climate range you most often walk in). The kit will handle most three-season day hiking in most temperate climates. It will not handle alpine winter conditions, multi-day backpacking with a heavy pack, or extreme heat above one hundred degrees Fahrenheit. Those are different kits and different conversations.
The challenge I want to leave you with is this. Pick one piece off this list. Not all seven. One. Buy it this week. Wear it on the next walk you take, whether that is a five-kilometer loop in your neighborhood park or an eighteen-kilometer coastal walk outside Lisbon. The kit is not the goal. The walk is the goal. The kit is what makes the walk something you finish without bleeding through your shorts at hour three. If the piece you pick is the prAna Halle Pant, you will know on the second walk that the gusseted inseam is real and the alteration-tax is gone. If it is the Smartwool sock, you will know on the first walk that the blister you got the last time was not your fault, it was the sock. If it is the Hoka Speedgoat, you will know on the first descent that the cushioning is the difference between a sore knee at the end of the day and a finished hike. Pick the piece. Walk in it. The next piece becomes obvious from there. The trail is waiting and it has been waiting and the body that arrives at it is the right body. Start with one piece. Start this week.
It was a Wednesday afternoon in October 2024, the kind of late-fall Atlanta day where the air had finally cooled and the dogwood outside the office window had started to turn copper, and I was sitting on the paper-covered exam table at a primary care office in Brookhaven trying to describe what had been happening to my chest. Palpitations. Three or four times a week. Sometimes when I was sitting on the couch, not climbing stairs, not even reaching for a glass of water. I had written notes in my phone for two weeks before this appointment so I could be exact about it. The new patient form had asked me to rate my symptom severity on a one-to-ten scale and I had circled six and added a sentence in the margin. The doctor walked in, looked at the intake sheet, looked at me, and the first complete sentence he said to me was about my BMI. The second sentence was that we should “address that first before chasing anything else.” The third sentence was “lose twenty pounds and see if the palpitations resolve.” He had not listened to my heart. He had not asked when the palpitations started. He had not asked about my family history of arrhythmia, which is significant and which I had written on the form. I walked out of that office twenty-three minutes after I walked in, sat in my car in the parking deck, opened the Notes app, and wrote one sentence at the top of a fresh page. “I am building the list differently now.”
That list is the reason this article exists. What I did between October 2024 and the spring of 2025 was systematically rebuild how I found doctors. I stopped using insurance portals as my starting point. I stopped relying on word-of-mouth from women whose bodies looked nothing like mine. I built a process, with directories that actually exist, scripts that actually work in an exam room, and a set of rules for when to stay and when to leave. I have walked maybe two dozen plus-size women through this process in the year since, and the framework is durable enough now that I want to put it in print. If you have ever been told your symptom is your weight before the doctor heard the symptom, this is for you. If you have ever postponed a Pap smear or a thyroid check because the appointment itself is the thing you are most afraid of, this is for you. If you have a daughter, a sister, a wife who has told you the doctor’s office is the place she dreads more than any other room in her life, hand her this. The work of finding a doctor who will treat you as a person before they treat you as a body mass index is real work, and it is doable, and you do not have to invent the playbook from scratch.
The medical-fatphobia research (named studies, real numbers)
The first thing to understand is that what happened in that Brookhaven exam room is not a one-off. It is a measurable, replicated pattern in the peer-reviewed literature, and the literature is now substantial enough that it cannot be dismissed as anecdote. Sean Phelan and colleagues published a 2015 review in
Obesity Reviews
titled “Impact of weight bias and stigma on quality of care and outcomes for patients with obesity” that pulled together the evidence on what providers actually do when they see a fat patient. The pattern across studies is consistent. Providers spend less time with higher-weight patients. They build less rapport. They are less likely to refer for further diagnostic testing. They attribute symptoms to weight at a higher rate, and they do this before completing the standard differential diagnosis a thinner patient would receive. That is not a moral failing of individual doctors. It is a systemic pattern visible in the data.
The Phelan paper matters because it gave clinicians the citation they needed to start talking about this internally. The earlier work that opened the door is Angelina Sutin and Antonio Terracciano’s 2013 paper in
PLOS One
, “Perceived weight discrimination and obesity,” which followed a cohort of more than six thousand adults across two waves of the Health and Retirement Study and found that experiencing weight discrimination was associated with a meaningfully higher risk of remaining at higher weight, controlling for all the variables you’d expect. The takeaway, which the authors stated plainly, is that the stigma itself does not produce the behavioral change clinicians were assuming it produced. The stigma produces avoidance. Of doctors. Of gyms. Of food eaten in public. Of the very behaviors the stigma is theoretically supposed to incentivize. The intervention does not work, the intervention causes harm, and the data has been clear about this for over a decade.
Aubrey Gordon, in her 2020 book “What We Don’t Talk About When We Talk About Fat,” compiles the lived-experience side of this with a level of citation most popular books in this space do not bother with. Her chapter on healthcare is the one I have given as a printed photocopy to more women than any other piece of writing on this topic. Gordon names the specific mechanism. The fat patient walks in with a symptom. The doctor sees the body before they hear the symptom. The symptom gets recoded as a weight issue, which means the symptom does not get investigated, which means the actual underlying condition – the gallstones, the thyroid, the cardiac, the endometriosis – goes undiagnosed for months or years longer than it would in a thinner patient. Gordon names women who died from delayed diagnoses where the chart, in retrospect, showed the relevant symptom flagged at multiple visits and dismissed as weight. The book is not theoretical. The book has names in it.
Dr. Joshua Wolrich, an NHS surgeon in the UK whose 2021 book “Food Isn’t Medicine” is the most accessible introduction to the actual evidence on weight and health that I have found, makes the medical case from inside the profession. Wolrich’s argument is that the equation of weight with health is bad science, that BMI was never designed as a clinical diagnostic tool (Adolphe Quetelet developed it in the 1830s as a population-level statistical measure, not an individual one), and that the practice of using BMI as a gatekeeping mechanism for further investigation is one of the more damaging legacies of twentieth-century medicine. He is not an outlier. He is a working surgeon writing what the data already shows. The reason his book matters for plus-size women is that he gives you the citations to hand a skeptical doctor. The conversation in the exam room goes differently when you can cite Wolrich citing the underlying meta-analyses than when you are arguing from feeling.
Dr. Sand Chang, an Oakland-based psychologist who has worked with Stanford counseling services and Kaiser Permanente Transgender Services and is one of the most cited voices in HAES-aligned mental health care, has done the work of connecting medical fatphobia to its compound effects on patients who are also queer, trans, disabled, or fat at the intersection of multiple marginalizations. Chang’s clinical writing and conference work through HAES-aligned channels and the Association for Size Diversity and Health makes the case that the experience of being a fat patient isn’t separable from the other axes a patient is being read along. The trans plus-size patient does not experience medical fatphobia and transphobia as two separate events. They experience a single compound exposure that doubles or triples the rate of substandard care. I will return to this in a dedicated section because it deserves more than a sentence.
The research, in aggregate, gives you three things you can bring into an exam room. First, you can name the pattern. The dismissal of your symptom as a weight issue is not personal, it is documented, and it is wrong. Second, you can cite the work. Phelan 2015 and Sutin 2014 are the two names to remember if you ever need to push back with a doctor who claims this is “just political.” Third, you can stop blaming yourself for the avoidance. If you have postponed appointments for months or years because of how doctors have treated you, that is a documented response to a documented pattern. The avoidance is not your weakness. It is your nervous system telling you the room was not safe.
The 4 directories that actually work
The directory question is the one I get asked most often, and the honest answer is that no single directory covers every zip code in the United States. What works is using four of them together, cross-referencing, and accepting that for many people the first usable name is going to be a telehealth provider until a local option opens up. The four I trust enough to send women to are below, in the order I would use them.
The first is the Association for Size Diversity and Health (ASDAH) Health At Every Size practitioner list. ASDAH is the organization that holds the HAES framework, and their directory is the closest thing to a vetted national list of providers who have signed onto the principles. The principles themselves are public on the ASDAH site and worth reading in full before you start the search, because they tell you what a HAES-aligned provider is committing to. The list itself is searchable by state and by specialty. The limitation is that it covers practitioners who have actively opted in, which means a doctor in your zip code who practices weight-inclusive medicine but has not signed up will not appear. Use it as a floor, not a ceiling. The web address moves periodically, so I will say only that searching “ASDAH HAES practitioner directory” will get you there.
The second is the Center for Body Trust provider directory (formerly Be Nourished), run out of Portland by Hilary Kinavey, a licensed professional counselor, and Dana Sturtevant, a registered dietitian, who together built the Body Trust framework starting in 2005. Their directory leans heavier on therapists and dietitians than on MDs, but their listings are higher-vetted than ASDAH’s because providers go through a Body Trust certification process before they appear. If you are looking for a HAES-aligned therapist or RD in addition to an MD, Be Nourished is the better starting point. For OB-GYN and PCP specifically, you will still need to cross-reference with ASDAH or Plus Size Birth.
The third is the Plus Size Birth provider list, curated by Jen McLellan, who has been doing public-facing plus-size pregnancy and birth work since 2013. McLellan’s directory is the most operationally useful one I know of if you are pregnant, trying to conceive, or in active OB-GYN care. The reason is that she screens for specific behaviors. Does the provider use weight-inclusive language in their intake. Do they have appropriately sized blood pressure cuffs and exam gowns. Do they refuse to weigh you on request without making it a fight. The screening criteria are listed on her site. Even if you do not find a provider in your zip code, McLellan’s site is worth reading for the questionnaire she uses to evaluate them, which you can adapt for your own search.
The fourth is the curated reading work of Sonalee Rashatwar, the licensed clinical social worker and sex therapist known publicly as The Fat Sex Therapist. Rashatwar’s referral lists are not a formal directory in the same way the others are. They are recommendations across her published work and her social presence, often pointing to specific named providers in specific cities. The reason her network is useful is that she works at the intersection of fat liberation, queer health, and trauma-informed care, and the providers she points to have usually been vetted through that triple filter. If you are queer, fat, and have a trauma history with medical care, Rashatwar’s named referrals are often the first place a usable doctor surfaces. Her work also explicitly addresses the South Asian and broader diaspora plus-size community, which most other directories do not.
Two honorable mentions that I use as cross-reference layers. The Body Positive Therapist Directory, maintained by Connie Sobczak and Elizabeth Scott’s Body Positive organization, is mental-health-focused but worth searching if you want a therapist who will not pathologize your body. And the Size Friendly Care lists curated by various HAES-aligned advocates – including some of Rashatwar’s network – circulate in fat-liberation spaces and occasionally surface specific providers who do not appear in the formal directories. Search for them, but verify everything. A name on an informal list is a lead, not a credential.
How to vet a doctor before the first visit (questionnaire)
The directories give you names. They do not tell you, before you walk in, whether the office itself will treat you well. The vetting work happens between finding the name and booking the appointment, and it is the step most women I work with skip because it feels confrontational. It is not confrontational. It is administrative. You are gathering information that any consumer of any service is entitled to gather. The phone call to the front desk before you book is the first filter, and a good one.
The call sounds like this. “Hi, I am considering becoming a patient and I have a few questions before I book. Do you have a weight-inclusive or HAES-aligned approach to care. Do you have blood pressure cuffs sized for larger arms and exam gowns sized over 2X. Is it possible to decline being weighed at visits when weight is not clinically necessary for the appointment.” Three questions. Each one tells you something. The pause before the answer tells you almost as much as the answer. A front desk that has heard the questions before will have a clean reply. A front desk that has not will get defensive or confused. Both are data.
The deeper vetting happens through the office’s online presence. Look at the provider’s bio for language clues. Words like “weight management,” “obesity medicine,” and “weight loss counseling” in the practice description are flags. Not always disqualifying, but flags. Words like “body diversity,” “weight-inclusive,” “HAES,” “intuitive eating,” or “non-diet approach” are positive signals. If the practice has a patient portal you can preview, check whether the intake forms ask for weight as a first-line data point or whether they ask about it contextually. The forms are written before you walk in, and they tell you what the practice considers central.
Reviews are useful but read them with a filter. Plus-size women leave reviews using a specific vocabulary that other patients do not. If you see reviews mentioning “the doctor actually listened,” “did not blame my weight,” “took my pain seriously,” those are usually from plus-size or chronic-pain patients who have learned to signal this carefully. Conversely, reviews celebrating a doctor for being “honest about my weight” or “telling it like it is” are usually a warning. The vocabulary tells you who the practice serves well.
The final pre-visit step, which I now do for every new provider, is sending a pre-visit email. I will give you the template in the next section. The purpose of the email is to surface the obvious flags before you have invested the copay and the time. If the provider’s response is gracious, the appointment is likely to go well. If the response is dismissive or defensive, you have saved yourself a wasted visit. Some providers will not respond at all, which is its own answer.
The pre-visit email template (copy-paste version)
Here is the email I send. You can copy it verbatim, change the specifics, and adapt the symptom to whatever you are actually coming in for. It runs about one paragraph because longer emails do not get read by front-desk staff and shorter emails do not surface the actual information you need.
Subject line: New patient inquiry, [your name], approach to weight-inclusive care
“Hello, my name is [first and last] and I am considering Dr. [last name] as my new primary care provider [or OB-GYN]. Before booking, I wanted to share a few things about how I prefer to engage with care. I follow a weight-inclusive approach to my own health, and I have had past experiences where symptoms were attributed to my weight before being investigated, which led to delayed diagnoses. I would prefer not to be weighed at appointments unless weight is clinically necessary for the specific issue being addressed, and I would like any weight-related conversation to be patient-initiated rather than provider-initiated. The reason I am coming in is [specific symptom or screening, in one sentence]. Can you let me know whether this approach is one Dr. [name] is comfortable with, and whether the practice has appropriately sized blood pressure cuffs and gowns. I appreciate your time and look forward to hearing back.”
That is it. Three pieces of information conveyed. Your approach. Your specific symptom. Your operational needs. The email does the work of filtering before the appointment. I have sent this email maybe forty times over the last fifteen months. About a third of practices respond warmly and the appointment proceeds. About a third respond non-committally, which I read as a yellow flag and either skip or proceed with low expectations. About a third do not respond at all, which I now treat as a hard no. The ones who do not respond before the visit do not respond well during the visit either. The correlation is high enough that I trust it.
The 4-sentence opener for the exam room
The pre-visit email is the asynchronous layer. The 4-sentence opener is the live exam-room layer, and it is the single most important script in this article. The opener is what you say after the provider walks in, after the small talk about the weather, after they ask “so what brings you in today.” The reason it is four sentences and not three or five is that four is the length that fits inside the average attention span of a doctor in a fifteen-minute slot. Three is too short to convey context. Five gets interrupted. Four is the sweet spot.
The opener: “I want to start by naming that I take a weight-inclusive approach to my own health, and I would prefer that we not discuss my weight today unless it is clinically necessary for the issue I am here about. The issue I am here about is [specific symptom, with a duration and a frequency]. Here is what I have noticed and what I have already tried [one sentence of context]. What I am hoping for from this visit is [specific diagnostic or referral ask].” Four sentences. Memorize them. Practice them in the car before you walk in. The reason to memorize is that the moment a doctor sits down and looks at your chart is the moment your nervous system is most likely to go quiet on you. Having the sentences pre-loaded means you do not have to compose under pressure.
The opener works for two reasons. First, it sets the frame of the visit before the provider sets it for you. Most exam-room dynamics are determined in the first sixty seconds by who establishes the agenda. If the doctor’s first move is to comment on your weight, the rest of the visit is spent recovering from that. If your first move is to name your approach, the visit proceeds on the terms you set. Second, the opener gives the provider a specific ask. Doctors are problem-solvers under time pressure. If you hand them a defined problem and a defined hoped-for outcome, they have something to work on. If you hand them only a symptom, the path of least resistance for an overworked clinician is to default to the BMI conversation because it is fast.
The opener fails in two ways. It fails if you deliver it apologetically, because the apology signals that you do not believe you are entitled to the request, and providers read that. Deliver it the same way you would tell a mechanic which sound the car has been making. Matter-of-fact. The opener also fails if you do not have the specific symptom ready. “I just have not been feeling well” is not a symptom. “Palpitations three to four times a week, lasting under a minute, often when seated, started in early September” is a symptom. The specificity is the leverage.
The BMI-pushback script (specific phrasing)
Even with the email and the opener, you are still going to hit the BMI conversation in some appointments. Not all. But enough that you need a script for it. The pushback script has three layers, and you use them in escalating order based on how the provider responds.
Layer one, when the provider first mentions BMI or weight in a context unrelated to your symptom. “I appreciate that you are bringing this up, and I want to circle back to the specific issue I came in for. Can we address [your symptom] first, and if weight is clinically relevant to that diagnosis, we can return to it after.” That sentence does three things. It does not deny the provider’s framing. It redirects to your agenda. And it concedes that weight could become relevant, which keeps you from sounding evasive. Most providers, hearing that, will accept the redirect.
Layer two, when the provider insists that weight must be addressed first or attributes your symptom directly to weight without diagnostic workup. “I hear that this is your assessment. Can you tell me what diagnostic steps you would take if I presented with these same symptoms at a lower weight, and can we proceed with those steps now, since the symptoms are what I am here to address.” That sentence is the most powerful one in this article. It does not argue about whether weight matters. It asks the provider to name the differential diagnosis they would run for a thinner patient. Most providers, when asked this directly, cannot defend giving you a different workup than they would give a thinner patient with the same presentation. The question makes the disparity visible.
Layer three, when the provider refuses to proceed with diagnostic workup and continues to insist on weight loss as the primary intervention. “I am going to ask you to note in my chart that I requested [specific diagnostic test or referral] and that you declined to order it. I would like a copy of that note for my records.” The chart note request is the legal lever. Once you say it, the provider has to either order the test, document the refusal, or both. Documented refusals show up later if you escalate to a complaint or pursue a malpractice review, and the provider knows that. In my experience, layer three is needed in maybe one out of five appointments where layers one and two failed. The other four times, layer two is enough.
When to demand a referral (specific symptoms)
There are specific symptoms where the default diagnostic workup is well-established in the literature and the failure to perform it on a higher-weight patient is documented enough that you should not accept dismissal. I will name the ones I see most often, with the referral or test you should be asking for.
Heart palpitations, chest pain, or unexplained shortness of breath should produce an EKG at minimum and a referral to cardiology or a Holter monitor if symptoms persist. The dismissal pattern here is to attribute these to anxiety, deconditioning, or weight. The standard of care, irrespective of body size, is to rule out arrhythmia and structural cardiac issues first. If your provider declines to order an EKG for cardiac symptoms, that is a layer-three pushback moment.
Pelvic pain, heavy bleeding, painful sex, or irregular cycles should produce a pelvic exam, a transvaginal ultrasound, and a referral to OB-GYN if your PCP is not equipped to evaluate. The dismissal pattern is to attribute these to hormones, weight, or stress without imaging. The standard of care includes ruling out fibroids, endometriosis, ovarian cysts, polycystic ovary syndrome, and adenomyosis. None of those diagnoses correlate with weight in a way that lets a clinician skip the imaging.
Joint pain, especially knee or hip pain in someone under fifty, should produce imaging and a referral to orthopedics or rheumatology if persistent. The dismissal pattern is “lose weight and see if it helps.” The standard of care includes ruling out osteoarthritis, autoimmune arthritis, and bursitis with appropriate imaging. Weight loss may eventually be part of a treatment plan after diagnosis, but it is not the diagnosis.
Fatigue, especially when accompanied by hair loss, cold intolerance, weight changes, or mood changes, should produce a complete thyroid panel including TSH, free T4, free T3, and thyroid antibodies. The dismissal pattern is to order TSH alone and call it a workup. A complete panel is what catches subclinical hypothyroidism and Hashimoto’s, both of which are commonly missed in plus-size women because the TSH-only screen does not surface them.
Headaches that change in pattern, frequency, or severity, especially with visual changes, should produce a neurological exam at minimum and imaging if the exam is abnormal. The dismissal pattern is to attribute these to dehydration, stress, or screen time. The standard of care includes ruling out idiopathic intracranial hypertension, which is actually overrepresented in higher-weight women and gets missed because providers attribute the headaches to weight without performing the exam that would surface the actual diagnosis.
The rule across all of these is the same. The diagnostic workup for the symptom does not change because of your body size. If the workup is being skipped, the workup is being skipped, and the failure to perform it is the deviation from standard of care, not the request to perform it.
When to fire your doctor (the 3-strike rule)
The decision to leave a provider should not be made in the heat of one bad appointment. Most of us, when we have a bad visit, either over-react and burn the relationship or under-react and stay for years past when we should have left. The framework that has worked for me and the women I mentor is the 3-strike rule. Three documented incidents, of specific types, are the threshold for switching providers. Fewer than three means you give feedback and stay. Three or more means you go.
Strike one is any single instance of the provider attributing a symptom to weight before performing the standard diagnostic workup for that symptom. One instance is forgivable as a bad day, a missed cue, or a provider who responds when corrected. After the appointment, you write the follow-up letter (template in the next section), and you note in your records that you have documented the incident. If the provider acknowledges and corrects, strike one stands but does not escalate.
Strike two is a second instance of the same pattern, after the first has been raised. Two instances signal that the first was not a bad day but a default mode. At this point, you should already be researching alternatives and you should not invest in further attempts to coach the provider through it. Your job is not to train your doctor. Your job is to receive competent care.
Strike three is any instance where the dismissal results in delayed diagnosis or actual harm. If a symptom you flagged was dismissed as weight, and the symptom turned out to be a real underlying condition that was diagnosed later by a different provider, that is an automatic exit, regardless of strike count. You do not stay at a provider who has missed a diagnosis on you, even if they apologize.
The other auto-exit triggers, separate from the three-strike count, are any moment where the provider raises their voice at you, lectures you about food intake without your invitation, refuses to order a test you specifically requested without documenting the refusal, or makes any comment that crosses from clinical assessment into personal judgment of your character or self-worth. Any of those is a single-incident exit. You do not need to count to three.
The mechanics of leaving are simple. You request your medical records be transferred to your next provider, you send a brief written note thanking the practice and asking for closure of your file, and you do not engage in a debate about why you are leaving. If they ask for feedback in an exit survey, give it. If they do not, you owe them nothing. The energy you would spend on the exit conversation is energy you need for the search for the next provider, and the next provider is what matters.
Insurance and HAES providers: navigating coverage
The hardest practical part of all of this is that HAES-aligned providers are not evenly distributed across insurance networks. Many of them, especially the ones who have built their practice around this framework intentionally, are out of network for at least some major insurers, and some of them have moved to cash-pay or direct primary care models specifically to opt out of the volume-driven incentives that produce rushed appointments. The result is that you may find a doctor who is right for you and discover that your insurance does not cover them, or covers them at a higher coinsurance.
The options here are real but limited. First, use your insurance’s out-of-network benefit if you have one. Most PPO plans cover out-of-network providers at a reduced rate, and the difference between in-network and out-of-network may be smaller than the cost of staying with a provider who is missing diagnoses on you. Calculate it. The math sometimes surprises people.
Second, look at the practice’s payment structure. Some HAES-aligned PCPs run direct primary care models with a flat monthly fee, often between fifty and two hundred dollars a month, which includes unlimited visits and basic labs. If your usage is heavier than average – which it often is for women managing thyroid, PCOS, or autoimmune conditions – the math can favor direct primary care over conventional insurance plus copays. The direct primary care provider is also more likely to spend thirty minutes with you on a visit rather than fifteen, because their incentive structure rewards relationship rather than volume.
Third, if you are limited to in-network providers by financial necessity, do the directory work inside your network. Most insurers’ provider search tools let you filter by specialty and read provider bios. Look for the same language signals – weight-inclusive, body diversity, HAES, intuitive eating – in the bios of in-network providers. They are rarer but they exist. Cross-reference any candidate against ASDAH or the other directories to see if they are also listed there.
Fourth, telehealth has changed the math significantly. HAES-aligned providers offering telehealth across multiple states means that geographic isolation is less of a barrier than it was even three years ago. Dr. Lesley Williams, a board-certified family medicine physician at Mayo Clinic Arizona and a Certified Eating Disorder Specialist who has been one of the most public HAES-aligned MDs in the country, is one example of a clinician building care around weight-inclusive principles. Practices like hers are part of the network I point women to when they can’t find a local option. The first visit can be telehealth, and many of the diagnostic conversations can happen there even if certain follow-ups require an in-person visit eventually.
The follow-up letter template (when care goes wrong)
When a visit goes badly, the follow-up letter is the tool you reach for. The letter has three functions. It documents the incident in writing, which creates a paper trail. It gives the provider a chance to respond, which sometimes produces an apology and a corrected approach. And it preserves your own clarity about what happened, which is harder than it sounds because the memory of a bad appointment tends to soften within a day or two and you start to question whether it was really that bad. The letter is your present self telling your future self what was said.
Here is the template. Send it within seventy-two hours of the visit while the details are fresh, by patient portal message if your provider has one or by certified mail if they do not.
“Dear Dr. [last name], I am writing to document my visit on [date] and share some feedback. During the appointment, I came in to address [specific symptom]. The interaction included [specific quoted statement or specific behavior, as exact as you can remember]. This raised concerns for me because [the standard of care for this symptom is X, or you had previously requested weight not be the first lens, or the symptom was not investigated]. I would like to request [what you want now, whether that is the diagnostic test that was skipped, a referral, a note in your chart, or simply an acknowledgment]. I am sharing this directly with you rather than escalating to a complaint because I would prefer to give you the opportunity to address it. Thank you for your time.”
That letter, sent without anger and with specific details, produces one of three outcomes. The provider apologizes and corrects, which has happened to me three times out of maybe a dozen letters sent. The provider responds defensively or not at all, which tells you the exit decision is the right one. Or the practice’s office manager intervenes and the situation gets routed to a different provider within the practice, which is sometimes a workable outcome if you like the practice but not the specific doctor. All three outcomes are useful information.
If the dismissal resulted in actual harm – a missed diagnosis, a delayed referral that allowed a condition to worsen, a refusal that violated standard of care – the next step beyond the letter is a formal complaint to your state medical board. The threshold for this is higher and you should generally consult with a patient advocate or a malpractice attorney before filing. Most state medical boards have online complaint forms. The board’s response is usually slow, but the documentation persists, and patterns of complaint against a single provider do eventually surface in board action.
The trans plus medical-fatphobia compound issue
I want to spend the time this section deserves, because the trans plus-size patient navigating American healthcare is exposed to a compound of biases that no single section in any general article on healthcare access can fully address, and the assumption that the strategies above translate directly is wrong in important ways. I am writing this section as a cis woman who has done the listening work and consulted with trans collaborators on the specifics, but I would direct anyone who lives at this intersection to Dr. Sand Chang’s writing and to the trans-led healthcare collectives that have built more specific resources than I can offer in a paragraph.
The compound is this. A trans patient walks into a medical setting and may already be navigating misgendering, inappropriate questions about transition status that are unrelated to the visit, refusal of providers to use chosen names, gatekeeping around gender-affirming care, and the structural problem that many electronic medical record systems still do not gracefully accommodate any gender other than M or F. A plus-size trans patient walks into the same setting carrying all of that, plus the medical-fatphobia stack documented in the research section above. The two biases interact rather than add. A provider who is dismissive of trans patients is statistically more likely to also be dismissive of fat patients, because both biases come from the same authoritarian framing of bodies as needing to be brought into compliance with norms.
The practical strategies for trans plus-size patients include, in addition to the general scripts above, the use of trans-specific directories like the GLMA (Health Professionals Advancing LGBTQ+ Equality) provider directory, the OutCare Health directory, and the regional networks maintained by groups like the National Center for Transgender Equality. These directories overlap only partially with HAES directories, which means the work of finding a provider who is competent across both axes often requires cross-referencing multiple lists and accepting that the candidate pool is smaller. Telehealth, again, expands the pool meaningfully.
The exam-room scripts also need adaptation. The 4-sentence opener for a trans plus-size patient might add a fifth sentence on chosen name and pronouns, delivered as part of the same framing, so that the provider hears the full set of expectations at once rather than piecemeal. The BMI-pushback script remains the same, but the trans patient should be prepared for providers to attempt to gatekeep gender-affirming care behind weight loss requirements, which has been documented as a pattern in surgical practices in particular. The response to that gatekeeping is the same as the response to any other inappropriate use of weight as a barrier. You ask the provider to name the standard of care for a cis patient with the same presentation, and you ask them to apply it.
The compounding effect is also psychological. The exposure to layered dismissal is more depleting than the exposure to a single layer, and the avoidance behaviors documented in the Sutin research are correspondingly more pronounced. Trans plus-size patients I have spoken with describe going years without primary care because the prospect of running the full gauntlet for a routine annual is not worth the symptom-level risk. That is not a failure of self-care. It is a rational response to a hostile environment, and the solution is structural, which means the patient needs allies in the system who will do some of the navigation work for them. A trans-competent and HAES-aligned PCP is one of those allies. Finding one is a project. Worth it.
The 3-move checklist for this week
Reading this article and not doing anything with it is the most common outcome and I want to interrupt that. The work I am asking for this week is small. Three moves. None of them require a referral, an appointment, or money. All of them are things you can do from your phone in the next seven days. If you do these three things this week, you will be measurably closer to the doctor relationship you actually need than you were yesterday. Do not skip them.
Move one. Open a browser, search for “ASDAH HAES practitioner directory,” filter by your state, and download or screenshot the list of any providers in your zip code or within driving distance. If there are no providers in your state, do the same with the Plus Size Birth provider list and the Be Nourished directory. Add any names you find to a single document or note on your phone. Title the note “My Doctor List.” This list is the asset you are building. It is going to grow over time.
Move two. Open a new note and write the 4-sentence pre-visit opener for yourself, with your name, the symptom or screening you would bring to a first visit, and your specific hoped-for outcome. Memorize it. Practice saying it out loud in your car or in the shower until it sounds natural. The reason to do this when you are not in distress is so that you have it ready when you are.
Move three. Schedule the second-opinion appointment. If you have a current provider who has dismissed a symptom, fired you in spirit if not in writing, or made you dread the exam room, schedule a consultation with one of the new names on your list. It does not need to be a transfer of care yet. It is a consultation. You are gathering information. The appointment itself is the move. Booking it is the practice of believing that you are entitled to better care than you have been getting.
That is the assignment. Three moves. Within seven days. The list, the script, the appointment. You do not have to fix the entire American medical system this week. You have to do the three small things that put you in motion. The motion is the win. The Brookhaven exam room I started this article with is the floor. I built up from it by doing exactly these three things, in that order, in November of 2024. By the spring of 2025 I had a new PCP, a new OB-GYN, a referral to cardiology that produced an actual diagnosis for the palpitations (benign premature ventricular contractions, monitored, not weight-related), and a relationship with care that I no longer dread. That is what is on the other side of this. Go build the list.
It was 9:14 on a Tuesday in late September of 2025, in a glass-walled conference room on the third floor of a software company off Ponce de Leon in Decatur, when Tasha got the email titled “Your Annual Ergonomics Evaluation – 10am Today.” The HR coordinator who arrived ten minutes early carried a clipboard, a tape measure, and a printed script that began with the same opening line the company used every year. “We want to make sure your workstation supports your long-term health and productivity. Today we will measure your seat height, your monitor distance, your keyboard tray position, and confirm that your current chair meets your needs.” Tasha had been at the company for two years. She had been quietly sliding forward in her assigned Herman Miller Aeron Size B every afternoon for those two years, because the chair, which the company purchased in a 2022 bulk order, was rated for users up to 350 pounds. Tasha weighed 312. She had measured the rating in the chair’s product manual a month after she started, on a slow Friday afternoon when no one was looking, and she had not told anyone what she found.
The HR coordinator’s script reached the chair question at minute six. “Does your current chair meet your needs?” Tasha had practiced the answer that morning in the bathroom mirror in her apartment in East Atlanta. She had practiced three versions. The first version, the silent one, was a simple “Yes, it’s fine,” followed by another year of sliding forward and the slow lumbar ache that had become the background music of every workday after 2 pm. The second version was the disclosure version, where she explained the weight rating, asked for a different chair, and watched the HR coordinator’s pen pause over the clipboard. The third version was the documented version, the one her friend Devon, an occupational therapist with the credentials OT/L who consulted at a hospital system in Birmingham, had walked her through over the phone the previous Saturday. Devon had said the same thing three times during that call. “If you ask without documentation, they will hear it as a preference. If you ask with documentation, they have to hear it as an accommodation.” The third version was the one Tasha used.
This piece is about that third version. It is about the structural truth that the office ergonomics industry, the HR profession that buys office chairs in bulk, and the federal regulatory framework that governs workplace safety have never been designed for plus-size bodies, and the only way to get a workstation that actually fits you is to treat the conversation as a documented accommodation request, not a preference, not a polite ask, not a workplace wellness suggestion. The chairs exist. The legal framework exists. The medical documentation pathway exists. What does not exist, unless you build it yourself, is the script and the timeline and the paperwork that turns those three things into a real chair under your real body on a real Monday morning.
The weight-rating reality (and why the Aeron 350 lb spec is a problem)
The Herman Miller Aeron is the default ergonomic office chair in American knowledge work. It has been the default since it launched in 1994, and after its 2016 redesign it became even more entrenched as the chair that startups, tech companies, law firms, and design studios order by the dozen when they outfit a new office. The chair comes in three sizes, A, B, and C, sized by user height and weight ranges. Herman Miller’s published specifications, accessible on the company’s product page and in the chair’s user manual, list a maximum user weight of 350 pounds for the Size B and a maximum user weight of 350 pounds for the Size C in its standard configuration. There is a documented option to upgrade the Size C with a heavier-duty cylinder and base that extends the rating, but the upgrade is a special order and is not what arrives in a default bulk purchase.
The 350 pound rating is not arbitrary. It is the weight at which the chair’s pneumatic cylinder, its base spokes, its tilt mechanism, and its frame stress-points are tested for the manufacturer’s warrantied duty cycle, which is typically a twelve-year span at eight hours of use per day. Above the rating, the chair will not immediately collapse, but the warranty is void, the duty cycle shortens, the cylinder loses gas pressure faster, and the frame stress-points accumulate fatigue at an accelerated rate. The 350 number is also the number that fits a population distribution the chair was originally designed for in the early 1990s, when the average American adult weight was meaningfully lower than it is now. According to CDC NHANES data, the average adult American woman in 2017 to 2020 weighed approximately 170 pounds and the average adult American man weighed approximately 200 pounds. The seventy-fifth percentile is meaningfully higher. The ninetieth percentile for adult women begins to brush against 250 pounds. The chair was never built for the upper tail of that distribution, and the upper tail is where a large share of the plus-size workforce sits.
The structural problem with the 350 pound rating, from a plus-size workplace perspective, is that the rating gets quietly elided in the procurement conversation. The HR coordinator orders forty Aerons because Aerons are what knowledge work uses. The procurement officer signs the PO. The chairs arrive. Nobody on the buying side reads page 14 of the manual, where the weight rating sits. The employees who exceed the rating know they exceed the rating, sometimes without ever having opened the manual, because the chair tells them. The seat pan creaks differently. The cylinder sinks faster. The lumbar mesh stretches in a way that does not snap back. The afternoon ache is the chair telling the employee what the manual already says. The employees who notice this almost universally do not raise it, because raising it requires disclosing weight, which is the workplace conversation most plus-size employees have spent a career strategically avoiding.
The cost of not raising it is the cost of working ten years on a chair that was sized for someone else. Lumbar disc compression. Sciatic nerve irritation. Hip pain that compounds over time. The slow erosion of focus and energy that comes from a workstation that fits seventy percent of you. The structural cost is also the bigger one. A workforce that does not raise the issue is a workforce the next procurement cycle does not see, which is why the next bulk order is also forty Aerons. The cycle does not break unless the conversation happens.
The ADA accommodation framework (and the 2014 EEOC ruling)
The Americans with Disabilities Act, passed in 1990 and amended substantively in 2008, requires employers with fifteen or more employees to provide reasonable accommodations for qualified employees with a disability, where “disability” is defined as a physical or mental impairment that substantially limits one or more major life activities. The statute does not, on its face, treat body size as a disability. It treats impairments. The case law on whether and when weight-related conditions qualify under the statute has evolved, and the evolution is the part that matters for a plus-size employee asking for an ergonomic accommodation.
The case that opened the door is EEOC v. BAE Systems Tactical Vehicle Systems LP, settled in 2012, with the EEOC’s subsequent guidance through 2014 clarifying the application. In that case, the EEOC alleged that BAE Systems had unlawfully terminated a materials handler in Texas in 2009 because of his weight, which the agency argued constituted a perceived disability under the ADA. BAE Systems agreed to a settlement that included a payment of $55,000 to the affected employee and an injunction against future discrimination. The agency’s public position around the settlement, and the subsequent guidance that clarified its enforcement posture, established that severe obesity (defined for legal purposes as body weight more than one hundred percent over the norm) and weight-related conditions arising from underlying physiological disorders can qualify as a disability under the ADA, and that an employer’s refusal to provide reasonable workplace accommodations on the basis of those conditions can constitute unlawful discrimination.
The legal framework that follows from this is the one a plus-size employee should understand before walking into the HR conversation. Weight itself, in the abstract, is not automatically a covered disability. Weight-related conditions, supported by medical documentation from a qualified provider, can be. Lumbar disc compression, sciatic radiculopathy, hip arthritis, lymphedema, fibromyalgia, knee osteoarthritis, type two diabetes with peripheral neuropathy, and a long list of related musculoskeletal and neurological conditions that affect a substantial share of the plus-size population are all covered under the ADA when properly documented, and an ergonomic workstation accommodation, including a higher-rated chair, a wider seat pan, a standing desk, or a different keyboard tray, is a textbook example of a reasonable accommodation an employer is obligated to engage with through the interactive process the statute requires.
Dr. Glenn Williamson, OT/L, an occupational therapist who has written professionally about workplace accommodations for plus-size and bariatric patients, has framed the documentation question this way in his published guidance for ADA accommodation requests. The medical documentation does not need to use the word “obesity” or to disclose a specific weight. It needs to describe the impairment (the lumbar condition, the radiculopathy, the joint condition), document that it substantially limits a major life activity (sitting for prolonged periods, walking, standing, working), and recommend the specific accommodation (a chair rated for the employee’s body weight with the specific lumbar support requirements, or a sit-stand desk, or a specific keyboard configuration). The employer’s obligation is to engage with the recommendation in good faith. The employer can propose alternatives. The employer cannot ignore the request, cannot delay it indefinitely, and cannot retaliate against the employee for making it.
OSHA, the federal Occupational Safety and Health Administration, sits in an unusual position on workplace ergonomics, and the position matters for the plus-size employee. In November 2000, OSHA issued a final ergonomics standard that would have required employers to evaluate and address ergonomic hazards in the workplace systematically, with specific requirements for chair fit, workstation adjustability, and job design. The standard was rescinded by congressional action in March 2001 under the Congressional Review Act, and OSHA has not issued a replacement final rule in the two and a half decades since. What this means in practical terms is that ergonomics in U.S. workplaces is governed by the General Duty Clause of the OSH Act, which requires employers to provide a workplace free from recognized hazards, and by industry-specific guidance documents that OSHA publishes as non-binding recommendations. There is no federal rule that says “your chair must fit your body.” There is the ADA accommodation framework for individuals with documented impairments, and there is a patchwork of state-level guidance, and there is the General Duty Clause as a backstop.
The implication is the one a plus-size employee needs to internalize. The federal regulatory floor on workplace ergonomics is, for the general population, very low. The federal regulatory floor on ergonomic accommodations for an individual with a documented impairment, under the ADA, is meaningfully higher and is enforceable through the EEOC complaint process. The pathway to a chair that fits is the ADA pathway, not the general workplace safety pathway. Knowing which pathway you are on changes the language you use, the documentation you bring, and the timeline you set.
The market for office chairs rated above 400 pounds is real, it is established, and it is almost entirely invisible inside the procurement catalogs that most HR departments use by default. Here are the four chairs a plus-size employee should know by name and weight rating before sitting down with HR, with the specific configurations that matter and the price ranges that the employer’s procurement team will encounter when they go to order.
The Steelcase Leap V2 is the most defensible request a plus-size employee can make in a corporate environment that already buys Steelcase or Herman Miller furniture. The chair is rated for users up to 400 pounds in its standard configuration, which is fifty pounds above the Aeron Size B and Size C standard rating. The chair has a documented record in independent ergonomic research, including studies by the Center for Health Research at the Health Alliance system in Cincinnati, that found measurable reductions in musculoskeletal pain among knowledge workers transitioned from older chairs to the Leap. The seat pan is wider than the Aeron Size B by approximately one inch, the back support adjusts dynamically through a flexing back mechanism, and the armrests adjust on four axes. The price runs roughly $1,200 to $1,800 depending on configuration and the employer’s volume discount, which lands the chair in the same price band as the Aeron and makes it a straight swap inside most procurement cycles. For a plus-size employee in a Steelcase-friendly office, this is the entry-level ask.
The case for the Leap V2 in the HR conversation is the case for an existing-vendor swap. The employer does not need to add a new vendor relationship. The procurement cost is comparable. The ergonomic credentials are documented. The weight rating is fifty pounds higher than the default chair. The friction is low. The Steelcase Amia, the sister chair in the same product family, is also rated to 400 pounds and runs roughly $900 to $1,300, which is a slightly less expensive alternative that delivers the same weight rating with a different mechanism and a slightly less aggressive lumbar profile.
###
Steelcase Leap Plus – 500 pound rating, plus-specific design
The Steelcase Leap Plus sits in the next tier up. The chair is rated for users up to 500 pounds, which clears the rating headroom that the standard Leap V2 does not. The seat pan is meaningfully wider than the Aeron Size C, the backrest is taller and wider, the cylinder is heavy-duty, and the base is constructed with reinforced steel spokes. The chair is sold through authorized Steelcase dealers, with pricing typically in the $1,100 to $1,500 range, which lands in the same band as a fully-configured Leap V2. The ergonomic adjustability is the same Leap mechanism re-engineered for a heavier duty cycle, and the seat pan dimensions are dialed for plus bodies in a way the standard Leap is not.
The case for the Leap Plus in the HR conversation is the case for an existing-vendor swap that clears the 500 pound threshold without forcing a new vendor relationship. The HR coordinator does not need to evaluate a new supplier. The counter to any pushback is that the chair fits the documented accommodation in a way the standard Leap V2 does not. For an employee whose body weight is above the 400 pound rating, the standard Leap V2 is not a defensible accommodation. The Leap Plus is.
HON Endorse – 450 pound rating, mid-market procurement-friendly
The HON Endorse is the chair to know if the employer is mid-market, government, or higher-education, where HON is a default vendor through GSA contracts and educational procurement systems. The Endorse is rated for users up to 450 pounds, the chair has a documented ergonomic research record, and the price runs roughly $700 to $1,000 depending on configuration, which is competitive with the Steelcase Amia and meaningfully less expensive than the Leap V2. The seat pan is wider than the Aeron, the backrest is taller, and the chair is built to a duty cycle that supports continuous eight-hour use.
The case for the HON Endorse is the same procurement-friendly case as the Steelcase Leap V2, with a different vendor. If the employer already buys HON, the chair is a straight swap. If the employer buys Herman Miller or Steelcase and is resistant to adding HON to the vendor list, the case shifts to a documented accommodation request, where the employer’s obligation is to engage with the recommended accommodation regardless of vendor preference.
Concept Seating’s 3142R1 is one of the heaviest-rated chairs on this list and the chair built for the most demanding use cases. The 3142R1 is rated for users up to 550 pounds, the chair is designed for twenty-four-hour continuous use in dispatch centers, security operations centers, and air traffic control environments, and the construction reflects the industrial duty cycle. The cylinder is a heavy-duty pneumatic certified to 100,000 cycles, the seven-leg base is tested to a 10,000 pound dynamic load, and the seat pan and backrest are wider and deeper than any of the standard office chairs above. The price runs roughly $1,200 to $2,000 depending on upholstery and adjustability options, which lands in the same band as a fully-configured Leap V2. For users above the 550 pound threshold, Concept Seating’s 3156(HR) extends the rating into 800 pound territory.
The case for the Concept Seating 3142R1 is the case for one of the highest weight ratings in the standard office chair market. For an employee whose documented condition requires a chair rated above 500 pounds, the 3142R1 is the answer. The chair is also a defensible request for employees with conditions that require continuous all-day support, including severe lumbar disc disease or post-surgical recovery scenarios, where the duty cycle and the structural rigidity of the chair matter as much as the weight rating itself.
The Humanscale Freedom, a chair sometimes proposed as a plus-size alternative in HR conversations, is worth naming for completeness. The Freedom is rated for users up to 300 pounds in its standard configuration, which is fifty pounds below the Aeron Size B’s rating. The Freedom is not a plus-size chair. It is a smaller-frame ergonomic chair with strong lumbar credentials for users inside its rated range. If HR proposes the Freedom as a “more ergonomic” alternative, the answer is that the chair’s weight rating is below the existing default and is not a plus-size accommodation. The four chairs above are.
The medical documentation case (when to involve your doctor)
The accommodation request that succeeds is the documented one, and the documentation that succeeds is the documentation that frames the request in clinical terms a benefits administrator or HR generalist can transmit unchanged to legal review. The employee’s job, before walking into the HR meeting, is to assemble the documentation in the form an ADA accommodation request expects.
The first conversation is with the primary care provider, or with a specialist if the relevant impairment is already under specialist care. The conversation should name the specific physical impairment (the lumbar condition, the knee condition, the hip condition, the lymphedema, the neurological condition), the specific limitation it imposes on a major life activity (sitting for prolonged periods, walking long distances, standing for the workday), and the specific accommodation the provider believes would meaningfully reduce the limitation in a work context. The provider does not need to specify the brand of chair. The provider should specify the functional requirements – a chair rated for the employee’s body weight, with adjustable lumbar support, with a seat pan that accommodates the employee’s hip width, with an adjustable height range appropriate for the employee’s leg length – and should provide the recommendation on the provider’s professional letterhead, signed and dated.
Dr. Margy Squires, CPE, a board-certified professional ergonomist who has written extensively about workplace ergonomic assessments, has framed the provider letter as the single most determinative document in the accommodation conversation. The letter establishes the impairment, it establishes the limitation, and it establishes the functional requirement. The employer’s HR or benefits team takes the letter and is now operating inside the ADA interactive process, which has specific procedural obligations and a clear EEOC enforcement record. Without the letter, the conversation is a preference conversation. With the letter, the conversation is an accommodation conversation. The same chair, the same employee, the same office. The legal weight of the request is entirely different.
The conversation with the provider has a secondary purpose, which is to establish a clinical record that supports the accommodation over time. ADA accommodation requests are not one-time documents. If the employer relocates, restructures, or proposes to revoke the accommodation, the medical record from the provider becomes the basis for re-asserting the request. Employees who skip the documentation step in year one frequently find themselves rebuilding the record from scratch in year three under more difficult circumstances. The cleaner the documentation at the start, the more durable the accommodation across the career.
The cost question is the next one. The provider visit, the documentation letter, and any required follow-up assessments cost something. For employees with employer-sponsored health insurance, the provider visit is typically covered under preventive or primary care benefits, and the documentation letter is generally a small additional fee, often $25 to $75. For employees without insurance or with high-deductible plans, community health centers, federally qualified health centers, and sliding-scale clinics will perform the assessment and write the letter for a meaningfully lower out-of-pocket cost. The accommodation request itself, once the documentation is in hand, does not require a lawyer, does not require a paid advocate, and does not require any further out-of-pocket cost from the employee.
The HR conversation script (the 5-sentence opener)
The conversation that opens the accommodation process has a specific shape, and the shape is what determines whether the conversation proceeds through the interactive process the ADA requires or stalls in the wellness-conversation lane HR departments default to. The five-sentence opener below is the structure Tasha used in that 9:14 conference room in Decatur, and it is the structure that survives the legal review the HR team will conduct after the meeting ends.
Sentence one. “I would like to make a request for a reasonable accommodation under the ADA related to my workstation.” This sentence does the work of converting the conversation from a preference conversation to an accommodation conversation. The phrase “reasonable accommodation under the ADA” triggers the HR team’s procedural obligation to engage in the interactive process. The employee has not disclosed a specific condition, has not disclosed a weight, and has not asked for a specific product. The employee has invoked a statute.
Sentence two. “I have documentation from my healthcare provider that I will share with the benefits team or the HR generalist who handles ADA requests at this company.” This sentence establishes that the documentation exists and signals that the employee has done the preparatory work. It also moves the conversation from the wellness-focused HR coordinator, who is not the right counterparty for an ADA request, to the benefits or compliance counterparty who is. Most companies of any size have a designated ADA contact, and most companies do not advertise who that contact is. The sentence forces the routing.
Sentence three. “The accommodation my provider has recommended is a workstation chair appropriate for my body, with the specific functional requirements outlined in the documentation.” This sentence is intentionally non-specific about the chair model. It defers the product conversation to the documentation itself, where the functional requirements are written in clinical language. The employee is not asking for a specific brand. The employee is asking the employer to fulfill the functional requirements the provider has identified.
Sentence four. “I am also open to discussing related workstation accommodations, including adjustments to the desk, keyboard, monitor, and any other equipment that supports the same condition.” This sentence is the future-proofing sentence. The chair is the entry point. The standing desk, the keyboard tray, the monitor arm, and any related equipment are the follow-on requests. By naming them upfront, the employee establishes that the accommodation is not a single product but a workstation, which is the correct frame for the interactive process and which prevents the employer from limiting the conversation to a one-time chair purchase.
Sentence five. “What is the next step in the interactive process at this company, and what is the timeline I can expect?” This sentence forces the procedural answer. The interactive process is the employer’s obligation, not the employee’s. The employer is supposed to engage with the request, propose accommodations, evaluate alternatives, and respond within a reasonable timeframe. By asking the question directly, the employee establishes a procedural record that becomes the basis for any subsequent escalation if the timeline drifts. The HR coordinator’s answer to this question, written down by the employee that afternoon, becomes the first entry in the employee’s accommodation file.
The five sentences fit on a single index card. The employee should bring the index card to the meeting, refer to it openly, and email a written summary of the conversation to the HR coordinator within twenty-four hours of the meeting. The email is the second entry in the file. The provider letter is the third. The employer’s written response is the fourth. By the end of week one, the employee has a documented record that establishes the request, the documentation, the conversation, and the timeline. The record is what carries the accommodation through procurement, through approval, through delivery, and through any subsequent personnel changes on the HR side.
Standing desk and the height-adjustment math
The standing desk is the second accommodation, and the math on a standing desk is where most plus-size employees get the configuration wrong. The default sit-stand desk that most companies buy in bulk is the Uplift V2 or the Vari Electric Standing Desk, both of which have an adjustment range that runs from roughly 25 inches at the lowest setting to roughly 51 inches at the highest setting. For an employee of average height, this range covers both seated and standing positions comfortably. For a plus-size employee, the relevant question is not the seated math (which is the same as for any seated worker) but the standing math.
Ergonomic standing-desk guidance, published by the Mayo Clinic and by the Cornell University Ergonomics Web reference, recommends that the standing-position desk height align with the employee’s elbow height when the employee is standing in a relaxed posture, with the upper arms hanging straight down and the forearms parallel to the floor. For a plus-size employee, the relevant variable is not body weight but standing height combined with elbow height, which can vary meaningfully from the population-average tables the desk manufacturers use to set adjustment ranges. The Uplift V2’s 51-inch maximum height accommodates most users up to roughly six feet two inches tall in a standing position. For a taller plus-size employee, or for an employee whose elbow height runs higher than the population average because of body composition rather than height, the 51-inch maximum may not provide enough adjustability for a properly aligned standing posture.
The solution is to specify the desk in the accommodation request, not to accept the default. The Uplift V2 with the C-frame configuration extends to a 50.5-inch maximum. The Uplift V2 with the V2-Commercial frame extends to a 51-inch maximum. The Uplift V2-Commercial with the wide range option extends to a 53-inch maximum. The Vari ProDesk Electric extends to roughly 50 inches at the maximum. For an employee who needs more than 51 inches at standing, the Jarvis Frame from Fully extends to 52.5 inches, and the Updesk Pro extends to 53 inches. The two-inch differences sound trivial. For a plus-size employee whose elbow height runs above the manufacturer’s design target, the two inches are the difference between an aligned standing posture and a forward-lean that compounds shoulder and neck strain across the workday.
The keyboard tray is the under-discussed component of the standing desk math. A standing desk with a fixed keyboard surface is a desk that forces the wrist into a flexed or extended position whenever the desk height is even slightly off the user’s elbow height. A standing desk with a programmable keyboard tray that adjusts independently of the monitor surface solves the geometry problem. For a plus-size employee, where the body proportions may not match the manufacturer’s reference user, the independent keyboard tray is the configuration that makes the desk usable. The Humanscale 6G keyboard tray, the Workrite Banana Board, and the Knape and Vogt keyboard arm are the three established models. The accommodation request should specify a keyboard tray with independent adjustability as part of the desk configuration, not as a separate purchase.
Keyboard, mouse, and monitor ergonomics at plus body proportions
The ergonomic configuration of the keyboard, mouse, and monitor is the part of the workstation that the standard ergonomic-assessment templates handle reasonably well for an average-sized user and handle quite poorly for a plus-sized user. The geometry that the templates assume – upper arms hanging straight down from the shoulder, elbows at the user’s side, forearms parallel to the floor, wrists straight, shoulders relaxed – depends on the user’s torso width matching the chair’s seat-pan width, which depends on the chair being the right size for the body. When the chair is too narrow, as the Aeron Size B frequently is for a plus-size user, the upper arms cannot hang straight down. They are pushed outward by the chair’s armrests, which forces the shoulders into a slightly elevated position, which sends the keyboard and mouse use into a chronic shoulder-strain pattern that the worker often experiences as upper back pain.
The fix is not a different keyboard. The fix is a wider chair that allows the upper arms to hang in the position the standard ergonomic geometry assumes. Once the chair is right, the keyboard and mouse choices follow the standard recommendations. A split keyboard, such as the Microsoft Sculpt Ergonomic Keyboard or the Kinesis Freestyle2, allows each hand to position naturally without forcing the wrists into a pronated angle. A vertical mouse, such as the Logitech MX Vertical or the Anker Vertical Ergonomic Mouse, reduces the forearm pronation that contributes to repetitive strain. A trackball mouse, such as the Kensington Expert Mouse, eliminates the wrist-twisting motion entirely. The choices among these are personal-preference choices within the ergonomic frame, not separate plus-size considerations.
The monitor configuration is where the plus-size proportions matter again. The standard ergonomic recommendation is that the top of the monitor sit at or slightly below the user’s eye height when the user is sitting in the chair in a neutral posture, with the monitor at roughly arm’s length distance. The eye height of a seated user varies with the user’s seated torso length, which is the distance from the seat pan to the eye. For a plus-size user with a wider hip and a deeper seat pan, the seated torso length can run different from the manufacturer’s reference user, and the monitor stand or arm needs the adjustability to accommodate. A monitor arm with a wide vertical range, such as the Humanscale M2 or the Ergotron LX, is the right choice. A fixed monitor stand at the manufacturer’s default height is the wrong choice.
The second monitor, where the worker uses one, sits on the same arm or a parallel arm at the same eye height. The temptation to put a second monitor on a stand at a different height is the temptation to introduce a chronic neck-rotation pattern that compounds across the workday. The accommodation request should specify dual monitor arms with parallel adjustability if the worker uses a dual-monitor setup, which is the configuration that supports an aligned posture for both screens.
The work-from-home advantage (and how to claim it)
Work-from-home is the structural accommodation that solves the problem the corporate procurement system cannot solve quickly. When the worker is sitting in a chair at home, the chair is the worker’s chair, the keyboard is the worker’s keyboard, the desk is the worker’s desk, and the geometry can be configured for the worker’s body without negotiating through a procurement cycle. For a plus-size employee who has the option of full or partial work-from-home, claiming and structuring that option is the fastest path to an ergonomically sound workstation.
The claim is not a request for the employer to buy the worker’s home equipment, although a growing share of employers do offer a home-office stipend that the worker can apply to ergonomic furniture. The claim is a request to formalize the work-from-home arrangement so that the worker can invest in their own home setup with confidence that the arrangement will not be revoked mid-investment. A worker who buys a $1,200 ergonomic chair for the home office and is then told to return to the office full-time has spent $1,200 and is back to the original problem. A worker whose work-from-home arrangement is documented as a written, signed agreement with the employer, with a defined scope and a defined notice period before any change, has the predictability to invest in the home setup as a long-term workstation.
The accommodation framing for work-from-home, when the worker has a documented condition, is a continuation of the ADA conversation. The same provider letter that supports the chair accommodation can support a work-from-home accommodation when the condition makes commuting, prolonged sitting in a non-adjustable chair, or office-environment constraints a meaningful limitation. The employer’s interactive-process obligation extends to the work location, not only to the workstation equipment. Many plus-size employees discover, in the course of the chair conversation, that the more durable accommodation is the work-from-home one, and the chair conversation becomes the lever that opens the work-from-home conversation.
The home-office stipend, where the employer offers one, runs typically in the range of $500 to $1,500 as a one-time onboarding allowance, with some employers offering annual refresh allowances in the $200 to $500 range. The stipend is taxable income unless it is administered as an accountable plan with documented business expenses, which is a detail the employer’s payroll team handles but which the worker should understand. The stipend is rarely enough to buy a high-end chair on its own. Combined with the worker’s own investment and any partial reimbursement the employer offers, the stipend is the meaningful seed for a workstation the worker actually controls.
When to escalate (and the 90-day timeline)
The interactive process is supposed to move on a reasonable timeline. The EEOC’s enforcement guidance does not specify a number of days, because reasonable depends on the complexity of the request and the employer’s resources, but the case law and the agency’s published guidance treat anything past ninety days, in the absence of an explicit explanation from the employer, as presumptively unreasonable for a straightforward equipment accommodation. The ninety-day timeline is the working benchmark a plus-size employee should hold in mind, and the timeline is the basis for the escalation process if the employer’s response is slower.
Days one through fourteen are the conversation phase. The five-sentence opener, the documented summary email, the provider letter, and the employer’s written acknowledgment of the request all sit in this window. By the end of week two, the employee should have a written confirmation from the employer that the request has been received and is in the interactive process. If the confirmation has not arrived by day fourteen, the employee should send a follow-up email referencing the original conversation and asking for the confirmation in writing.
Days fifteen through forty-five are the proposal phase. The employer’s HR or benefits team should be in active conversation with the employee about specific accommodations, costs, and timelines. The employee should expect a written proposal, in the form of a specific chair model, a specific desk model, a specific keyboard configuration, with a procurement timeline, by day forty-five. If the proposal is the wrong chair (the Humanscale Freedom, the Aeron Size C in its standard configuration, anything rated below the documented requirement), the employee should respond in writing with the specific reason the proposed accommodation does not meet the functional requirements in the provider letter, and should request a revised proposal.
Days forty-six through seventy-five are the procurement phase. The accommodation has been agreed in writing, the procurement order has been placed with the vendor, and the equipment is in transit. The employee should expect specific delivery and installation dates, and should keep the written record of those dates as the procurement timeline lands.
Days seventy-six through ninety are the installation phase. The chair arrives, the desk arrives, the keyboard arrives, the installation is scheduled, and the worker is sitting in the new setup. If the ninety-day window closes without the accommodation in place, and the employer has not provided an explicit and reasonable explanation for the delay (a vendor backorder, a building access constraint, a procurement-cycle dependency that has been documented), the employee has the basis for an internal escalation to the company’s compliance or legal team.
The internal escalation, before any external complaint, is the right next step. The escalation is a written summary of the request, the documentation, the conversations to date, the agreed accommodations, and the missed timeline, sent to the company’s designated ADA compliance officer or to the head of human resources if no compliance officer is designated. Most internal escalations resolve the timeline question. The handful that do not resolve through internal escalation become the basis for an EEOC charge, which is filed within 180 days of the discriminatory act and which the EEOC will investigate or refer to the appropriate state agency. The vast majority of plus-size workstation accommodation requests never reach the EEOC. They resolve in the interactive process. The ninety-day timeline is what keeps the interactive process accountable.
The 4-move checklist for this quarter
The article ends, as Kira’s columns always do, with the four concrete moves for the next ninety days. The moves are sequenced. Each one depends on the one before it. None of them require waiting for the employer to act first.
Move one. This week. Read the user manual for your current office chair and document the weight rating, the seat pan width, the cylinder rating, and the duty cycle. Save the page reference in a personal file. If you do not know how to find the manual, the model name is on a label under the seat pan or on the base of the chair, and the manual is available on the manufacturer’s website. The documentation is for your file, not the employer’s. Knowing the specific numbers your current setup is rated for is the foundation for every subsequent conversation.
Move two. Next two weeks. Schedule a visit with your primary care provider or your relevant specialist and request a documentation letter for a workplace ADA accommodation, framed in clinical terms with the specific impairment, the limitation on a major life activity, and the functional requirements for the workstation. Bring a written request and the relevant ergonomic guidance to the appointment so that the provider has the language available to use. If your provider is unfamiliar with the workplace accommodation process, the EEOC’s published guidance and the Job Accommodation Network’s resource library both have provider-facing template letters that can be shared.
Move three. Days twenty-two through thirty. Schedule the conversation with HR using the five-sentence opener, bring the provider letter, send the written summary email within twenty-four hours, and request the employer’s written response within fourteen days. Open a personal file with the date-stamped documents that come out of the meeting. The file is the procedural record.
Move four. Days thirty through ninety. Run the interactive process to its conclusion. Track the timeline against the ninety-day benchmark. Escalate internally if the timeline drifts past day ninety without a documented explanation. Hold the position. The chairs exist, the framework exists, the documentation exists, and the only thing standing between the worker and the workstation that fits is the calendar.
The observation, after
What the experience teaches, after the chair arrives and the desk arrives and the keyboard tray clicks into place and the worker sits down on a Monday morning in a workstation that actually fits, is that the entire structure of “ergonomics” as an HR category was built around a population the plus-size employee was never inside. The default chair, the default desk, the default keyboard, the default monitor stand, the default ergonomic assessment, the default user manual, the default training video, the default OSHA guidance document, the default Mayo Clinic recommendation, the default Cornell University Ergonomics Web reference – every one of them was built around an average-sized user whose body proportions match the manufacturer’s reference user. The plus-size employee who walks into the ergonomic-assessment meeting is walking into a system that was never designed with their body in mind, and the system will not adjust on its own. The system adjusts when the employee documents the impairment, names the accommodation, invokes the statute, and holds the timeline. The chairs exist. The framework exists. The HR script exists. What does not exist, until the employee builds it, is the documented case that turns the three things into a real chair under a real body. Ergonomics was never designed for plus-size bodies. The workaround requires documentation, not goodwill.
After three years of reading GLP-1 literature, talking to friends on these drugs, and watching the conversation around them turn into a marketing circus, the most useful thing I can do is set the comparison out plainly. Ozempic and Mounjaro are both FDA-approved injectable medications for type 2 diabetes, and that is the lane this piece stays in. I am not your doctor. I am not a doctor at all. I am a wellness writer who has watched four women in my life try to make this decision while their endocrinologists were running 15 minute appointments, and I have read enough prescribing information to lay the comparison out in a way that does not require a pharmacology degree. The goal is not to pick a winner for you. It is to help you walk into the appointment with the right questions.
Both drugs sit inside a class of medications that has changed how type 2 diabetes is treated over the last decade. Ozempic, made by Novo Nordisk, contains semaglutide and was approved by the FDA in 2017. Mounjaro, made by Eli Lilly, contains tirzepatide and was approved in 2022. They are both weekly injections. They both lower blood sugar. They both tend to reduce appetite as a side effect, which is the part of the story that pulled them onto magazine covers. But they are not the same drug, they do not work through identical mechanisms, and the side effect profiles, the cost picture, and the long-term data are different enough that the choice between them actually matters.
Quick verdict if you have 30 seconds
For type 2 diabetes specifically, Mounjaro (tirzepatide) shows somewhat stronger A1C reduction and weight loss in the head-to-head trial that compared the two, but it is the newer drug with less long-term safety data. Ozempic (semaglutide) has more years of real-world use behind it, a broader prescribing history, and the cardiovascular outcomes data that made it a default in many endocrinology practices. The right pick depends on your A1C target, your insurance coverage, your tolerance for gastrointestinal side effects, and your doctor’s read on your full health picture. Talk to your endocrinologist. Do not order either of these from an internet pharmacy that is not legitimate.
What these drugs are and how they actually work
Ozempic is semaglutide, a GLP-1 receptor agonist. GLP-1 is a hormone your gut releases after a meal, and it does several things – it tells your pancreas to release insulin, it slows down how fast food moves out of your stomach, and it signals fullness to your brain. Semaglutide is a synthetic version of that hormone that lasts long enough to be injected once a week. For someone with type 2 diabetes, the net effect is lower blood sugar after meals, more stable fasting glucose, and often a reduction in appetite that leads to some weight loss as a secondary benefit.
Mounjaro is tirzepatide, which targets the same GLP-1 receptor but also activates a second receptor called GIP. GIP is another gut hormone that plays a role in insulin secretion and fat metabolism. The dual-action design is the whole pitch behind Mounjaro – by hitting two receptors instead of one, it appears to produce a bigger drop in blood sugar and body weight in clinical trials than GLP-1-only drugs. Both drugs are administered through a pen injector, once a week, with dose escalation over several months to let the body adjust.
Worth naming the obvious: both have also been pulled into the weight-loss conversation through their sister formulations – Wegovy is semaglutide marketed for weight loss, Zepbound is tirzepatide marketed for weight loss. This piece is about the diabetes versions specifically. If you are interested in either drug for weight management without type 2 diabetes, that is a separate conversation with a separate prescriber pathway.
Side-by-side comparison
Feature
Ozempic (semaglutide)
Mounjaro (tirzepatide)
Manufacturer
Novo Nordisk
Eli Lilly
FDA approval for type 2 diabetes
2017
2022
Drug class
GLP-1 receptor agonist
Dual GIP/GLP-1 receptor agonist
Administration
Once-weekly subcutaneous injection
Once-weekly subcutaneous injection
Typical dose range
0.25 mg to 2 mg weekly
2.5 mg to 15 mg weekly
Typical A1C reduction in trials
Around 1.5 to 1.8 percentage points
Around 1.9 to 2.4 percentage points
Cardiovascular outcomes data
Yes, established in SUSTAIN-6 trial
Trial ongoing as of 2026
List price without insurance
Around $1,000 per month
Around $1,000 to $1,100 per month
Ozempic: the one with the longer track record
Ozempic has been in widespread use for type 2 diabetes since 2017, which means nearly a decade of real-world prescribing data, post-marketing safety surveillance, and outcomes research back it up. For an endocrinologist deciding what to start a newly diagnosed patient on, that history matters. It is the more conservative pick in the sense that fewer surprises tend to show up after a drug has been in the population at scale for years.
The cardiovascular data is one of the strongest pieces of the Ozempic case. The SUSTAIN-6 trial showed that semaglutide reduced the risk of major cardiovascular events in adults with type 2 diabetes who had cardiovascular disease or were at high risk for it. That kind of outcomes data, not just blood sugar numbers but actual heart attack and stroke reduction, is part of why semaglutide became a default in many practices. If you have type 2 diabetes plus existing heart disease, this is a factor your doctor will weigh.
A1C reduction in the trials sits in the range of 1.5 to 1.8 percentage points depending on dose. Weight loss as a secondary benefit averages somewhere in the 10 to 15 pound range over roughly a year of use, with wide individual variation. The most common side effects are gastrointestinal – nausea, occasional vomiting, constipation, diarrhea – and they are most pronounced during the dose escalation phase. Most people who tolerate the drug long-term find the GI side effects fade after the first two to three months.
The real-world downside that does not show up in trial data: shortages. Because of off-label weight-loss demand, semaglutide supply has been intermittently constrained, which means even diabetic patients have sometimes had trouble filling prescriptions. Ask your pharmacy about current availability before you commit to a plan. For broader context on adjusting to a chronic diagnosis, Lori Gottlieb’s
Maybe You Should Talk to Someone
is the book I keep recommending to women navigating new medical news.
Mounjaro: the newer drug with stronger trial numbers
Mounjaro entered the market in 2022 with clinical trial data that turned heads. The SURPASS series of trials showed A1C reductions in the 1.9 to 2.4 percentage point range depending on dose, which is meaningfully larger than what GLP-1-only drugs had been delivering. The weight loss numbers were also larger, with patients on the higher doses losing 15 to 20 percent of starting body weight in some studies. For someone with high A1C numbers that have not come down with metformin and lifestyle changes alone, the bigger reduction can be the difference between staying on oral medications and adding insulin.
The mechanism is the part that makes researchers cautiously optimistic. GIP activation, in combination with GLP-1 activation, appears to produce metabolic effects that GLP-1 alone does not. Research is underway looking at whether tirzepatide may have benefits for sleep apnea, fatty liver disease, and cardiovascular outcomes in non-diabetic populations, but as of 2026 the cardiovascular outcomes trial in diabetic patients is still ongoing. That is the asterisk – we do not yet have the same heart-attack-and-stroke reduction evidence for Mounjaro that we have for Ozempic.
Side effects look broadly similar to Ozempic, with some patients reporting more pronounced GI symptoms during dose escalation. The dosing schedule starts at 2.5 mg and can be titrated up to 15 mg over months, with increases happening no more often than every four weeks to allow the body to adjust. The titration is not a small consideration – moving from 2.5 mg to 15 mg is a six-month-plus process for most people who reach the top dose. Cost runs roughly $1,000 a month at list price, with actual out-of-pocket depending on insurance, manufacturer savings card eligibility, and whether your plan has tirzepatide on its type 2 diabetes formulary. If you want a journal to track dosing, meals, blood sugar, and side effects week to week, a basic dot-grid notebook from
a brand like Leuchtturm1917
is what my therapist friend recommends for this kind of self-tracking.
Where they overlap and where they differ
Both drugs are weekly pen injections, both work through gut-hormone signaling, both reduce blood sugar, both tend to reduce appetite, and both carry warnings about pancreatitis, gallbladder problems, and a boxed warning related to thyroid C-cell tumors based on rodent studies. Both require dose escalation over months. Both produce GI side effects, especially in the first weeks. Both are expensive without insurance. Both have been targets of supply shortages because of off-label weight-loss demand. The overlap is substantial.
Where they differ comes down to four things. First, the magnitude of the effect – Mounjaro produces larger reductions in both A1C and body weight in head-to-head comparisons, with SURPASS-2 showing tirzepatide outperforming semaglutide on both measures. Second, years of safety data – Ozempic has more, full stop. Third, cardiovascular outcomes evidence – established for semaglutide, still being researched for tirzepatide. Fourth, the insurance and access landscape – which one your plan covers can be the deciding factor regardless of clinical merits, and that is worth checking before you and your doctor settle on a plan.
Which one for which person
If your A1C is moderately high (in the 7 to 8.5 range) and you have existing cardiovascular disease or risk factors, Ozempic is the option with the cardiovascular outcomes data behind it. For someone with a relatively simple type 2 diabetes picture and an endocrinologist who wants to start with the more conservatively-evidenced option, this is the path many practices default to.
If your A1C is significantly high (above 8.5) and you have not gotten the reduction you need from metformin, lifestyle, or a previous GLP-1, Mounjaro’s larger A1C-lowering effect is the case for trying it. If your doctor’s read is that you need a bigger drop to get to target and avoid moving to insulin, the stronger trial data on tirzepatide is the argument for the newer drug.
If insurance is the practical constraint – and for most people it is – check your formulary first. Some plans cover one and not the other, some require step therapy through metformin and a sulfonylurea first, some have prior authorization requirements that take weeks to clear. The Eli Lilly and Novo Nordisk savings programs each cover commercially-insured patients under specific conditions, and your endocrinologist’s office often has the most current information. For tracking appointments, glucose readings, and questions for your next visit, a dedicated medical journal like
a health tracking notebook
is genuinely useful, especially for the first six months when you are learning your body’s response.
If you are weighing either drug primarily for weight loss without type 2 diabetes, the right conversation is about Wegovy or Zepbound with a doctor who specializes in obesity medicine, not Ozempic or Mounjaro off-label. The dosing, the insurance coverage, and the prescribing pathway are different.
Frequently asked questions
How long does it take to see results from either drug?
Blood sugar improvements often start within the first two to four weeks at the starting dose, though full A1C reduction takes about three months to show up on a lab draw. Weight changes typically begin within the first month or two and continue gradually over a year, with most of the loss in the first six to nine months. These drugs work on a slow curve, not a dramatic week-over-week one.
What happens if you stop taking them?
Blood sugar typically rises back toward pre-treatment levels, and weight that was lost during treatment often comes back over the following year for many patients. These are treatments meant for long-term management of a chronic condition. Talk to your doctor before stopping for any reason other than a medical emergency.
Are the side effects actually as bad as the headlines suggest?
The most common side effects (nausea, occasional vomiting, constipation, diarrhea) affect a significant minority of users, are most pronounced during dose escalation, and tend to improve over the first two to three months. Serious side effects (pancreatitis, gallbladder issues, severe GI symptoms requiring hospitalization) are uncommon but real. Both drugs are contraindicated for people with a personal or family history of medullary thyroid carcinoma.
Can you switch from Ozempic to Mounjaro or vice versa?
Yes, with a doctor’s guidance. The transition is usually handled by stopping one drug and starting the other at the lowest dose, then titrating up over weeks or months. Some patients switch because of side effects, some because of insurance changes, some because A1C is not responding on the first drug. It is not a decision to make on your own based on a TikTok video.
Final pick
I am not picking a winner here in the way I would for shapewear or skincare, because this is a prescription medication for a chronic disease and the right pick depends on your specific picture in a way a single recommendation cannot capture. What I will say: if I were sitting with a friend asking me which one to ask her endocrinologist about first, my read of the evidence as of 2026 is that Ozempic is the safer default for someone with a longer time horizon and moderate A1C, and Mounjaro is the stronger option for someone with high A1C who needs a bigger reduction and whose insurance covers it. Either one is a real conversation worth having with a doctor who knows your full health picture. Bring the trial data, bring your A1C history, bring your insurance card, and bring the questions you actually have. This isn’t going to fix you, but it might help on a Tuesday. For the journal to take to the appointment,
something simple and durable
is all you need.
There are moments when your head feels so full that you cannot think straight. When emotions pile on top of each other until you cannot tell whether you are angry or sad or scared or all three at once. When you know something is bothering you but you cannot quite name it, and it just sits there in your chest like a weight you cannot put down.
These are the moments when mental health journal prompts can genuinely change things. Not because writing in a journal is magic – it is not – but because the act of putting your inner world into words forces your brain to slow down, organize, and make sense of what it is experiencing. It takes the swirling chaos of feelings and pins them to the page, where you can look at them clearly and figure out what they actually mean.
If you have tried journaling before and found yourself staring at a blank page with no idea where to start, these prompts are for you. If you have never journaled and are curious about it, these prompts are for you too. And if you journal regularly but feel like you have been stuck in surface-level territory, these mental health journal prompts will take you deeper in the best possible way.
Why Journaling Is One of the Best Things You Can Do for Your Mental Health
Before we dive into the prompts, let us talk about why journaling is so effective for mental health. Because understanding the “why” will help you stick with the practice even on days when you do not feel like writing.
Research consistently shows that expressive writing – the kind where you write honestly about your thoughts and feelings – has measurable benefits for both mental and physical health. A landmark study by psychologist James Pennebaker found that people who wrote about emotionally significant events for just 15 to 20 minutes a day showed improvements in immune function, reduced blood pressure, fewer doctor visits, and better emotional wellbeing. Those results have been replicated dozens of times across different populations.
Here is what happens in your brain when you journal. Writing about emotions engages your prefrontal cortex, the rational, planning part of your brain. This naturally reduces activity in your amygdala, the fear and emotion center. In other words, the simple act of writing about your feelings helps your brain shift from reactive mode to reflective mode. You move from “I am drowning in this feeling” to “I am looking at this feeling and trying to understand it.”
Journaling also creates what psychologists call “cognitive defusion” – the ability to see your thoughts as thoughts rather than as absolute truths. When you write “I feel like I am not good enough,” you start to notice that it is a feeling, not a fact. That tiny shift in perspective can be enormously freeing.
For women navigating body image challenges, societal pressures, relationship stress, career uncertainty, or any of the countless things that weigh on us, journaling offers a private, judgment-free space to be completely honest. You do not have to filter yourself. You do not have to worry about someone else’s reaction. You can just be real.
And that is exactly what these mental health journal prompts are designed to help you do. A good
guided mental health journal
with prompts already included can make getting started even easier.
How to Use These Mental Health Journal Prompts
You do not need to work through all 30 prompts in order. In fact, I would encourage you not to. Instead, browse through the list and pick the one that speaks to you in this moment. The one that makes your stomach tighten a little or your eyes widen or your heart say “yes, that one.” That is your prompt for today.
Setting Up Your Journaling Space
You do not need anything fancy to journal. A notebook and a pen will do. But if creating a cozy, inviting space helps you show up to the practice, go for it. Light a candle. Make a cup of tea. Put on soft music. Wrap yourself in something comfortable. Creating a small ritual around journaling signals to your brain that this is a special, sacred time for you.
Some people prefer typing on a laptop or phone, and that is perfectly fine. The benefits come from the process of expressing yourself in words, regardless of the medium. However, research does suggest that handwriting may engage slightly different brain processes and can feel more therapeutic for some people. Experiment and see what works for you.
Ground Rules for Your Journal
There are no wrong answers. Seriously. This is not a test. Write in full sentences or fragments. Write neatly or in a complete mess. Write three lines or three pages. The only “rule” is honesty. Be as honest with yourself as you can. No one else will read this unless you choose to share it.
If a prompt brings up big emotions, that is actually a sign that it is working. Let yourself feel. Cry if you need to. Put the journal down and take a break if you need to. Then come back when you are ready. You are in control of this process.
Try to write for at least 10 to 15 minutes per prompt. Give yourself time to get past the surface-level answers and into the deeper stuff. The most important insights often come after the first wave of obvious responses, when you push yourself to keep going and see what else is there.
Prompts for Processing Difficult Emotions (1 through 10)
These mental health journal prompts are designed to help you sit with and process the emotions that are hardest to face. They are not about fixing anything – they are about understanding and being with what is.
Prompt 1 – What emotion have I been avoiding lately, and what might happen if I let myself feel it fully?
We all have emotions we try to push away – anger, grief, jealousy, fear. This prompt invites you to name the one you have been sidestepping and explore what it might be trying to tell you. Often, the emotions we avoid the most carry the most important messages. Anger might be telling you that a boundary has been crossed. Grief might be telling you that something mattered deeply. Give yourself permission to go there.
Prompt 2 – Write about a time recently when you felt truly hurt. What happened, and what did you need in that moment that you did not get?
This prompt helps you identify unmet needs – one of the most important skills for emotional health. When we are hurt, we often focus on what the other person did wrong. But underneath the hurt is always a need that was not met – a need for respect, for safety, for understanding, for love. Naming that need is the first step toward being able to ask for it or give it to yourself.
Prompt 3 – If my body could talk right now, what would it say to me?
Our bodies hold emotions that our minds have not processed yet. Tension in your shoulders, a knot in your stomach, heaviness in your chest – these are all your body’s way of communicating. This prompt invites you to listen. And for those of us with complicated body relationships, it can be a powerful way to start seeing your body as an ally rather than an adversary.
Prompt 4 – What am I most ashamed of right now, and what would I say to a friend who was carrying this same shame?
Shame thrives in secrecy and silence. Writing about it – even just for your own eyes – breaks that cycle. And the second part of this prompt, where you imagine offering compassion to a friend with the same shame, helps you access kindness for yourself that might otherwise feel out of reach.
Prompt 5 – Write a letter to the version of yourself who was going through the hardest time in your life. What does she need to hear?
This prompt can be deeply emotional, so approach it with care. Writing to your past self from the safety of the present allows you to process old pain with the wisdom and compassion you have now. You can acknowledge what was hard, validate the feelings, and offer the comfort that nobody else provided at the time.
Prompt 6 – What is one thing I am angry about that I have not allowed myself to express?
Women are often socialized to suppress anger, to be “nice” and “agreeable.” But unexpressed anger does not disappear – it turns inward and becomes depression, anxiety, or physical symptoms. Give your anger a voice on the page. You do not have to act on it. You just need to let it exist.
Prompt 7 – What story am I telling myself about my current situation, and is it the whole truth?
We all construct narratives about our lives, and those narratives shape how we feel. “I am stuck.” “Nothing ever works out for me.” “I always mess things up.” This prompt invites you to examine your current narrative and ask whether it is a fact or a story. What evidence supports it? What evidence contradicts it? Is there a more complete, more compassionate story available?
Prompt 8 – What loss am I still grieving, even if it happened a long time ago?
Grief does not follow a timeline. You might still be mourning a relationship, a dream, a version of yourself, or a life you thought you would have. This prompt gives you permission to grieve on your own schedule, without judgment. There is no expiration date on loss.
Prompt 9 – Write about something you feel guilty about. Then write about what you would need to forgive yourself.
Guilt can be useful when it motivates us to repair harm. But chronic guilt – the kind that just loops and loops without resolution – is corrosive. This prompt helps you distinguish between guilt that has served its purpose and guilt that has overstayed its welcome. And it begins the process of self-forgiveness, which is one of the most healing things you can do.
Prompt 10 – How am I really doing right now? Not the version I tell other people, but the real answer.
Sometimes the most powerful journal prompt is the simplest one. Most of us have a rehearsed answer for “how are you?” This prompt asks you to drop the script and tell the truth, even if the truth is messy or contradictory or hard to put into words. Let yourself be seen, even if you are the only one watching.
Prompts for Reducing Anxiety and Finding Calm (11 through 20)
These mental health journal prompts specifically target anxiety – the racing thoughts, the what-ifs, the constant feeling that something bad is about to happen. Writing is one of the most effective tools for anxiety because it forces your spinning mind to slow down and deal with one thought at a time.
Prompt 11 – List everything that is currently worrying you, no matter how small or irrational it seems.
A brain dump. Get it all out. Every worry, every concern, every nagging thought. When anxious thoughts are swirling in your head, they feel infinite and unmanageable. When they are on paper, you can actually see that there are a finite number of them – and some of them are probably not as big as they felt when they were competing for space in your mind.
Prompt 12 – For each worry on your list, write down whether it is something you can control, something you can influence, or something that is completely outside your control.
This follow-up to Prompt 11 is incredibly clarifying. When you sort your worries into these three categories, you quickly see where your energy is best spent – and where you are burning energy on things you cannot change. For the things outside your control, practice the mantra: “I release what I cannot control.”
Prompt 13 – What is the worst case scenario I am afraid of, and what would I actually do if it happened?
Anxiety often keeps us stuck in vague, formless dread. This prompt forces you to get specific. And here is what usually happens: when you actually think through the worst case scenario, you realize that you would survive it. You would cope. It would be hard, but you would find a way. That realization is incredibly calming.
Prompt 14 – Write about a time when you were anxious about something that turned out fine.
Your brain has a negativity bias – it remembers the times things went wrong and forgets the countless times your anxiety was unfounded. This prompt pushes back against that bias. Remind yourself of your track record. How many times has the thing you worried about never actually happened? Probably more times than you can count.
Prompt 15 – What would today look like if I were not anxious? Describe it in detail.
This prompt is a gentle visualization exercise. Imagine your day without the weight of anxiety. What would you do differently? How would you move through the world? What would you try? What would you enjoy? This is not about wishing your anxiety away – it is about connecting with the life that exists underneath it, the life that is still possible and waiting for you.
Prompt 16 – What am I really afraid of underneath this anxiety?
Anxiety is often a surface emotion that is masking something deeper – fear of rejection, fear of failure, fear of not being enough, fear of being seen. This prompt asks you to dig beneath the anxiety and see what is really driving it. When you name the core fear, it loses some of its power.
Prompt 17 – List five things I can see, four things I can touch, three things I can hear, two things I can smell, and one thing I can taste right now.
This is the classic 5-4-3-2-1 grounding technique, adapted for journaling. Writing it down instead of just thinking it adds an extra layer of grounding because you are engaging your motor system and your visual processing. Use this prompt when anxiety is spiking and you need to come back to the present moment quickly.
Prompt 18 – What is one kind thing I can do for myself in the next hour?
When anxiety feels overwhelming, the idea of feeling better eventually can seem impossible. But the next hour? You can do something about the next hour. Maybe it is making a cup of tea, stepping outside for five minutes, putting on your favorite playlist, or changing into comfortable clothes. This prompt brings your focus from the terrifying future to the manageable present. Changing into something cozy like a
super soft lounge jogger set
can genuinely help shift your nervous system.
Prompt 19 – Write about someone who makes you feel safe. What is it about them that creates that feeling?
Thinking about safety when you are anxious might seem counterintuitive, but it actually activates your attachment system, which is the body’s natural antidote to the threat system. Write in detail about this person – how they look at you, how they speak to you, what they do that makes you feel held. You can carry this image with you as an internal resource for anxious moments.
Prompt 20 – What would I tell my anxious thoughts if they were a scared child?
This reframe is beautiful and effective. Your anxious thoughts are not your enemy – they are a part of you that is trying to protect you, just doing it in a way that is not helpful anymore. If those thoughts were a scared child, you would not yell at them or try to silence them. You would get down on their level, acknowledge their fear, and gently reassure them. Try that approach in your journal.
Prompts for Building Self-Awareness and Clarity (21 through 30)
These mental health journal prompts are about understanding yourself better – your patterns, your values, your dreams, and your needs. They are less about processing pain and more about building a clear, honest relationship with who you are.
Prompt 21 – What does my ideal ordinary day look like, from morning to night?
Not your dream vacation or your fantasy life – your ideal regular Tuesday. What time do you wake up? What do you eat? How do you spend your time? Who are you with? This prompt reveals what you actually value, not what you think you should value. And it can show you which parts of your current routine are aligned with your true self and which parts are not.
Prompt 22 – What am I tolerating in my life that I should not be?
We all have things we put up with – the friend who drains our energy, the cluttered space we walk past every day, the job that does not value us, the clothes that do not fit right. This prompt asks you to get honest about what you are tolerating and consider what it would take to change it. Sometimes just naming a toleration is the first step to eliminating it.
Prompt 23 – When do I feel most like myself? What am I doing, and who am I with?
This prompt helps you identify the conditions under which you thrive. When you know what makes you feel most alive and authentic, you can deliberately create more of those conditions in your life. It is like reverse-engineering happiness.
Prompt 24 – What is a belief I held five years ago that I no longer believe? What changed?
This prompt is a powerful reminder that you are always growing and evolving. The beliefs that feel so solid and permanent right now may shift dramatically in the next few years. This awareness can make you hold your current beliefs a little more lightly and be more open to change.
Prompt 25 – What boundary do I need to set that I have been avoiding?
Boundaries are one of the most important tools for mental health, and they are also one of the hardest things to implement. This prompt gives you space to identify a needed boundary and explore what is stopping you from setting it. Is it fear of conflict? Fear of rejection? People-pleasing? Understanding the obstacle is the first step to overcoming it.
Prompt 26 – Write about a compliment you received that you had trouble accepting. Why was it hard to believe?
The compliments we deflect often reveal our deepest insecurities. If someone said you were beautiful and you immediately thought “they are just being nice,” that tells you something about what you believe about your appearance. This prompt invites you to explore why certain positive messages do not land and what it would take to let them in.
Prompt 27 – What would change in my life if I truly believed I was enough, exactly as I am right now?
This is a big one. Really sit with it. If the voice that says “not good enough, not thin enough, not smart enough, not successful enough” went completely quiet – what would be different? What would you stop doing? What would you start doing? How would you walk through the world? This prompt gives you a glimpse of the freedom that is possible when you release the need for external validation.
Prompt 28 – List three things you are proud of that have nothing to do with how you look or what you have accomplished.
We are so conditioned to measure our worth by appearance and achievement that we forget all the other things that make us valuable. Your kindness. Your ability to make people laugh. Your resilience. Your curiosity. The way you love. This prompt reconnects you with the parts of yourself that have nothing to do with productivity or beauty standards.
Prompt 29 – What does my inner critic sound like, and whose voice is it really?
Your inner critic did not come out of nowhere. It is usually a composite of critical voices from your past – a parent, a teacher, a bully, a culture. When you identify whose voice your inner critic is actually using, you realize that it is not your truth. It is someone else’s judgment that you internalized. And that means you have the power to give it back.
Prompt 30 – Write a letter to your future self, one year from now. What do you hope she knows, feels, and believes?
This final prompt is about hope and intention. It is a way to set a compass heading for your inner life. What emotional growth do you hope for? What beliefs do you hope to have released? What relationship do you hope to have with yourself? Write it as a love letter to the woman you are becoming. And then put it somewhere safe and read it in a year.
Tips for Making Journaling a Sustainable Habit
Having 30 beautiful mental health journal prompts is wonderful, but they only work if you actually use them. Here are some tips for making journaling a lasting part of your self-care routine.
Choose a Consistent Time
Journaling works best when it becomes a habit, and habits need consistency. Pick a time that works for your life – first thing in the morning, during your lunch break, or before bed are all popular choices. Morning journaling can set a positive tone for the day. Evening journaling can help you process what happened and release the day before sleep. There is no best time – just the time that you will actually do it.
Lower the Bar
If writing for 15 minutes feels like too much, write for five. If five minutes feels like too much, write for two. If opening your journal feels like too much, just set it on the table and look at it. Seriously. The hardest part is starting. Once you begin, you will usually write more than you planned. But even on the days when you write one sentence, you showed up. That counts.
Invest in Tools You Love
You are more likely to journal if you enjoy the physical experience of it. A
beautiful leather journal
that feels good in your hands, a pen that writes smoothly, a cozy spot that feels like yours – these things matter more than you might think. They transform journaling from a chore into a ritual.
Do Not Reread Right Away
Some journal entries are for processing, not for rereading. If you wrote something raw and emotional, let it sit. You can come back to it in a week or a month with fresh eyes and new perspective. Or you can never read it again. The healing happened in the writing itself.
Mix It Up
You do not have to answer a deep mental health journal prompt every single day. Some days, a simple gratitude list is perfect. Some days, doodling is what you need. Some days, writing an angry rant is the right medicine. Let your journal be a flexible, living thing that adapts to what you need in the moment.
Consider a Digital Option Too
If you travel a lot or want your journal always accessible, consider keeping a digital journal on your phone or tablet alongside a physical one. Apps designed for therapeutic journaling can offer additional features like mood tracking and pattern recognition that add another layer to your practice. A
tablet with a stylus
can give you the handwriting experience digitally.
There is also something powerful about looking back at old journal entries months or years later. You see patterns you could not see in the moment. You see growth you did not realize was happening. You see that the things that felt like the end of the world were actually the beginning of something new. Your journal becomes a record of your resilience, and that is an incredibly valuable thing to have.
Whatever prompt you choose today, remember this: there is no wrong way to journal. Messy is fine. Repetitive is fine. Contradictory is fine. Your journal is a mirror of your inner world, and inner worlds are complex, beautiful, and always changing. Give yourself permission to put it all on the page – the light stuff and the heavy stuff, the clarity and the confusion, the hope and the fear. It all belongs there. And so do you.
Key Takeaways
Journaling activates your prefrontal cortex and reduces amygdala activity, helping your brain shift from reactive to reflective mode – making it one of the most effective tools for mental health.
You do not need to answer all 30 prompts in order – pick the one that resonates with you right now and write for at least 10 to 15 minutes to get past surface-level answers.
The prompts are organized into three categories: processing difficult emotions, reducing anxiety, and building self-awareness – so you can choose based on what you need most.
Making journaling sustainable is about lowering the bar, choosing a consistent time, and investing in tools you actually enjoy using.
There is no wrong way to journal – messy, repetitive, and contradictory entries are all part of the process and equally valuable for your mental health.
Frequently Asked Questions
How often should I use mental health journal prompts?
There is no strict rule, but research suggests that journaling three to four times per week provides significant mental health benefits. Daily journaling can be wonderful if it works for your schedule, but even once or twice a week is valuable. The most important thing is consistency over time rather than frequency. A shorter, regular practice is more beneficial than long, sporadic sessions. Listen to your needs and adjust accordingly.
What if journaling brings up really intense emotions that feel overwhelming?
It is completely normal for deep journal prompts to bring up strong emotions. If you feel overwhelmed, put down the pen and use a grounding technique – focus on your senses, take slow deep breaths, or step outside for fresh air. You can always come back to the prompt later. If journaling consistently triggers intense distress, consider working with a therapist who can help you process these emotions in a supported environment. Journaling can complement therapy beautifully but is not a replacement for professional support when needed.
Should I keep my journal private or share it with someone?
Your journal should be private by default. The power of journaling comes from the freedom to be completely honest without filtering yourself for an audience. When you know no one else will read it, you give yourself permission to write things you might not say out loud. That said, you might occasionally choose to share a specific entry with a therapist, partner, or trusted friend if it helps you communicate something important. The key is that sharing should always be your choice, never an obligation.
Can journaling replace therapy for mental health?
Journaling is a wonderful self-care tool, but it is not a substitute for professional mental health treatment when that is needed. Think of journaling as one tool in your mental health toolkit – it works beautifully alongside therapy, medication, social support, and other interventions. If you are experiencing persistent anxiety, depression, trauma symptoms, or any mental health concern that is interfering with your daily life, please reach out to a mental health professional. Journaling can enhance your therapeutic work, but it should not be your only resource during serious mental health challenges.
Why Walking Is the Most Underrated Weight Loss Tool
The 30-day walking for weight loss plan you are about to follow is not a flashy fitness trend or an extreme challenge designed for people who already work out five days a week. This is a progressive, realistic plan built specifically for plus-size women who want to start moving more, feel stronger, and see real changes in their bodies and energy levels. Walking is the exercise that actually sticks, and this plan is designed to prove it.
Here is why walking deserves more respect than it gets. Research published in the Journal of Exercise Nutrition and Biochemistry found that women who walked 50 to 70 minutes three times per week for 12 weeks reduced their body fat, waist circumference, and BMI significantly. Another study in the British Journal of Sports Medicine showed that brisk walking produces comparable fat loss results to running when the energy expenditure is matched. You do not need to run to lose weight. You need to walk consistently and progressively.
Walking has several advantages over more intense forms of exercise, especially for plus-size women. It is low impact, meaning less stress on your joints, knees, and back. It does not require gym equipment or a membership. It can be done anywhere – your neighborhood, a park, a shopping mall, a treadmill at home. And perhaps most importantly, it does not leave you so exhausted and sore that you dread doing it again tomorrow. Sustainability is the secret ingredient in any weight loss plan, and walking is the most sustainable exercise on the planet.
The plan ahead gradually increases your walking time, pace, and intensity over four weeks. You will start where you are – not where someone else thinks you should be – and build from there. Every day has a specific goal, but every day also has built-in flexibility because real life does not pause for a fitness plan. If you miss a day, you pick up where you left off. No guilt, no starting over, no quitting.
Before You Start – Setting Yourself Up for Success
Check in With Your Body
If you have been mostly sedentary, have joint issues, or have any health conditions that might be affected by increased physical activity, talk to your doctor before starting. This is not about getting permission to move your body – your body is yours and you are allowed to move it. It is about making sure you have any information you need to move safely and comfortably. If you have knee issues, your doctor might suggest a knee brace. If you have plantar fasciitis, you might need specific shoes. This information helps, not hinders.
Get Your Baseline
Before day one, go for a walk at your normal comfortable pace and time how long you can walk before you feel like you need to stop or slow down significantly. This is your baseline. Maybe it is 10 minutes. Maybe it is 25 minutes. Maybe it is 5 minutes. Whatever it is, that number is your starting point and there is absolutely nothing wrong with it. Write it down. You are going to be amazed by how much that number changes over 30 days.
Choose Your Walking Route
Pick two to three routes near your home or workplace. Having options prevents boredom and gives you choices based on weather, time, and energy levels. A flat neighborhood loop is perfect for easy days. A route with some gentle hills adds natural intensity for harder days. An indoor option – a mall, a big box store, a treadmill – gives you a backup for bad weather days. Knowing your routes in advance removes one more decision from your daily routine, which makes it easier to just go.
Schedule Your Walks
Put your walks on your calendar like appointments. Research consistently shows that people who schedule their workouts are significantly more likely to complete them than people who try to fit them in when they have time. Morning walkers tend to be the most consistent because they get it done before the day’s demands pile up, but the best time to walk is whatever time you will actually do it. If that is your lunch break, after dinner, or during your kid’s soccer practice, that is perfect.
Track Your Progress
You need a way to track your walks. A simple notebook works. A step counter on your phone works. A fitness tracker works. The method does not matter as much as the habit of recording what you did. Tracking creates accountability, shows your progress over time, and gives you concrete evidence that you are changing even on days when the scale does not move.
Week 1 – Building Your Foundation (Days 1 through 7)
The goal of week one is simple – build the habit. You are not trying to break records or push limits. You are teaching your body and brain that walking is now a regular part of your routine. Consistency matters more than intensity this week.
Day 1 – Your Starting Walk
Walk for 15 minutes at a comfortable, conversational pace. This means you could hold a full conversation with someone without getting winded. If 15 minutes feels like too much, walk for whatever your baseline time was and work up from there. If 15 minutes feels easy, resist the urge to do more. You are building a habit, not proving anything.
Day 2 – Same Pace, Same Time
Walk for 15 minutes again at the same comfortable pace. Same route or a different one. Notice how your body feels compared to yesterday. Some people feel a little stiff after day one. That is completely normal and typically resolves within the first few minutes of walking.
Day 3 – Add Five Minutes
Walk for 20 minutes at a comfortable pace. This small increase is enough to challenge you slightly without feeling overwhelming. If you need to slow down during the last five minutes, slow down. Finishing the walk matters more than maintaining a specific speed.
Day 4 – Rest or Light Movement
Rest days are part of the plan, not a break from the plan. Your muscles repair and strengthen during rest. Today, you can take a complete rest day or do some gentle stretching, a slow stroll around your neighborhood, or some light housework. Listen to your body.
Day 5 – 20 Minutes With Purpose
Walk for 20 minutes, but this time, focus on your posture. Stand tall with your shoulders back and down, engage your core by gently pulling your belly button toward your spine, and swing your arms naturally. Good posture while walking increases calorie burn, reduces back pain, and strengthens your core without any extra effort.
Day 6 – 20 Minutes Exploring
Walk for 20 minutes on a different route than you have been using. A new route keeps your brain engaged, makes the walk feel shorter, and prevents the boredom that kills walking plans. If possible, find a route with some natural beauty – a park, a tree-lined street, a path near water.
Day 7 – Your First Longer Walk
Walk for 25 minutes at your comfortable pace. This is ten minutes more than day one, which is a meaningful increase. Pay attention to how you feel at minute 25 compared to how you felt at minute 15 on day one. You are already building endurance.
Week 1 Summary
Total walking days: 6 (with 1 rest day). Total walking time: approximately 115 minutes. Average daily walk: about 19 minutes. You have established the habit, built a small amount of endurance, and proven to yourself that you can do this consistently. That is a massive win.
Week 2 – Increasing Duration and Pace (Days 8 through 14)
Week two builds on your foundation by gradually increasing both how long and how fast you walk. You are ready for more, and your body is adapting. This week introduces the concept of pace variation, which is one of the most effective tools for increasing calorie burn during walks.
Day 8 – 25 Minutes With a Speed Check
Walk for 25 minutes. During the middle ten minutes, pick up your pace slightly. You should still be able to talk, but you might need to pause between sentences to breathe. This slightly faster pace is often called a brisk walk, and it is where the real calorie burning happens. Slow back down for the last five minutes as a cool-down.
Day 9 – 25 Minutes Steady
Walk for 25 minutes at a steady, moderate pace. Not your slowest, not your fastest, just a consistent moderate effort. Focus on keeping your stride even and your breathing rhythmic. Consistency of effort teaches your cardiovascular system to work more efficiently.
Day 10 – 30 Minutes With Intervals
Walk for 30 minutes. After a five-minute warm-up at an easy pace, alternate between two minutes of brisk walking and two minutes of comfortable walking. Repeat this pattern until you reach the 25-minute mark, then cool down with five minutes of easy walking. These intervals boost your heart rate and increase calorie burn without requiring sustained high-intensity effort.
Day 11 – Rest or Gentle Movement
Your second rest day of the plan. Use it wisely. Gentle stretching, foam rolling, or a slow walk of 10 minutes or less is fine. Your body needs this recovery time especially as you start increasing intensity.
Day 12 – 30 Minutes Steady Brisk
Walk for 30 minutes at a brisk pace for the entire walk (after a brief warm-up). Brisk walking typically means 3 to 3.5 miles per hour, but do not worry about exact speed. The talk test is your best guide – you can talk but you would rather not sing. This is the pace that research links most strongly to weight loss and cardiovascular improvement.
Day 13 – 30 Minutes With Hills
Walk for 30 minutes on a route that includes some incline. Hills naturally increase your effort level, engage your glutes and hamstrings more than flat walking, and boost calorie burn significantly. If you do not have hills nearby, use a treadmill with a 2 to 4 percent incline, or find a parking garage and walk the ramps. Slow your pace on the uphills as needed. The incline is doing the work.
Day 14 – 35 Minutes at Your Choice
Walk for 35 minutes. You choose the pace and the route. This is about building your longest walk yet while also giving you ownership of the process. Some people prefer a steady moderate pace. Others prefer intervals. Some want hills. Choose what felt best this week and do more of it.
Week 2 Summary
Total walking days: 6 (with 1 rest day). Total walking time: approximately 175 minutes. Average daily walk: about 29 minutes. You have increased your walking time by over 50 percent from week one and introduced pace variation and incline. Your cardiovascular fitness is noticeably improving.
Week 3 – Adding Intensity and Variety (Days 15 through 21)
By week three, you are a walker. The habit is forming, your endurance has grown, and your body is ready for more challenge. This week introduces longer walks, more structured intervals, and some strength elements that amplify your results.
Day 15 – 35 Minutes With Power Intervals
Walk for 35 minutes. After a five-minute warm-up, do one minute of your fastest sustainable walking pace followed by two minutes of moderate recovery pace. Repeat this pattern for 25 minutes, then cool down for five minutes. These power intervals are where significant calorie burn happens because your heart rate spikes during the fast portions and stays elevated during recovery.
Day 16 – 35 Minutes Steady With Arm Movement
Walk for 35 minutes at a brisk, steady pace. Add intentional arm movement – pump your arms in a controlled, 90-degree angle motion as you walk. This turns your walk into a full-body exercise by engaging your upper body, core, and increasing your overall calorie burn by 5 to 10 percent. It also naturally increases your walking speed without feeling like you are pushing harder with your legs.
Day 17 – 40 Minutes Easy Pace
Walk for 40 minutes at a comfortable, easy pace. This is a recovery-paced walk with a longer duration. The purpose is to build endurance and burn calories through duration rather than intensity. Put on a podcast, call a friend, or just enjoy being outside. Not every walk needs to be hard to be effective.
Day 18 – Rest Day
Full rest or very gentle activity. At this point in the program, rest days are essential for preventing overuse injuries and allowing your muscles, joints, and connective tissue to adapt to the increased demands you are placing on them. Use this day to stretch, take a bath, or do some gentle yoga.
Day 19 – 35 Minutes With Walking Lunges
Walk for 35 minutes at a brisk pace. At the 10-minute mark and again at the 20-minute mark, stop and do 10 walking lunges (5 per leg). If lunges are uncomfortable for your knees, substitute 30 seconds of marching in place with high knees. Adding these brief strength bursts to your walk increases muscle engagement and boosts your metabolic rate for hours after your walk ends.
Day 20 – 40 Minutes With Hills
Walk for 40 minutes on your hilliest available route. By now, hills that felt challenging in week two should feel more manageable. Push yourself to maintain a brisker pace on the inclines than you did last week. Your legs are stronger, your heart is more efficient, and you can handle more.
Day 21 – 45 Minutes at Your Pace
Walk for 45 minutes. This is your longest walk yet and a milestone worth celebrating. Choose your pace and route based on how your body feels. If you are energized, make it a brisk, challenging walk. If you are tired from the week, keep it moderate and steady. Either way, 45 minutes of walking is an incredible achievement and a major jump from where you started.
Week 3 Summary
Total walking days: 6 (with 1 rest day). Total walking time: approximately 230 minutes. Average daily walk: about 38 minutes. You are now walking nearly double your week-one average and incorporating intensity techniques that significantly boost calorie burn. Most people notice tangible changes in their energy levels, sleep quality, and how their clothes fit by this point.
Week 4 – Pushing Your Limits (Days 22 through 30)
The final week is nine days instead of seven, giving you a full 30-day experience. This week challenges you with your longest walks, your most structured intervals, and culminates in a walk that would have seemed impossible on day one. You are ready for this.
Day 22 – 40 Minutes Power Walk
Walk for 40 minutes at the briskest pace you can sustain for the full duration. This is not a sprint. This is your fastest comfortable walking pace maintained consistently. Focus on posture, arm swing, and heel-to-toe foot placement. A sustained power walk at this duration burns significant calories and builds serious cardiovascular endurance.
Day 23 – 40 Minutes Pyramid Intervals
Walk for 40 minutes using pyramid intervals. After a five-minute warm-up, walk fast for one minute, recover for one minute, walk fast for two minutes, recover for one minute, walk fast for three minutes, recover for two minutes, then work back down – fast for two minutes, recover for one minute, fast for one minute, recover for one minute. Repeat the pyramid if time allows, then cool down. Pyramids prevent boredom and push your cardiovascular system in a progressive, manageable way.
Day 24 – 45 Minutes Steady
Walk for 45 minutes at a moderate to brisk pace. This is a workhorse walk – not your hardest, not your easiest, just solid consistent effort. These steady-state walks are the backbone of any walking program and are responsible for the majority of your cumulative calorie burn over 30 days.
Day 25 – Rest Day
Your final scheduled rest day. You have earned it. Stretch, foam roll, hydrate, and mentally prepare for the final push. Look back at your tracking log and appreciate how far you have come. Your day-one baseline probably feels laughable now, and that is exactly the point.
Day 26 – 45 Minutes With Strength Stops
Walk for 45 minutes at a brisk pace. At the 15 and 30-minute marks, stop and do a mini strength circuit: 10 squats, 10 calf raises, and a 20-second wall sit (use a bench, tree, or wall). These strength additions build the muscles that support your walking form and increase your resting metabolic rate, meaning you burn more calories even when you are not walking.
Day 27 – 50 Minutes Easy Exploration
Walk for 50 minutes at an easy, enjoyable pace on a route you have never tried before or rarely use. A new environment stimulates your brain, makes the time fly, and reminds you that walking is not just exercise – it is a way to explore and enjoy the world around you. This is your longest walk yet, and the easy pace makes it achievable and pleasant.
Day 28 – 45 Minutes With Maximum Intervals
Walk for 45 minutes. After a five-minute warm-up, alternate between 90 seconds of your absolute fastest walking pace and 90 seconds of recovery. This 1:1 interval ratio is demanding and incredibly effective for calorie burn and cardiovascular improvement. Continue this pattern for 35 minutes, then cool down for five minutes. Your fastest walking pace by day 28 is significantly faster than your fastest pace on day 10, which shows real fitness improvement.
Day 29 – 50 Minutes Moderate Steady
Walk for 50 minutes at a moderate, steady pace. This walk is about endurance and reflection. Think about how far you have come, how much stronger you feel, and what you want your walking practice to look like going forward. This is not the end of your walking journey – it is the foundation for everything that comes next.
Day 30 – Your Celebration Walk (60 Minutes)
Walk for 60 minutes. One full hour. Choose your favorite route, your favorite pace, and your favorite playlist or podcast. This walk is a celebration of 30 days of commitment, consistency, and growth. Four weeks ago, you walked for 15 minutes. Today, you are walking for a full hour. That transformation is extraordinary, and it happened because you showed up day after day.
Week 4 Summary
Total walking days: 8 (with 1 rest day). Total walking time: approximately 410 minutes (6 hours and 50 minutes). Average daily walk: about 51 minutes. You are now a strong, consistent walker who can comfortably walk for an hour. Your cardiovascular fitness, endurance, and calorie-burning capacity have transformed.
Essential Gear for Comfortable Walking
Walking Shoes
Your shoes are the single most important investment for a walking program. For plus-size walkers, proper footwear is even more critical because your feet support more weight with every step. Look for shoes with ample cushioning (especially in the heel and forefoot), a wide toe box that does not squeeze your toes, sturdy arch support, and a sole that provides good shock absorption.
The
Nike Air Monarch IV
is a classic walking shoe that comes in wide and extra-wide widths with excellent cushioning. For women who need maximum support, the
Brooks Addiction Walker 2
is a podiatrist-recommended walking shoe available in wide widths that provides exceptional stability and motion control.
Replace your walking shoes every 300 to 500 miles, or roughly every three to six months of regular walking. Worn-out shoes lose their cushioning and support, which leads to foot, knee, and hip pain. If you notice aches that were not there before, your shoes might be the culprit.
Moisture-Wicking Clothing
Cotton absorbs sweat and stays wet, which causes chafing, discomfort, and temperature regulation problems. Moisture-wicking fabrics pull sweat away from your skin and dry quickly, keeping you comfortable during longer walks. The
plus-size moisture-wicking walking sets on Amazon
are affordable and come in sizes up to 5X.
Anti-Chafe Products
Thigh chafing is real, it is painful, and it can derail your walking plan faster than anything else. Prevention is simple. Apply an anti-chafe balm or cream to your inner thighs, under your arms, and anywhere skin rubs together before every walk. Products like Body Glide or Megababe Thigh Rescue create a invisible barrier that prevents friction. Some walkers also wear bike shorts or slip shorts under their walking clothes for additional protection.
A Supportive Sports Bra
Walking creates repetitive motion that can be uncomfortable without proper breast support, especially for larger cup sizes. A high-impact sports bra is not necessary for walking – a medium-support encapsulation bra that separates and supports each breast individually tends to be more comfortable than a compression style. The
All in Motion sports bras at Target
offer excellent support in extended sizes at an accessible price point.
A Water Bottle
Hydration during walks longer than 20 minutes matters, especially in warm weather. A handheld water bottle or a waist-mounted hydration belt keeps water accessible without interrupting your stride. Aim for 8 ounces of water every 20 minutes during your walk, and more in heat or humidity.
Nutrition Tips to Maximize Your Walking Results
Fuel Before Your Walk
Walking on a completely empty stomach can leave you lightheaded and low-energy, while walking on a full stomach causes cramps and discomfort. The sweet spot is a small snack 30 to 60 minutes before your walk – something with simple carbohydrates and a little protein. A banana with a tablespoon of peanut butter, a small handful of trail mix, or a piece of toast with avocado gives you enough energy to power through your walk without weighing you down.
Recover After Your Walk
Eat a balanced meal or snack within an hour of finishing your walk. This helps your muscles recover and prevents the ravenous hunger that leads to overeating later. Include protein (to repair muscles), complex carbohydrates (to replenish energy stores), and some healthy fat (to keep you satisfied). A Greek yogurt parfait with fruit and granola, a turkey and avocado wrap, or a smoothie with protein powder, banana, and spinach are all excellent post-walk options.
Focus on Whole Foods
You do not need to follow a strict diet to see results from your walking plan. Focus on eating more whole, minimally processed foods – vegetables, fruits, lean proteins, whole grains, and healthy fats – and less of the processed, high-sugar, high-sodium foods that make up the modern diet. Small, sustainable nutrition improvements paired with consistent walking produce better long-term results than any crash diet.
Stay Hydrated All Day
Hydration affects everything from your energy levels to your appetite to your walking performance. Aim for half your body weight in ounces of water per day, plus additional water during and after your walks. If plain water bores you, add sliced fruit, cucumber, or a splash of lemon juice. Herbal teas count toward your water intake too.
Do Not Eat Back All Your Calories
One common mistake is using exercise as an excuse to eat significantly more. Walking burns real calories – a 200-pound woman walking briskly for 45 minutes burns approximately 300 to 350 calories. But that does not mean you should add 350 calories to your daily intake. A small post-walk snack is fine. Rewarding every walk with a large treat undermines your calorie deficit and stalls weight loss. This is not about deprivation – it is about awareness.
Troubleshooting Common Walking Challenges
Shin Splints
Pain along the front of your lower leg during or after walking is usually shin splints, caused by doing too much too soon, worn-out shoes, or walking on hard surfaces. Treatment includes rest, ice for 15 minutes several times a day, and stretching your calves. Prevention means increasing your walking time gradually (this plan is designed with that in mind), wearing proper shoes, and walking on softer surfaces like tracks or trails when possible.
Knee Pain
If your knees hurt during or after walking, check your shoes first – worn-out or unsupportive shoes are the most common culprit. Second, check your walking form – taking too-long strides puts extra stress on your knees. Shorter, quicker steps are easier on your joints. Third, consider your route – constant downhill walking is harder on knees than flat or uphill walking. If knee pain persists, a knee support sleeve can provide compression and stability during walks.
Boredom
Walking the same route at the same time every day gets monotonous. Combat boredom by rotating routes, listening to podcasts, audiobooks, or music, walking with a friend or family member, joining a walking group, or using a walking app that gamifies your routes. Some walkers track their cumulative miles and plot them on a virtual journey – like walking the equivalent distance from one city to another.
Weather
Bad weather is the most common excuse for skipping walks. Have an indoor backup plan ready at all times. A treadmill, a large store or mall, an indoor track, or even walking in place at home while watching TV are all valid alternatives. You do not lose progress because you walked indoors instead of outdoors. You lose progress by not walking at all.
Time Constraints
On days when you genuinely cannot fit in the full walk, do a shorter version rather than skipping entirely. Even a 10-minute walk maintains your habit and provides real health benefits. Research shows that three 10-minute walks throughout the day provide similar health benefits to one continuous 30-minute walk. Split your walk into morning, lunch, and evening segments if that is what fits your schedule.
Lack of Motivation
Motivation is unreliable. It comes and goes depending on your mood, energy, sleep, and stress levels. Do not depend on motivation – depend on routine. Set out your walking clothes the night before. Put your shoes by the door. Tell someone your walking plan so they can check in on you. On the days you least want to walk, commit to just five minutes. Most of the time, once you start, you will keep going.
What Happens After Day 30
What You Can Expect to Have Achieved
After 30 days of consistent walking, most people experience measurable changes. These typically include weight loss of 3 to 8 pounds (depending on starting weight and nutrition), reduced waist circumference, improved cardiovascular endurance, better sleep quality, higher daily energy levels, improved mood and reduced stress, and better blood pressure and blood sugar numbers. Your body has adapted to regular movement, and it now expects and craves it.
Keep the Momentum Going
Day 30 is not a finish line – it is a launching pad. You have built a walking habit, and now you get to decide what to do with it. You have several options for continuing your progress. You can repeat the plan with increased baseline times, starting at 25 minutes instead of 15 and scaling up from there. You can maintain your week-four walking schedule as your regular routine, walking 45 to 60 minutes most days. You can add other forms of exercise alongside your walking, like strength training, swimming, or yoga. Or you can train for a specific goal, like a 5K walk, a charity walk event, or hitting 10,000 steps daily.
Beyond the Scale
Weight loss may have been your initial motivation, and that is completely valid. But after 30 days, many women discover that the non-scale benefits of walking are even more valuable. The mental clarity, the stress relief, the quiet time with your own thoughts, the sense of accomplishment, the physical strength, the improved sleep – these benefits last long after you reach any number on the scale. Walking changes your body, but it also changes your relationship with movement. And that relationship is worth more than any number.
The
fitness trackers with plus-size bands on Amazon
can help you track your continued progress beyond the 30-day plan, monitoring steps, distance, heart rate, and calories burned throughout the day.
Key Takeaways
Walking is one of the most effective and sustainable forms of exercise for weight loss, especially for plus-size women, because it is low impact, free, accessible, and produces real results when done consistently.
This 30-day plan progressively builds from 15-minute walks to 60-minute walks, gradually increasing duration, pace, and intensity so your body adapts without injury or burnout.
Proper gear – especially supportive walking shoes and moisture-wicking clothing – prevents pain, chafing, and discomfort that can derail your progress.
Rest days are built into the plan because recovery is when your body gets stronger, and skipping rest leads to overuse injuries.
Small, sustainable nutrition changes paired with consistent walking produce better long-term results than any extreme diet.
After 30 days, most women experience 3 to 8 pounds of weight loss plus significant improvements in energy, sleep, mood, and cardiovascular fitness.
Day 30 is a launching pad, not a finish line – use the habit you have built to keep walking, add new exercises, or train for specific goals.
Frequently Asked Questions
How many calories does walking burn for a plus-size woman?
Calorie burn depends on your weight, walking speed, terrain, and duration. As a general estimate, a 200-pound woman walking at a brisk pace (3.5 mph) burns approximately 350 to 400 calories per hour. A 250-pound woman burns approximately 430 to 480 calories per hour at the same pace. Heavier bodies burn more calories during the same activity because they are moving more mass. Walking on hills or at faster speeds increases these numbers further. Over the course of this 30-day plan, total calorie burn from walking alone is approximately 7,000 to 12,000 calories, which translates to 2 to 3.5 pounds of fat loss from walking alone before accounting for any nutritional changes.
Can I walk every day or do I need rest days?
You can walk every day if your body feels good, but scheduled rest days are included in this plan for important reasons. Rest allows your muscles, joints, and connective tissue to recover and adapt. Without rest, you risk overuse injuries like shin splints, plantar fasciitis, and joint inflammation that could sideline you for weeks. If you feel great on rest days and want to move, keep it light – a gentle 10-minute stroll, some stretching, or easy yoga. Save your full-effort walks for the scheduled walking days.
Is walking enough for weight loss or do I need to diet too?
Walking alone can produce weight loss, especially if you were previously sedentary, because it creates a calorie deficit through increased activity. However, combining walking with mindful eating produces significantly better results. You do not need to follow a strict diet. Focus on eating more whole foods, watching portion sizes, staying hydrated, and reducing highly processed snacks and sugary drinks. The combination of regular walking and moderate nutritional improvements is the most sustainable and effective approach to lasting weight loss.
What if I miss a few days during the 30-day plan?
Missing days does not mean you failed or need to start over. Life happens – illness, bad weather, family emergencies, exhausting work days. If you miss one day, simply do that day’s walk tomorrow and shift the plan by one day. If you miss several days, go back to the last day you completed and pick up from there. The plan is designed to be flexible. Completing it in 35 or 40 calendar days still gives you the same progressive benefit as completing it in exactly 30. Consistency over time matters far more than perfection.
Should I walk on a treadmill or outside?
Both are effective. Outdoor walking offers natural terrain variation, fresh air, sunlight (which helps vitamin D production and mood), and changing scenery that reduces boredom. Treadmill walking offers climate control, consistent surfaces, precise speed and incline control, and convenience. The best choice is whichever one you will do consistently. Many successful walkers use both – outdoor walks when the weather cooperates and treadmill walks when it does not. If you primarily use a treadmill, set the incline to at least 1 percent to simulate the natural resistance of outdoor walking.